
 With increased technological advancements, switches require updating with current times. To avoid the risk of contracting COVID-19, it has become important to not touch surfaces of buttons and keys that have been frequently used by other people. This calls for a need to innovate the switching technology for replacing a hand-operated switch, with an automatic contactless switch.
So today, we will design a no-touch switch that works entirely on hand gestures. Our smart contactless switch includes a sensor that is capable of detecting hand movements and translates them into commands for controlling lights, fans and various home appliances.
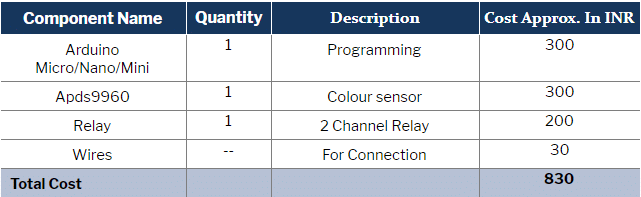
Bill of Materials
Let’s start designing the smart switch by shopping for the following components.
Coding
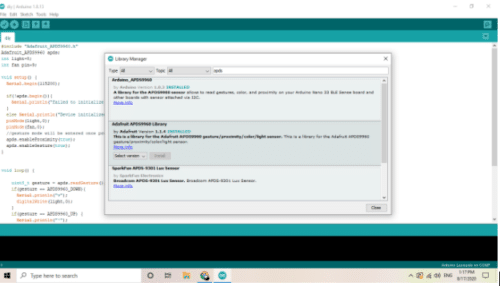
First of all we need to install the required library in the Arduino IDE. Go to Select → Library Manager → Search APDS9960 → Install Adafruit APDS9960

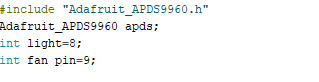
After installing the library, add it into the code and then define the pin number for light and fan control. Next, create a setup function where you can initialise the sensor and set the pinmode output for light and fan control.

Then create a loop function to update the sensor readings and use your hand gestures as an input to control the pin. Also create a few if conditions for specifying the commands based on the type of hand gestures (up, down, left and right).
Up: Lights ON

Down: Lights OFF
Left: Fans ON
Right: Fans OFF

Connection
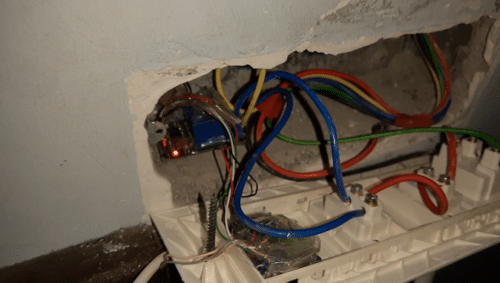
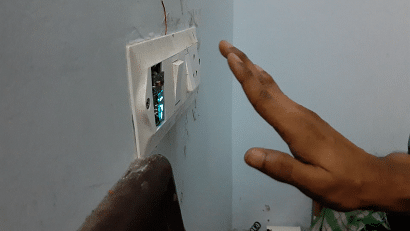
Now upload the code to Arduino and connect the components as described in the circuit diagram. Then connect the AC wire with the common pin of relay module to control the lights and fans.

Testing for the Contactless Switch
Now power the device and relay. When you will move your hand in an upward direction, the relay will be moved and lights will switch ON. Similarly, a hand gesture in downward direction will switch OFF the lights.


Good Project. Thanks for sharing. Please share the circuit diagram and the details how you powered Arduino inside switch board. How you got 5V DC to power Arduino inside switch board.
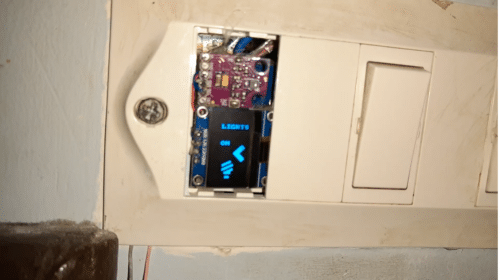
I could see a display which shows Arrow in the video but it is not in the bill of materials.
You can use 5v dc adapter and fit it inside the board for that. Here I have used the phone charger having 5v out .
Can we use apds 9930 instead of apds 9960?
Code is not made for 9930
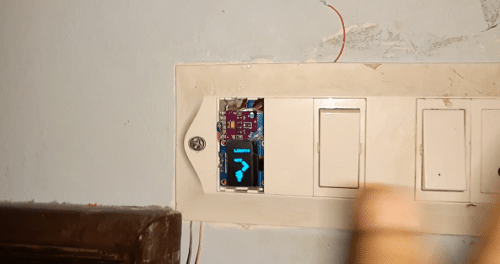
That’s OLED display
Can we use apds 9930 instead of apds 9960? Can you tell me please?
can somebody please tell me, how did that display came there in the project
There are two versions of CODE attached with the article one is simple other with OLED. The article is about a simplified version of a switch without OLED to reduce the overall cost of the project and to reduce the construction time. If anyone wants to expend extra money then he can add OLED and the code is attached with the article. The connection with OLED is the same as both are I2C based devices.
can u please share the OLED libraries?
You used two appliances.Can we use 3 4 appliances…..this is my doubt .
Frome each sensor you can control 2 appliances , if want to control more appliance add one more sensor to the board
Can I use Arduino Uno board
Yes
I want OLED connections and 2 APDS sensor circuit diagram
Hi can you please provide documentation
Can we directly give the connection to the bulb instead of switchboard light connection..
Yes , Through the relay but please do connection carefully after getting full knowledge . Wrong connection cause AC shortcircuit and is also very dangerous. DO connection correctly and cross-check and do in care of some electriation
s good idea
Thank you for your feedback.
The idea of is good. where can we get the block diagram and connection circuit? sir
block diagram and circuit connection ?
good idea but not put the block diagram
please, can you upload the block diagram
Please share the oled circuit diagram
Can i use it with arduino nano, as I checked in google it is showing it won’t work with arduino nano.. I already bought my arduino nano as u posted micro/nano/mini
Yes it will work with Arduino Nano mini or any othe arduino as well
When i dumped adafruit example for gesture test. It is not showing initialised or not initialised. I’m not knowing where the fault is. I’m sure that arduino is in good condition
Try performing gestures on the sensor and see the output on the serial. also, check the baud rate in code and in m=serial monitor
Set same baudrate as in program,conncetions as in circuit diagram. In serial monitor I’m getting failed to initialize device
Have you connected the sensor correctly, recheck the wiring , SDA go to SDA of Arduino SCL goes to SCL vcc goes to VCC and GND goes to GND. try testing the sensor with example code
Bro give us the circuit diagram and the connection with main board this way it is not possible to the the project … You are not sharing the main things…. As a bigginer to this field I m interested with your idea…. But your resources are stucking me… Kindly share us the connections properly if possible and source code is not downlable and… If possible make a video how you made it…. Demo it’s fine… But make a connection video…. And thank u for your so much support
The connection diagram is in code check it. Also, the Code is downloadable. If you face a problem in connection or understanding circuit diagram please elobrate
Source code showing error 404 while downloading
Hi Sanjay, kindly refresh the page and redownload.
Thank you for this project lub u
Hey Please Can You Upload A video of the Connection By explaining and In detail
Kindly refresh the page.
Hello We have choosen this as our Mini project.
What will the technical output for this project?
Please Help Asap!
Heyy
We have choosen this as our Mini project.
Can You please help us with simulation The output .
Can We perform this Project Online such as by using Simulation tools like TinkerCad etc?
if thinker cad have apds9960 sensor in its library parts then yes you can do
Can you share the video of the wiring with the switch. It’s urgent I need it for my project.
The relay module has 3 pins NO (Normally OPEN) COM (Common). Put the live wire in COM pin and bulb live wire to NO Pin and Connect Netural wire of circuit board outlet to netural wire of bulb. be carefull cut off the power wire connection. .You can contact me on what’s app 761350809 if you have further confusion regarding AC connection (Be careful do all connection right way and cross-check AC shock and Short circuit is dangerous)