
 People in India like to chant various mantras as they believe it brings good luck, peace of mind and helps in concentration. Here we present the circuit of an electronic chanting amplifier having nine bhajans and one mantra to choose from. They are jai ganesh jai ganesh jai ganesh deva, jai jai jai jai ambe rani jai bhavani, jai matadi jai matadi, om namah shivaya om namah shivay (mantra), radhe krishna radhe shyam, govind bolo hari gopal bolo, shriman narayan narayan narayan, shri ram jai ram jai jai ram jai jai jai jai jai siyaram, jai jai jai jai jai hanumaan and jai jai jai jai jai siyaram jai jai jai jai jai hanumaan.
The device is small and handy to carry anywhere and can be used while traveling. It is ideal not only for the pooja room but could be kept in the living room also—a suitable gift for any occasion.
Circuit and working
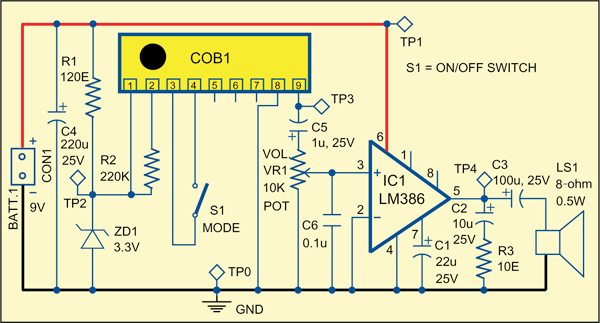
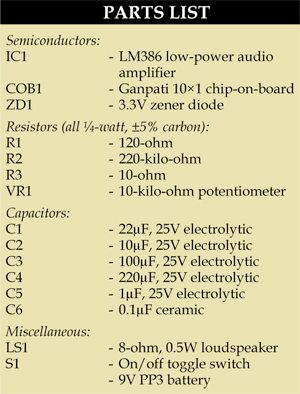
The bhajan and mantra chanting amplifier circuit is shown in Fig. 1. It is powered by a 9V PP3 battery. The circuit is built around a chip-on-board (COB) and LM386 audio amplifier (IC1). The chanting IC (COB1) is available as Ganpati 10×1 in the Indian market. Zener diode provides 3.3V to COB1 for its operation. The prerecorded ten songs are already stored in COB1. Resistor R2 connected at pin 2 of COB1 is the element to generate appropriate sound frequency in the COB. Audio output is available at pin 9 of the COB.
The mode to play a particular song is selected through mode-selection switch S1. When mode switch S1 is opened, a bhajan plays on. You can toggle the switch to select the next bhajan. When S1 is closed, a particular song plays continuously unless power is switched off. LM386 is a low-power audio amplifier. Audio input is fed to its pin 3 via capacitor C5 and volume control VR1. The audio output is available at its pin 5.

Construction and testing
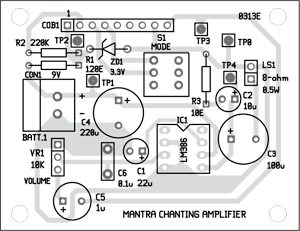
A single side PCB for the electronic chanting amplifier is shown in Fig. 2 and its PCB layout in Fig. 3.
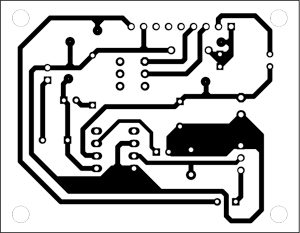
Download PCB and component layout PDFs: click here
Mount all the components, except COB1, on the PCB. COB1 should be fixed using glue. Use IC base for LM386. This will help you remove the IC easily in case it becomes faulty. There are nine pins available in the COB and therefore connecting points for the same are provided on the PCB. However, only six pins have been used here. Extend six wires from the PCB and solder each wire to the respective pin on the COB as shown in the schematic diagram. Use a good-quality speaker. We have tested the circuit using an 8-ohm, 0.5W speaker.

Connect the 9V PP3 battery at CON1 as shown in Fig. 3. You will hear the Jai Ganesh Jai Ganesh Jai Ganesh Deva song. If the volume is not loud enough, adjust control knob VR1 to increase the volume. Depending on the position of switch S1, the song will either repeat or stop after it completes. To play the next song, toggle switch S1.
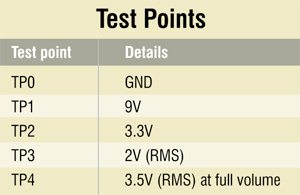
If you don’t hear sound from the speaker, first check the power supply. To help you troubleshoot the circuit, various test points are listed in the table. You need a voltmeter to check the voltages at various points.
The article was originally published in March 2013 and has been recently updated.


Kindly share your contact no. We have very urgent need of continuous mantra,water over flow alarm
Hello Friends.
Can you share the contact number of customized COB manufacturers ? I want to embedded some fixed announcement in it. only 3 announcement I want to store in its ROM. I want 1000 pieces in first order and then I will put order later on.
Hello Mr Rahul,
You can contact Mr Prakash Lokwani Mobile No. +919824522438. I had good experience working with him.
Hope that helps you