
 This Global Positioning System (GPS)-based timer is used to turn on and turn off a radio receiver at a specific time. The GPS clock works as the timer for turning on and turning off any digital or analogue radio receiver set at 100.1 FM band.
All India Radio (AIR or Akashvani), the Indian national radio broadcast station, has many frequency bands like SW, MW and FM. Daily news broadcast timings from AIR station are available on their website www.newsonair.com/News-Schedules.aspx
NEO 6M GPS module used in this project is shown in Fig. 1. The module has an external antenna and built-in EEPROM with TTL interface. Its default baud rate is 9600bps, and it works in standard NMEA format.
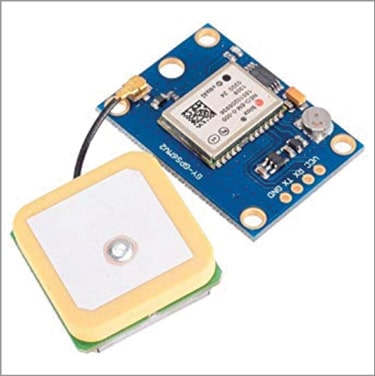
NEO 6M module is compatible with Arduino microcontroller (MCU) board. It has four pins: VCC, RX, TX and GND. The module communicates with Arduino via serial communication using RX and TX pins.
Circuit and working
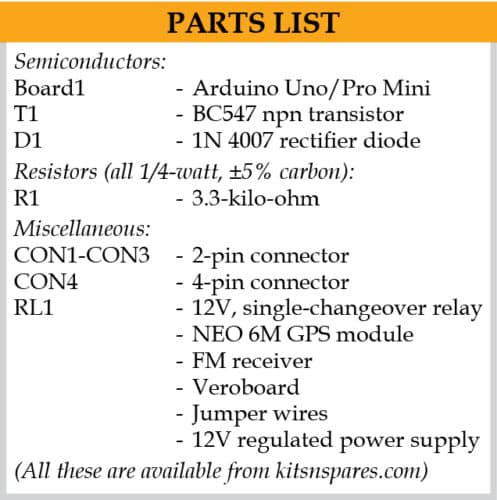
The circuit diagram of the GPS-based timer is shown in Fig. 2. It requires Arduino Uno board (Board1), transistor BC547 (T1), 12V supply, single-changeover relay (RL1), NEO 6M GPS module, FM receiver and a few other components.

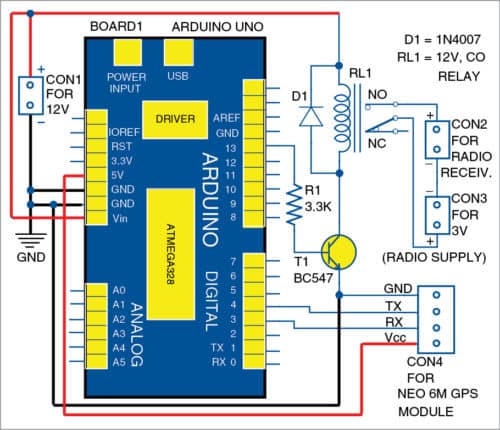
The circuit is powered by 12V, 1A SMPS used for general power supply. The 5V supply pin from Arduino Uno is used to power the GPS module. GND, RX and TX pins of GPS module are connected to GND and pins 3 and 4 of Arduino, respectively. The 12V power supply is used for driving the relay and Arduino Uno board. The relay driver circuit is driven by BC547 transistor.
The relay drives the AC/DC load (power supply) to turn on and turn off the radio. Here, a 3V DC power supply is used for the radio receiver.

Software
The program (GPStimer.ino) is written in Arduino programming language and compiled using Arduino IDE. Open Arduino IDE and select SketchInclude LibraryManage Libraries option. Search for TinyGPS++ library by Mikal Hart that provides object-oriented parsing of NMEA sentences to Arduino.
Click Install to install TinyGPS++ from Manage Library window. You also need SoftwareSerial library for this project. Note that SoftwareSerial library is included in the latest version of Arduino. With an older version, you can install it like TinyGPS++, as given above.
After installing the libraries and circuit connections, upload the source code (GPStimer.ino) through the standard USB port by selecting the correct Arduino board and COM port.
In code section, GPS time is set to UTC time. For India, time is converted to IST by adding 05:30 to UTC time, and also to twelve-hour format.
The timer is programmed as per AIR News Service schedule, which is normally relayed for ten minutes. During the time of testing of this project, AIR news timings were as follows: 6AM, 7AM, 8AM, 9AM and 11AM for news in Hindi, and 6PM, 8PM, 9PM and 11PM for news in English.
The circuit can turn on the radio receiver as per these timings. Feed these timings in Arduino program as given below.
if ((hr == 6)or(hr == 7)or(hr == 8)or(hr ==
9)or(hr == 10)or(hr == 11))
digitalWrite (13, HIGH);
if (mn > 9)
digitalWrite (13, LOW)
The circuit automatically switches on 3V DC power source of the radio daily, every hour for ten minutes, starting at 6AM and ending at 11AM. Note that the circuit can control any power source (230V AC or 12V DC) used in the radio receiver. If your radio receiver is operated by dry cells, extend two wires from its on/off switch terminals and connect them across CON3, as shown in the circuit.
You can also use the circuit for a public address system, bus stop, railway station, tea shop, saloon, etc.
Download Source Folder
Kamal Das is track maintainer in Eastern Railway and also an electronics hobbyist


