
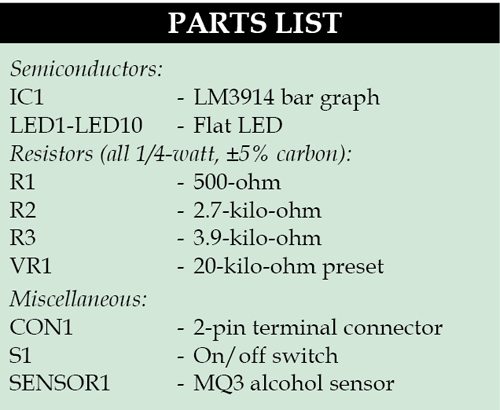
A lot of accidents happen every day due to drunk driving. This is a very useful circuit for testing whether a driver is drunk or not. The circuit is easy to use, inexpensive and indicates various levels of alcohol consumption through LEDs.
Circuit and working
Fig. 1 shows a circuit of the alcohol level tester. Alcohol sensor MQ3 is used here to detect the alcohol fumes’ concentration.
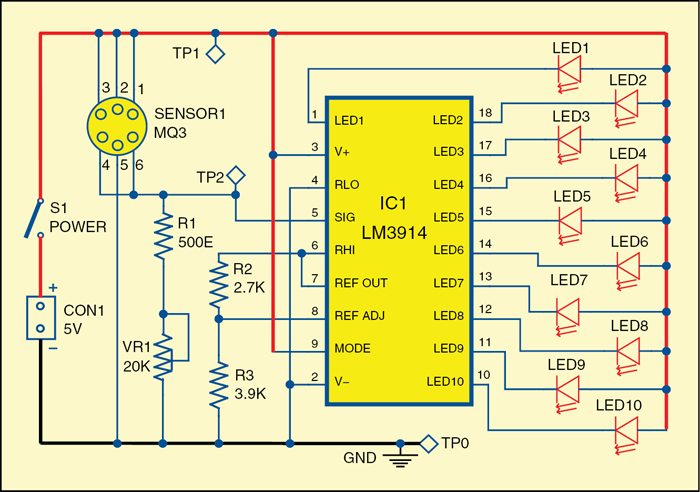
 Pins 2 and 5 of MQ3 are connected to 5V power supply and the ground, respectively, as shown in the circuit. These pins are actually the heating-coil pins of the sensor. The input pins 1 and 3 of the sensor are also connected to 5V. Pins 4 and 6 are connected to input pin 5 of LM3914 (IC1).
The number of glowing LEDs indicates the concentration level of alcohol detected by the sensor. Resistor R1 and preset VR1 are used to calibrate the output voltage from the sensor.
 When a drunk breathes out near sensor1, the alcohol vapours come in contact with MQ3 sensor and its resistance changes. This raises signal level at pin 5 of IC1 a larger number of LEDs start glowing than the two that were glowing before.

Construction and testing
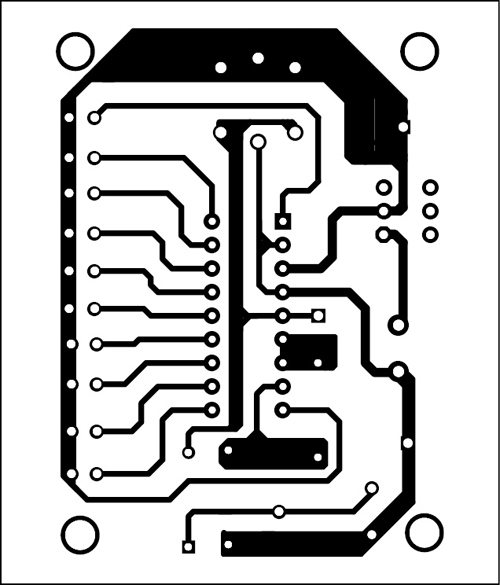
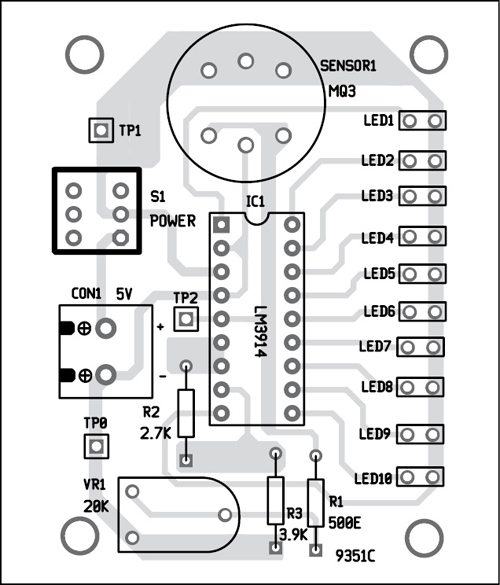
An actual-size, single-side PCB for the alcohol level tester is shown in Fig. 2 and its component layout in Fig. 3. After assembling the circuit on PCB, enclose it in a suitable case.
Download PCB and component layout PDFs: click here
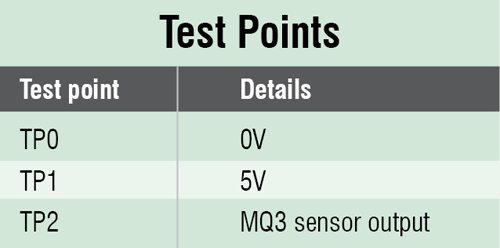
Switch on the circuit and verify the test points mentioned in the table. Before using the circuit, vary VR1 until LED1 and LED2 glow when the sensor is in normal environment. Now open the cork of an alcohol bottle and bring it near sensor1. You will notice that LED3, LED4 and LED5 also start glowing. As you bring the alcohol bottle’s open mouth very close to sensor1, all the LEDs (LED1 through LED10) will start glowing.
We do not recommend that you actually consume some alcohol to test the circuit. The above test with a bottle of alcohol, or its sample in a small glass, should suffice for most purposes. Until you find a drunk, of course!

The author is an electronics hobbyist.


hi am efrem zewdu i want to know about alchol sensor
Kindly elaborate your query.
Sir,
I took this for my mini project..i belive in you thath the provided ciruit diagram is correct and errorless..i have less money to set up this i have not much money to spend more…
हेलो सर आई एम रिसीव थिस प्रोजेक्ट ऑल कंपोनेंट एंड पीसीबी सर्किट
Kindly elaborate your query.
Hi sir pls can I get the construction of alcohol consumption sensor level in details
Hey abhi, do you have any pictures of components ?
Im interested in CON1, how does it act as voltage source i dont understand.