
Ever since this tiny, credit-card-sized computer, Raspberry Pi, appeared in the market, it has caught the imagination of every electronics and computer hobbyist around the world. The powerful Linux operating system combined with 26 input-output (I/O) pins can do many amazing things out-of-the-box. This article explains how to interface a USB camera and Wi-Fi with Raspberry Pi. It also explains the steps for making a webcam server using VLC Apache2 server software.
Raspberry Pi operating system
Several formats of Linux are available for installation on this tiny board. Among these, the most popular ones are Archlinux, Wheezy Linux, qtonpi, Fedora and xbmc.
I prefer Wheezy Linux because it is Debian style, where installation and tweaking is quite easy. The 2014-09-09-wheezy-raspbian.zip is available for download on raspberrypi.org. The wireless adapter, which comes in the form of a Wi-Fi dongle, can be installed out-of-the-box, so can be the USB cameras.
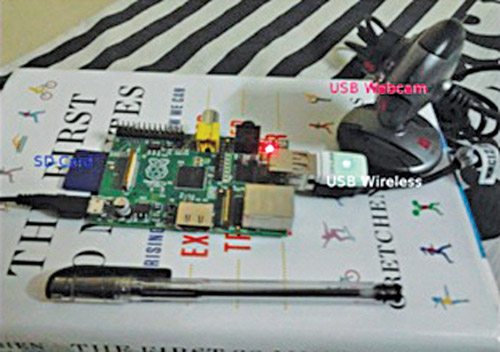
The steps to interface a USB webcam and Wi-Fi with a Raspberry Pi (model-B) board are given below. The USB webcam interfaced to a Raspberry Pi board is shown in Fig. 1.
Preparing the operating system
After downloading the zip file (wheezy-raspbian), extract the image in a folder on your computer and insert a 2GB or bigger-size SD card in the card reader slot. At this stage, check the identity of the SD card—sda, sdb or sdc—as shown in your Linux PC. After inserting the SD card, issue an ‘ls /dev/sd*’ command at a terminal prompt and see what name has been given to the card.

[stextbox id=”grey”]bera@Acer-AOD255E:~$ ls /dev/sd*
/dev/sda /dev/sda2 /dev/sda4 /dev/sda6
/dev/sda1 /dev/sda3 /dev/sda5 /dev/sda7
/dev/sdb1 /dev/sdb2 /dev/sdc[/stextbox]
Here, my SD card has been identified as /dev/sdc. Now, go to the folder where you have extracted 2012-09-18-wheezy-raspbian.img file. This image file now needs to be written on the SD card to make it work as the operating system. Any mistake here will lead to the loss of entire data on your computer hard disk.
Look for the highest order, like sdc, sdd, etc, to identify your SD card. To be absolutely sure, just unplug and re-plug the card a few times and notice the changes.

At the terminal prompt, issue the following command:[stextbox id=”grey”]bera@Acer-AOD255E:~/Desktop/Raspberry-
PI/OS$ sudo dd if=2012-09-18-wheezy-
raspbian.img of=/dev/sdc bs=2M[/stextbox]
This will use dd, the powerful image-creator program of Linux, and transfer the image to the SD card.
When it prompts for ‘su’ password, enter it. (In Windows, there are several graphical image-creator programs like Nero Burner that can be used in a similar fashion.)
The above command may take several minutes. Look for HDD Lamp Busy indication. When the lamp stops blinking, go to the desktop and safely remove the SD card. (Right-click on the SD card and then click on Safely Remove.)
Connecting the display/monitor
Connect the TV screen or monitor to Raspberry Pi board using a composite video cable (AV cable) or HDMI cable, insert the SD card into the SD card slot and switch-on the power supply.
The TV screen/monitor even on the right AV channel may refuse to come up the first time. When that happens, remove the power-supply cord of Raspberry Pi board once (keeping the monitor’s power supply on) and then re-plug it. Now, the monitor should come on live, if the SD card is not removed.
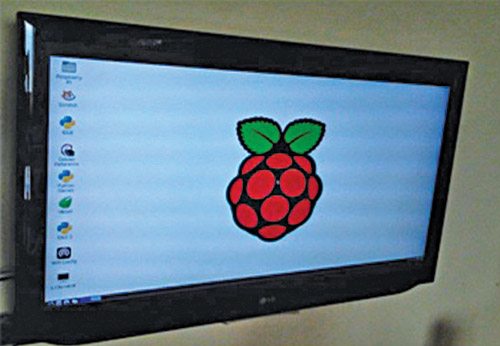
Once the Raspberry Pi starts booting up, it will prompt you for login name and password. The login for Wheezy linux is pi and the password is raspberry. Once entered, Raspberry Pi will open the text screen. Enter Startx command at the prompt to start the beautiful GUI desktop screen (Fig. 2). The first time when I saw the image on my television screen, I was mesmerised.
To make Raspberry Pi open the GUI screen every time it boots up, all you have to do is to make a change in the raspi-config page. Select Sudo Raspi-config and bring the cursor down on Automatic GUI Boot Up. Select → Finish → Reboot. And, it’s done.
Connecting the USB camera and Wi-Fi dongle
Connect the Wi-Fi adapter and webcam to USB slots. You will run short of USB ports now because Raspi-B model has only two USB ports. Find a USB hub with multiple USB ports and grab a hub that has a small, 5V power supply input to it.
(Remember, wireless needs more power. Therefore, if the hub is not powered by a suitable 5V supply, the Raspberry Pi may malfunction.)
Power-on the USB hub; connect the wireless adapter (Wi-Fi dongle), web camera, keyboard and mouse to the USB hub. Go to Raspberry Pi desktop and double-click the wireless module (Wi-Fi Config). Most wireless adapters are easily detected and installed on Raspberry Pi.
Set up a Wi-Fi connection
After double clicking Wi-Fi Config icon, the wpa-gui page will open up. Click Search and a list of available wireless connections will come up. Select a connection and enter the IP address, if required, or leave it as it is for DHCP mode, select the authentication mode (mostly WEP) from the pull-down menu and then enter WEP key in the first blank space. Click Finish and Connect. The symbol will turn to Connected.
(For connecting to a mobile hotspot like cell phones, the WPA2 psk type authentication is used. Select the same from the pull-down menu.)
Checking network connection
To check whether your Wi-Fi is connected to the network or not, you need to go to Terminal and issue ping command as given below.
[stextbox id=”grey”]pi@raspberrypi:/$ ping raspberrypi.org[/stextbox]If you get continuous ping response, it means you are online and connected. Otherwise, you need to check the connections and, if required, need to go through the steps below.
Enter the following command at Raspberry Pi terminal:
[stextbox id=”grey”]pi@raspberrypi:/$ dmesg | grep ^usb[/stextbox]This command will furnish details of the kernel ring buffer of all the devices installed, starting with the word USB. Look out for 802.11 and the manufacturer’s name (realtek or ralink) associated with it. This means that the hardware is built on that chip and Raspberry Pi needs the driver (say realtek) for it. (On the latest Raspbian OS, this step is not required because it finds the suitable driver automatically.)
Driver installation
You can issue the following command to search the driver on your Raspberry Pi computer:
[stextbox id=”grey”]bera@Acer-AOD255E:~/Desktop/Raspberry-
PI/OS$sudo apt-cache search realtek[/stextbox]
The command will give details of the packages available for that manufacturer. Since your Raspberry Pi is still not connected to the Internet, you need to go to a Linux PC that has an Internet connection and search for realtek drivers online. Go to the manufacturer’s website and download Debian wireless package (e.g., firmware-realtek.deb, firmware-ralink.deb) from their website. Copy this package in the /home/pi folder of the SD card and issue the following command to the Raspberry Pi:
[stextbox id=”grey”]pi@raspberrypi:/$ sudo apt-get install
firmware-realtek.deb[/stextbox]This will install the right firmware on Raspberry Pi. Once the firmware is installed, disconnect the wireless adapter and reconnect it to Raspberry Pi. This will restart the kernel search process for the right software driver.
With the firmware installed, setting-up the connection is pretty straight forward now. Go back to the desktop and double-click WiFi Config icon and follow the steps mentioned above under Set-Up a Wi-Fi Connection section.
Setting up the webcam server
ffmpg has some issues on Raspberry Pi as a result of which ffserver does not work easily. Some staunch Raspberry Pi supporter claims to tweak it to work but I find it very complicated and not worth when various other easy choices are available.
Apache2 server with webcam software makes our job very easy but, before that, to ensure the webcam is working, we have to install VLC software. Along with showing webcam images, VLC can play all kinds of media files including *.flv files, which was not possible in the earlier OS.
Installation of VLC Apache2
To install it, issue the following command:
[stextbox id=”grey”]pi@raspberrypi:/$ sudo apt-get install
vlc apache2 webcam[/stextbox]This will install the wav trio—webcam, Apache2 and VLC media player. Go to the desktop, in the media section, click on VLC media player. Go to File → Capture Device, and see if the camera images appear or not. VLC is smart enough to find your first camera at /dev/video0 and the video driver as video4linux2 (if not, select from the pull-down menu). It will take some time for the images to appear on the screen. The images may appear broken at many places, but do not worry about it now.
Webcam software has no default configuration file to run with, so we have to make one now using Nano editor. Nano is the most beautiful, yet versatile, text editor for Debian Linux. Close the current window and open a terminal to write the following commands:
[stextbox id=”grey”]pi@raspberrypi:/$ sudo nano /etc/
webcam.conf
[ftp]
host = localhost
dir = /var/www
file = webcam.jpg
tmp = imageup.jpg
local = 1
[grub]
device = /dev/video0
width = 176
height = 144
delay = 5
quality = 75
trigger = 180[/stextbox]Save the file with ctrl+o command. Exit Nano using ctrl+x command. Close it and go back to the terminal window.
Note that, the webcam has a versatile software, with an ability to continuously ftp the captured image to a remote server, where the main webpage may be the host. But, in this case, we have made local = 1, which means that we will host it on Raspberry Pi’s Apache server page (var/www directory) itself.
The delay = 0 means the cam will take pictures non-stop. Since this will put a lot of load on the tiny Raspberry Pi board, a delay of five (means, taking one snap every five seconds) will be more justified for Raspberry Pi.
Checking the working of Apache server
We will now check whether Apache web server is working or not. In the Raspberry Pi computer, open a Midori browser page and enter the address as:
[stextbox id=”grey”]http://localhost[/stextbox]Apache will open a page, indicating the server is up-and-running (even though there is no content page available in the server). So far, so good. Now, we have to see whether the same page is available over wireless or not.
Before that, we have to know the IP address of our Raspberry Pi board (mine is a DHCP by my wireless router).
Issue the following command at the terminal window:
[stextbox id=”grey”]
pi@raspberrypi:/$ifconfig
[/stextbox]This will give details of the IP addresses of the wired as well as the wireless network of Raspberry Pi board. Look out for WLAN configuration—WLAN IP address of my Raspberry Pi board as assigned by my router is 192.168.1.2. So, I enter the following address in the address bar of the browser on my laptop:
[stextbox id=”grey”]http://192.168.1.2/[/stextbox]The same page opens up in my laptop. This confirms that Apache is up-and-running on Raspberry Pi board.
Automatic capturing of images
Open the terminal window and enter the following command:
[stextbox id=”grey”]pi@raspberrypi:/$sudo webcam /etc/
webcam.conf &[/stextbox]The last ‘&’ command means the process will execute in the background. Now, go back to a remote laptop and enter the following address in the browser address bar (To stop the webcam, use ctrl+c command or find out process ID number and then kill it by $sudo kill–9xxxx, where xxxx is the process number.):
[stextbox id=”grey”]http://192.168.1.2/webcam.jpg[/stextbox]A still-image facing the camera will now appear on the top-left corner of your laptop. This confirms that the webcam is working. You may try to open the same page in Midori browser on Raspberry Pi, but it may take several minutes to open, as most of its resources are busy handling webcam images. Do not worry; the page will open on the remote laptop quite comfortably.
Change the direction of the camera and refresh the browser on your laptop, and the image will change. Unless the browser window is refreshed, the picture will not change.
Now, we will create an automated page-refresh in Raspberry Pi itself.
Automated page-refresh from Raspberry Pi
Let us now use Nano to create a simple html page in /var/www directory of Raspberry Pi. Note that, /var/www is an Apache document root directory. Whatever we write here will be available, to view, from any PC connected to the network.
[stextbox id=”grey”]pi@raspberrypi:/$ sudo nano /var/www/
webcam.html
<html>
<head>
<META HTTP-EQUIV=”pragma” CONTENT=
”no-cache”>
<META HTTP-EQUIV=”refresh” CONTENT=”0”>
</head>
<body>
<center>
<h2> My Raspi Webcam </h2>
<img src=”webcam.jpg” width=”320”
height=”240”>
</center>
</body>
</html>[/stextbox]Save using ctrl+o and exit using ctrl+x keys on the keyboard. Now, go to the remote laptop and open the page http://192.168.1.2/webcam.html
The image will be auto-refreshing every second now. But, this may be a little irritating to the eyes, so we may need to enter a delay factor here. In the webcam, html CONTENT=”0” can be made to CONTENT=”5” for a more soothing refresh once in every five seconds.
You can strip Raspberry Pi board from the mouse, keyboard and monitor, and the webcam will still work non-stop—such is the power of Raspberry Pi and Linux.
Complete automation
Now, how about an automated script? So that, every time you boot or even before login, Raspberry Pi will fire-up the webcam command.
You can get rid of the monitor, keyboard and mouse from Raspberry Pi board. For that, we will put the command in /etc/rc.local file, and every time, on boot up, the webcam will start. Open a shell script file webcam.sh in /home/pi and enter the following command:
[stextbox id=”grey”]pi@raspberrypi:/$ sudo nano /home/pi/
webcam.sh
#! /bin/bash
webcam /etc/webcam.conf &[/stextbox]
Save it and exit.
[stextbox id=”grey”]
pi@raspberrypi:/$ sudo chmod +x /home/
pi/webcam.sh // make it executable
[/stextbox]
Now, in the /etc/rc.local file, enter this line before ‘exit 0’ line like this:
[stextbox id=”grey”]pi@raspberrypi:/$ sudo nano /etc/
rc.local
…..
…..
/home/pi/webcam.sh
exit 0[/stextbox]
Save it and exit.
Now, strip-off the keyboard, mouse and monitor from Raspberry Pi, and reboot it. Then, go to the remote laptop and open the page http://192.168.1.2/webcam.html. Look for the time stamp at the bottom of the picture. It should change every five seconds. If so, you have just made Raspberry Pi an automated webcam server.
Setting time and date
To reduce the cost of Raspberry Pi board, its manufacturer has not included a real-time clock (RTC) on the board. So, every time on boot-up, the time goes back to an earlier date. However, you can change the date using the following command:
[stextbox id=”grey”]pi@raspberrypi:/$ sudo date –set=
’2014-11-06 23:30’[/stextbox]
But, how to get your Raspberry Pi board running without a keyboard, mouse and monitor? Simple, through ssh (secure shell) command.
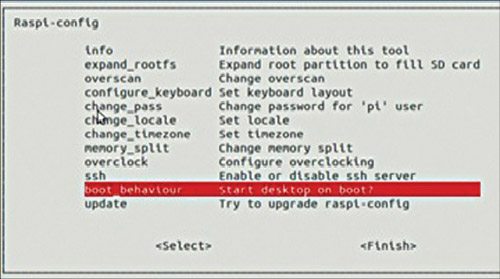
Before stripping the I/O devices, run the raspi-config command (Fig. 3), select ssh option and enable it. Click Finish and reboot it.
Reboot Raspberry Pi board and access it from a remote PC or laptop through Wi-Fi. That is, after successful installation of the Wi-Fi dongle, you can reboot Raspberry Pi computer and run it on headless mode (no keyboard, mouse and monitor). Wi-Fi should be connected on the same network to access Raspberry Pi computer using ssh command. Issue the following command:
[stextbox id=”grey”]pi@raspberrypi:/$ ssh -l pi 192.168.1.2[/stextbox]When asked for password, enter raspberry and you are good to go. Change the date and time using above command and check the webcam (which is already running now) time stamp on http://192.168.1.2/webcam.html page. You will see the current time running now.
Capturing live images using motion software
There is another versatile, video-rendering open source software available, which works well along with Raspberry Pi. Motion software, besides streaming video, can detect sudden motion of an object in the frame area and take snapshots or videos, depending on the threshold limit set in /etc/motion.conf file. To install motion software, follow the steps as given below.
[stextbox id=”grey”]$sudo apt-get update
$sudo apt-get upgrade
$sudo apt-get install motion[/stextbox]By default, motion remains off. You need to edit motion configuration file. To do so, enter the following command in the terminal:
[stextbox id=”grey”]
$sudo nano /etc/motion/motion.conf
[/stextbox]Motion configuration file will appear and you can change a few settings. Most importantly, though, we need to change the following:
daemon off (to switch on—this can be changed near the top of the file). Save it, exit Nano editor and open the next motion file using the following command:
[stextbox id=”grey”]$sudo nano /etc/default/motion[/stextbox]
Change start_motion_daemon= no to start_motion_daemon=yes.
Now, we need to start motion server by issuing the following command:
[stextbox id=”grey”]$sudo service motion start[/stextbox]Wait for a minute and then navigate to your Raspberry Pi’s IP address at 8081 port.
It should be something like http://192.168.1.2:8081. You can enter this IP address on the Web browser in Raspberry Pi or the remote laptop to access the image being captured by the webcam.
You will find your Raspberry Pi webcam churning out streaming pictures.
You can do further settings in motion.conf file as follows:
[stextbox id=”grey”]$sudo nano /etc/motion/motion.conf[/stextbox]Find Threshold under Motion Detection Settings. The default value is 1500.
The threshold value 1500 means that, if there is a minimum disturbance of 1500 pixels in the picture frame of the camera, it will trigger an event. Take a snapshot (or video) and dump it to /tmp/motion directory. However, since 1500 is a small value, you may change it to 6000.
At this point, you may change the webcam port to 5678 as 8081 is very common. Find On Picture Save in motion.conf file and create a pipe in front of it. Write the program you want to start additionally. For examples, I have added my program sendmail1.php (as shown below).
[stextbox id=”grey”]on_picture_save echo ‘Alert’ | echo %f >
/tmp/motion/img.txt | php -f /var/www/
sendmail1.php[/stextbox]
(Here, php -f /var/www/sendmail1.php is my program that motion kicks into life.)
You will find many parameters in motion.conf file and you can change them to make motion much more interesting.
Somnath Bera is an avid user of open-source software. Professionally, he is a thermal power expert and works as an additional general manager at NTPC Limited.

I tried the above steps
Dedian apache works fine on both on my rpi and laptop but when I try
Opening the webcam server that is
httpp://192.168.0.103/webcam.jpg or
httpp://192.168.0.103/webcam.jpg
The result it gives is
404 error url not found
Plz help as soon as possible
I also attempted to open the webcam server and got the “404 error url not found”. I have gone through many guides and don’t have any positive outcomes. Kindly assist
nice