
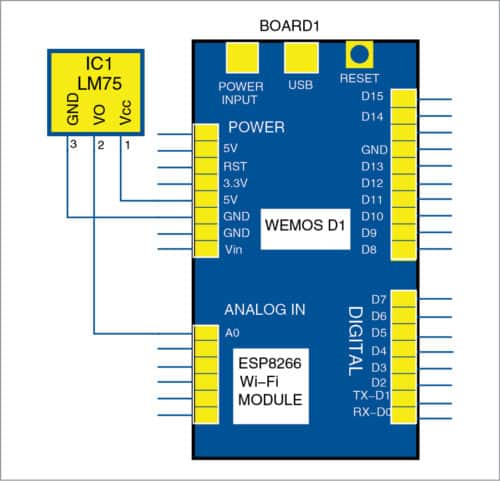
 The Internet of Things (IoT) is being widely used in industrial and commercial applications. This article describes how to monitor devices or things connected to WeMos D1 board, which acts as a Web server. Pin description of WeMos D1 board is shown in Fig. 1.

Hypertext Transfer Protocol (HTTP) in the IoT works as a request and response protocol between a client and server. A Web browser functions as a client on a computer that requests information from the website (server). When you type the Web address in the Web browser, it acts as a client and requests contents of the Web page in HTML format from the website. The website, acting as a server, is always listening for such requests from the client (Web browser) and responds with contents of the page.
Circuit and working
The circuit diagram for monitoring things through a Web browser is shown in Fig. 2. It is built around WeMos D1 (Board1) and an analogue sensor (LM35). To monitor the sensor, it is necessary to connect it to analogue input pin of Board1.
However, we will first test the project without using the sensor. We should be able to see the float voltage value on the browser, that is, reading a random value on the browser without connecting the sensor to input pin A0 of WeMos D1. All this is monitored by the program (wemos_sensordata.ino) inside WeMos D1 board. Data read from pin A0 is sent as HTTP response to the client (Web browser).
Construction and testing
WeMos D1 board can be programmed using Arduino IDE. To use WeMos D1 board in Arduino IDE, install the board library in Arduino IDE, based on the steps given below.

1. Open Arduino IDE and paste the following address from File→Preferences→Additional Board Manager URLs:
http://arduino.esp8266.com/stable/package_esp8266com_index.json
2. Select ESP8266 by ESP8266 Community, and click on Install from Tools→Boards→Board Manager.

3. Close Board Manager. Go to ToolsBoard and select WeMos D1 R2 & mini option.
4. Select 115200 from Tools→Upload Speed.
To connect WeMos D1 board to the computer, you may need a USB-to-serial chip driver. Install the driver from the following URL:
http://github.com/nodemcu/nodemcu-devkit/tree/master/Drivers
After connecting WeMos D1 board to the computer/laptop using a USB cable, open the source code (wemos_sensordata.ino) from Arduino IDE.
Before uploading the code to WeMos D1 board, make sure to replace the SSID and password in the program/sketch with your Wi-Fi username and password. Compile and upload the code to WeMos D1 board.
Open Serial Monitor to view the IP address of WeMos D1 board assigned by your network, as shown in Fig. 3. (Note: IP address in your case will be different.)
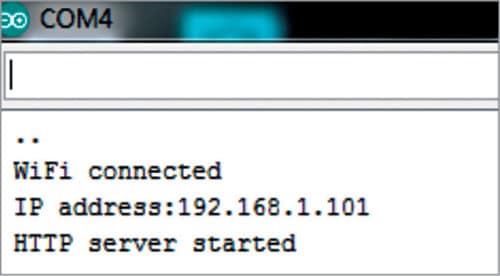
If you are not getting the IP address in Serial Monitor, ensure that baud rate is 115200. Then, open the Web browser (client) and type the IP address of WeMos D1 board.
Once you have entered the IP address in the Web browser, it will request for the contents of that page in HTML format. WeMos D1 board as a server will respond with the contents of the page (which will have float voltage value captured from pin A0). You will be able to view the float voltage of pin A0 and millis values, as shown in Fig. 4.
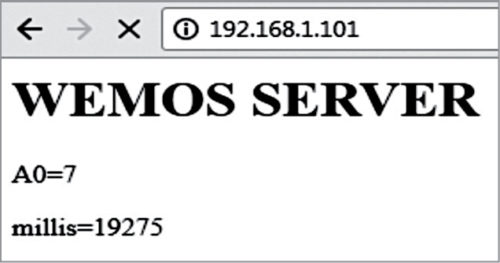
Millis value is the time in milliseconds since WeMos D1 board’s last reset. A0 and millis values are updated every three seconds. You can change this refresh rate by changing number 3 in the following line in the source code:

You can also connect an analogue sensor, such as temperature sensor LM35, with WeMos board and check the value of A0. The procedure and IP address will be the same as above. After entering the IP address in the browser, as mentioned above, you will get the value of A0, which will vary with the ambient temperature. For example, at room temperature, A0 reading will be around 96. If you raise the temperature by heating the sensor, A0 reading will also increase. This way you can monitor temperature of the sensor and device reset status from the Web browser.
Download the source code: click here
The formula for converting analogue signal at pin A0 of WeMos D1 board into voltage is:
Voltage=(3.3×analogue read (A0)) /1024
Citharthan is assistant professor at Christ the King Engineering College, Coimbatore, Tamil Nadu
Sathish Kumar Selvaraj is founder of SJK Technologies Pvt Ltd, New Delhi
This article was first published on 22 October 2019 and was updated on 13 November 2019.


Hello , I am newbe , but if you do not mind , an personal need ,just for cheep experiment ,wold be very helpful an DIY with ESP8266F(mini new) , and the second thought , to log in the WiFi with DNS without using the IP from serial monitor .
Many thanks for attention and kindness .