
It is not just another Engraved LED lamp that you see on the market nowadays. This is an advanced version of that lamps. In the era of connected devices, I have made my own connected lamps. This project is inspired by Filimin: A Wi-Fi Enabled Touch Light That Connects You. I truly loved this product as in this generation of smartphone where each and everything, every activity is taken over by our smartphone, this product will let you share your feelings to your loved ones without using smartphone at all.
What is this project about?
In this project, we have 2 lamps which have inbuilt WiFi, connected to AdaFruit server via the internet.
I personally made the lamp as “I Miss You” lamps, you can engrave anything you want on it. So If I’m missing someone, instead of texting or calling her that I miss you, which is what every other person on the planet is doing, I can simply touch my lamp to make the LED Glow on my device. After a few seconds, another LED Lamp which is on the device with the person I’ve gifted it to, will also start glowing with the same intensity. The longer I touch the lamp, the brighter the light will be which reveals how much am I missing the other person. The other person could be anywhere in the whole world, and this device will help me convey my feelings to the other one.
This is an innovative way of expressing your feelings to your loved ones. This can also be your Bat Signal to call your friends to come play!
The “Blue Tick” feature on the WhatsApp Messenger which acts as a read receipt for us. Our project has the same feature! As soon as the other person sees that the lamp is glowing, they will come to know that I’m conveying a message and as soon as they touch the device, the LED will turn OFF on both the lamps to acknowledge that they’ve seen your message. This is how I can determine that our message is conveyed.

The whole process can be completed vice versa. The other person I can repeat the process to convey whatever they want to say by doing the same.
Components Required
- 2 x ESP8266 12e boards
- 2 x 100k Resistor
- 2 x BC547 Transistor
- 2 x 12V DC Adapters
- 2 x LED strips (length according to the size of Acrylic sheet)
- 2 x Acrylic Sheet(I have used the sheet with the dimensions 150 x 90 x 5 mm)
- Some wires
Circuit Diagram
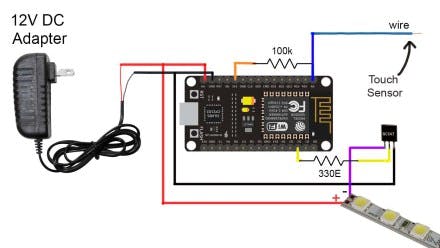
Circuit Operation
The code uploaded on these boards is a bit complicated to explain and understand so I’ll just explain the whole project by the process occurring in the background.
So first of all, I have made a touch switch using a simple multicore wire through Resistor Divider circuit on the Analog Pin of our ESP board. So as soon as we touch that wire the LED strip on connected to that same ESP starts glowing. The longer we touch the wire, the brighter the lights will be. I have programmed 17 levels of brightness. After you are done with your perfect brightness level stop take off your finger over the wire and after few seconds, this lamp will send the data of its brightness value to another lamp via Adafruit MQTT broker.Both the boards are acting as adafurit MQTT clients.

After that, the second lamp will start glowing with the same brightness as soon as it receives the data from the server. Now both the lamps will be glowing with same intensity. Now is the person with the second lamp touches the wire, lights on both the lamps will turn off which indicates that the message is successfully received and read by the person.
And likewise, the second person can do the same process. So basically the code has MQTT client in it and some complex conditions and nothing else. So just go through the code and if you are good at Arduino coding, then you’ll easily understand the whole stuff.
Codes
The code for this project is uploaded to my GitHub account. You can download it from there.
Tutorial Video
If you still have some doubts regarding the making of this project, watch out my full tutorial video in which I have covered every aspect of this project.


Electronicsforu.com too helpful for my project.
But I want idea based on agriculture project.
Are you looking for any specific IC or component-based project?
Hi, can i ask if it is possible to improve the respond time of the lamps? Thank you.