

Bandhavgarh tiger reserve forest, MP [INDIA] – 1150 square kilometres spread across Umaria district. The jungle has a core area of 820 square kilometres where no human activity is allowed. The buffer area of about 330 square kilometres is spread across two forest areas of Umaria and Katni. In the jungle area, the cell phone network coverage is extremely poor. You may get some coverage at the buffer area but inside the core, area cellphone is simply useless! The thick shades of forest also make the solar PV cells difficult to work.
In the spring session when the jungle gets thinner due to most of its deciduous trees drop leaves and there is little undergrowth all around as monsoon is far away, it’s guaranteed to meet the Tigers on your track. In case your vehicle break downs or you run out of petrol due to a leaking petrol tank you have to rely on your luck to meet the beat officer or the forest patroller on your way. Getting down off the vehicle is not only dangerous & life threatening but strictly not allowed as well. The king of jungle is roaming everywhere!
At one patrolling camp I was talking to one beat officer – how do you communicate with your base camp? and he showed me the huge microwave tower which runs on battery power and solar PV recharging. How efficient it is?
Not even 10%. It hardly works when it is awfully required! – the man grumbled obviously.
But why? – I asked, isn’t the designer designed & installed it considering everything!
– It’s 10 years old and it’s a power guzzler. After one or two sentences it becomes dead and the battery hardly remains charged these days! In this deep jungle, the designer should have thought of a low powered chat message window instead of an elaborate microwave wireless voice communication!
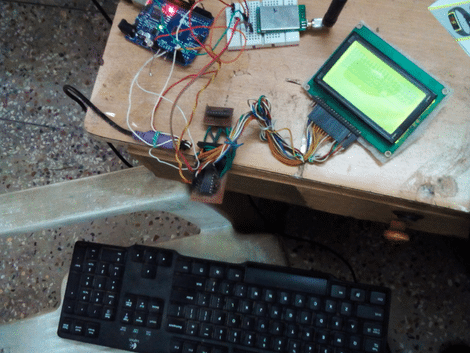
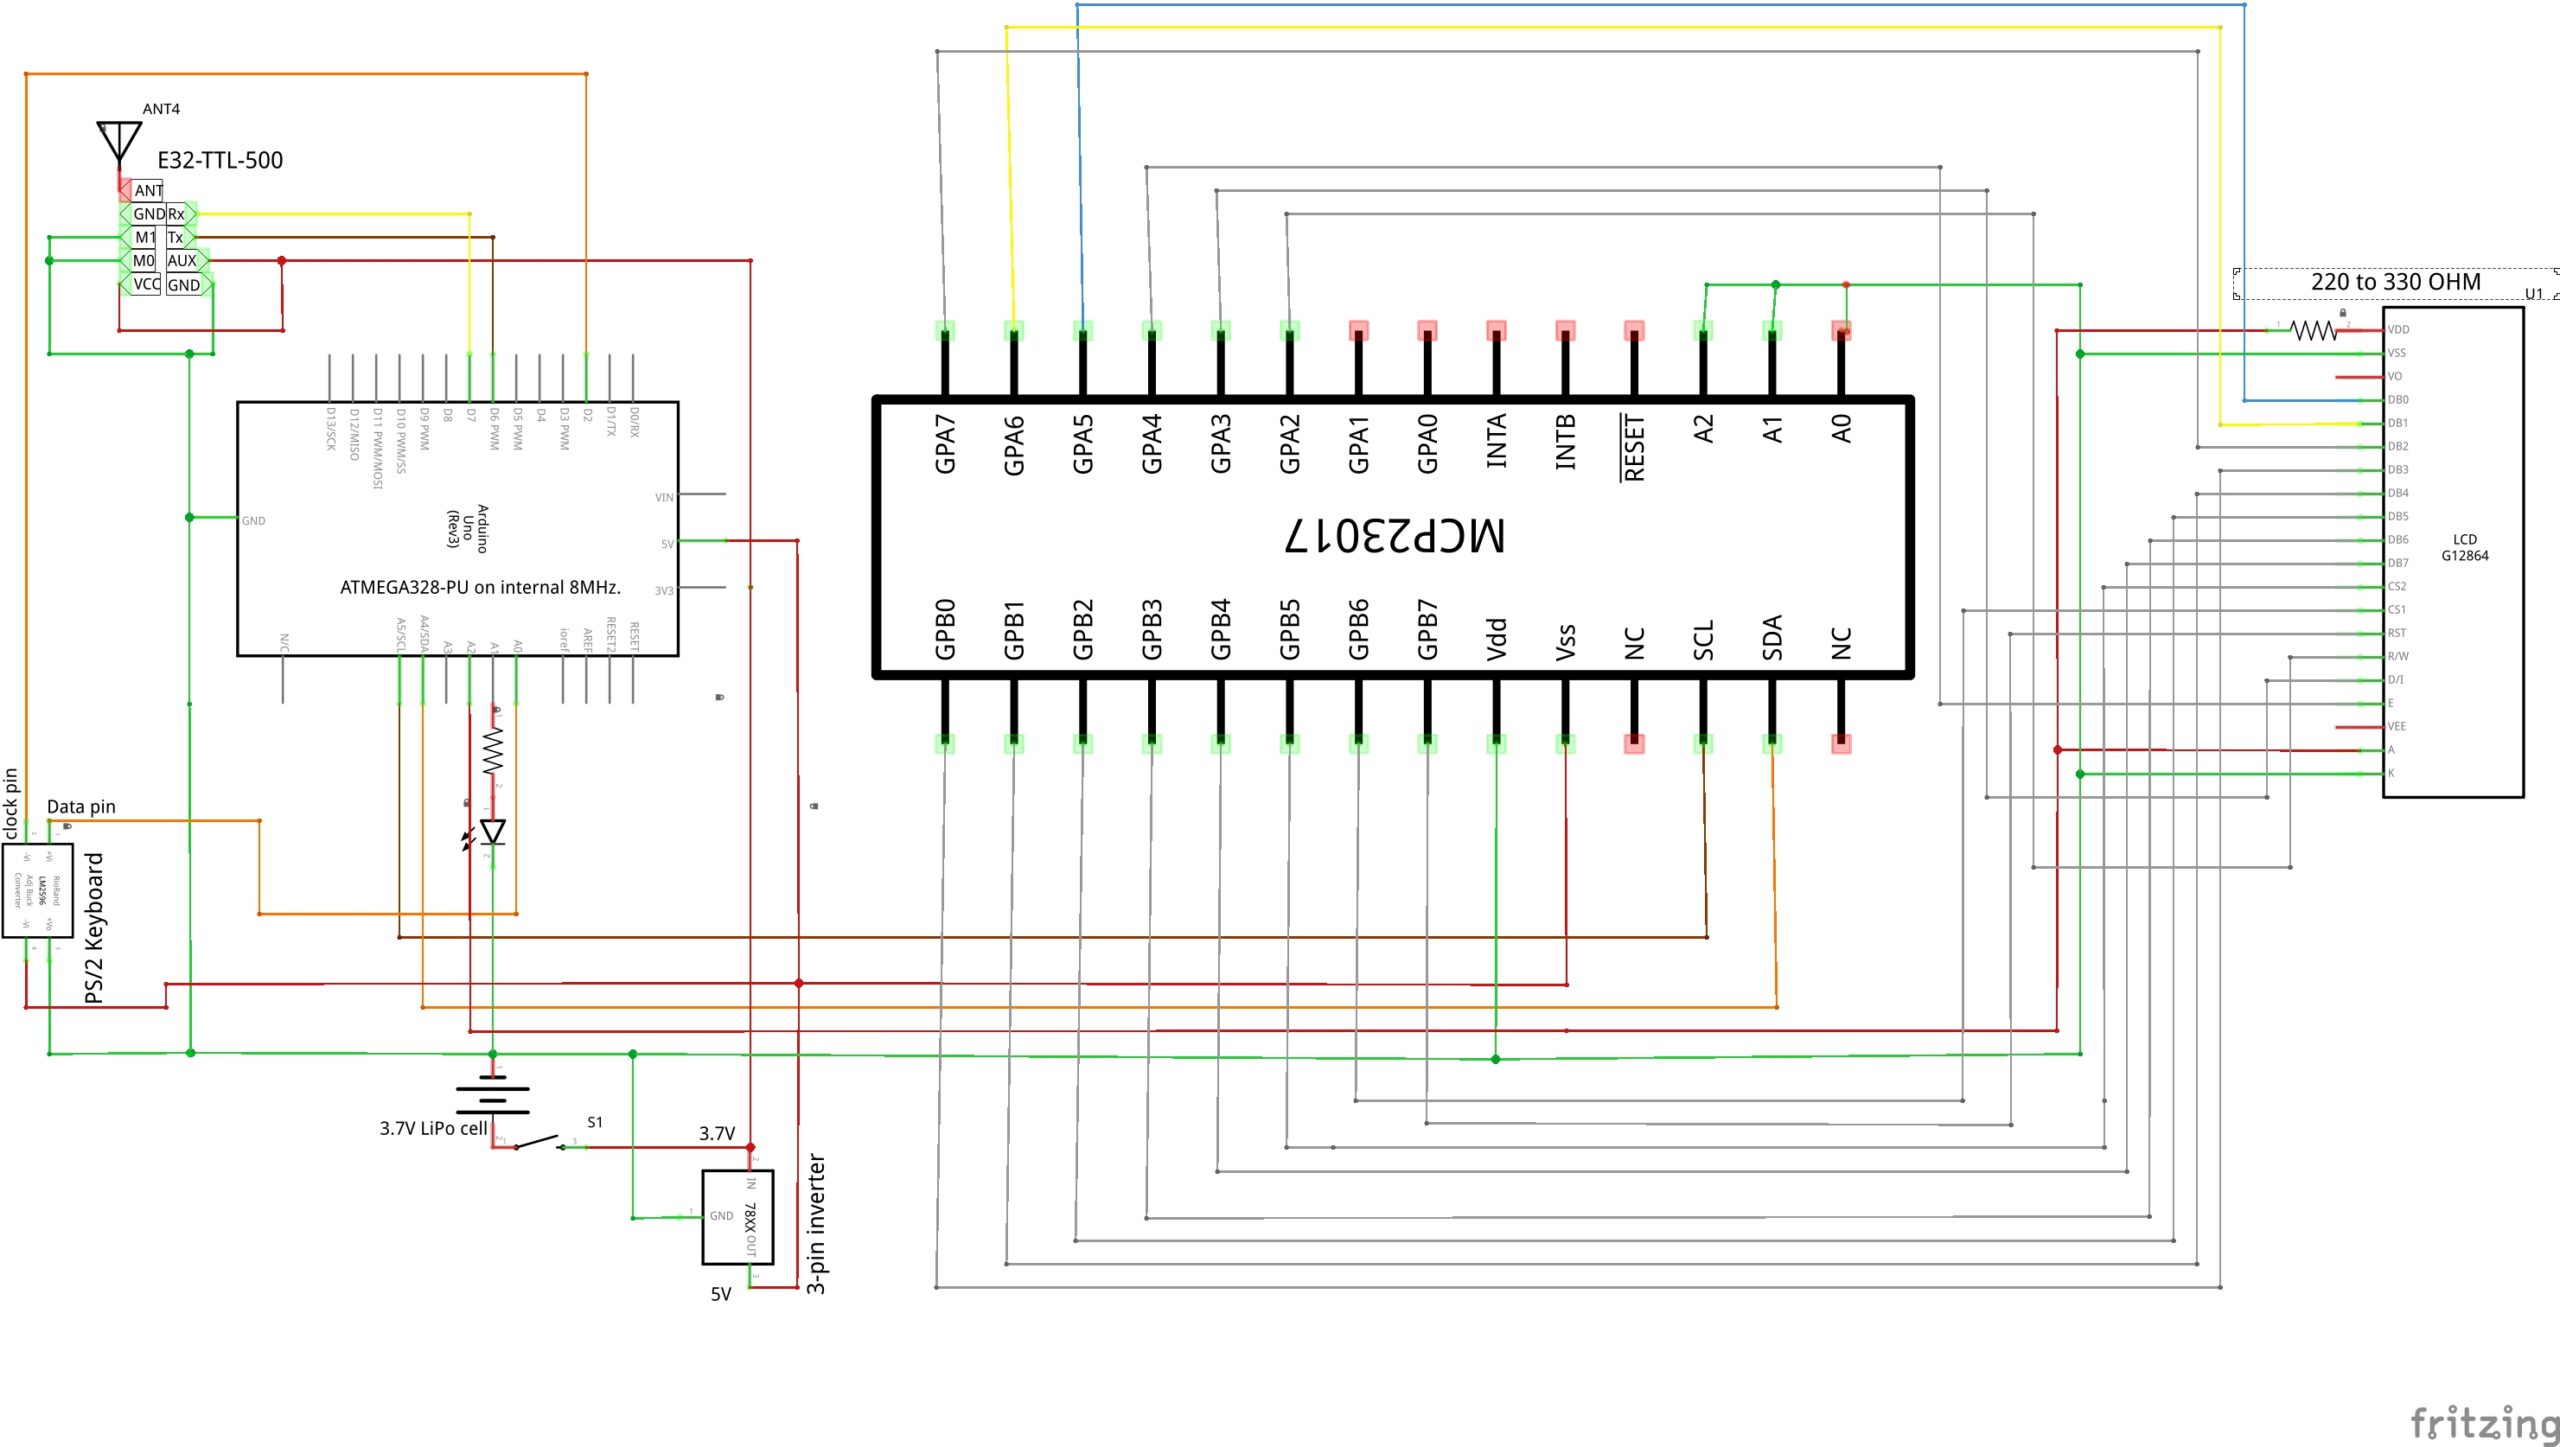
Well, that was the prelude of this LoRa Chatmetry project. Using a LoRa 868 MHz, 500 ~ 1000 mWatt, 64*128 black & white graphical KS0108 LCD screen, small whip antenna, a low power ATMEGA328 [Arduino ] chip on internal 8 MHz and an old outdated PS/2 keyboard [scavenged from an old desktop PC] , the system will work for 10 ~ 12 hours together on a 5 volt 3300 MWh small cell phone battery. On a 20 Watt solar PV cell, the 3.7 Volt 3300 MWh battery should be charged comfortably every day. One disadvantage of this LCD and the PS2 keyboard is that they run only on 5 volt supply whereas all other equipment run on 3.3Volt supply.

5V & 3.3V on 3.7V system
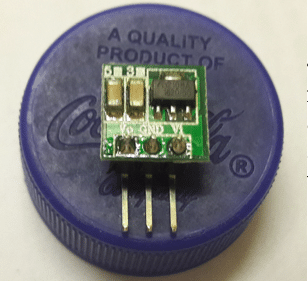
Since the system uses both 3.3 V and 5 V, creating them without a loss is difficult. But one can use the low power 3 leg inverter to create 5volt out of 3.7volt LiPo cell. Such low power 5volt inverter is available in Aliexpress.com for <$2 only [see pic]. In place of 3.3 V, ATMEGA or the SS Radio can run comfortably on 3.7Volt as they are all less than 5Volt tolerant.
Screen Geometry
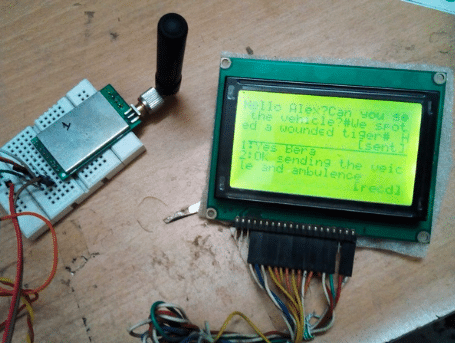
The 64*128 screen is divided into two windows – 4 top lines for the sending window while 4 bottom lines are the receiving window and a partition line in between separates them. The old PS/2 keyboard that came with your first desktop computer is good enough for using with this chatmetry device. A very low grade editor is built up on the top window using the following keys for creating simple chat messages.

[The button works for creating/editing messages are – all alphanumeric keys, left key, right key, space bar, backspace, ESC, DEL. However, the ‘Enter’ button has no functionality associated here.]
For ending a message we have to press the ‘#’ key. The moment you press ‘#’ key the preceding messages will be sent and the word ‘[sent]’ will be shown on the bottom right of the top screen. Similarly, when someone sends a message from an identical [another] unit like this one or from a computer using software like -GTKTerminal, picosoft, putty, picocom or pico etc. [the communication protocol is 9600-8-N-1] he will press the ‘#’ for ending the message and subsequent sending of the message, the message will appear on the bottom window and word ‘[recd]’ will be shown on the bottom right of the bottom screen [see prototype]
 Usage of keys/buttons
All alphanumeric keys [A to Z & 1 to 0]: For the key they are intended for
ESC = For clearing of both the screens and restart the chat window [without restarting Arduino]
→ = For jump one space forward
← = For delete one character backward
BACKSPACE = For delete one character backward
Spacebar = For delete one character forward
Ring: When there is a message received. The ring led on A1 pin will start glowing.
Backlight = To reduce power consumption, The LED backlight glows only when there is message received or a key is pressed.
Power saving
Preserving power is the name of the game. The back light of the LCD is taken from one GPIO pin – A2 such that when the ESC button is pressed the back light goes off ,thus preserving precious power all the way! However, when there is an incoming message or the keyboard is pressed ,it becomes on for viewing. It has a small LED which flashes when a message is received from the remote unit but answer is yet to be send. Once a reply is sent or the ESC button is pressed, the LED & the GLCD goes off as well.
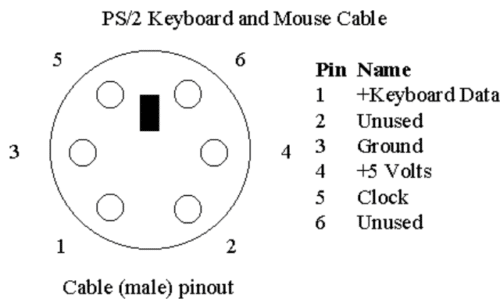
PS/2 Keyboard
The older desktops used to have this type of key boards. They have 4 essential wires to connect – clock, data, +5V and ground. There is a library function available to connect this key board with Arduino. To utilize the keyboard ,it needs only 4 wires – two are the 5 volts supply lines and one common GPIO [like any from A0 to D13 ] and another Interrupter GPIO like GPIO-2 or GPIO-3 on an UNO board.
GPIO Ex-pander MCP23017
A total of 15 GPIO pins are required for connecting the GLCD for which the UNO really comes short supply after having the SS Radio, keyboard and the alram LED connected to it. To tackle the situation we have used a GPIO Expander – like MCP23017 where most of the GLCD PINs are transferred while only I2C connections are extended to the UNO board.
Parts List
- Arduino – ATMEGA328
- PS/2 keyboard
- E32-TTL-500 Transceiver
- MCP23017 – GPIO Expander
- 5V/3.3V LiPo cell
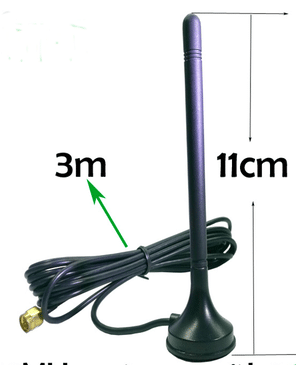
Antenna
In a deep jungle what you require mostly is a small 5DBi antenna erected upon a tree top or a mast to clear the immediate line-of-sight towards your line of communication. The rest will be achieved by the long spread of signals which will find it’s destination easily among the trees & leaves. On 1200 Kbps the spread of signal is maximum. At a 500 mW to 1000 mW [27 dbM to 30 dbM] it can reach upto 6 miles to 30 miles safely depending on the line-of-sight.
Allowed band
In INDIA 865 MHz to 867 MHz is free band in which there are 8 channels of 250 Khz spacing within it. Please use some RFSet software [or anything supplied by your vendor] to set your radio parameters within that channel. In the same RFSet software you can set a 4 byte ID number so that it can only communicate to the same ID number radios.
For commercial use you have to restrict yourself with in channel 0 to 7 [India]. In US – 902 ~ 928 MHz, in China – 779 ~ 787 MHz, in Europe – 433 MHz.
| Channel | Start Frequency (MHz) | Width (KHz) |
| 0 | 865.4 | 125 |
| 1 | 865.6 | 125 |
| 2 | 865.8 | 125 |
| 3 | 866 | 125 |
| 4 | 866.2 | 125 |
| 5 | 866.4 | 125 |
| 6 | 866.6 | 125 |
| 7 | 866.8 | 125 |
| 8 | 865.7 | 250 |
Creating Port Address of the GPIO expander
MCP-23017 has three address pins – A0, A1, A2, they will be either connected to +5 ve or ground. For each different combination of connections (all three to be connected) , it will create a port address of the chip. The most default address is 0x20 where all A0,A1,A2 are connected to ground. Similarly A0 to +5ve whereas A1 & A2 to ground will create address 0x21 (for more detail see the data book of MCP-23017). After setting the address the same to be entered in the header file – I2C_graphical_LCD_display.h (see where I’ve marked as “change here for port” ). However, I’ve set it for the default address as 0x20 for which you need not to do any changes in it.


Hi,
Where can I find your program? Can you send me an e-mail?