

Eight years back I purchased a small bathroom scale from @Home ,Mumbai and it cost me a good amount of money then. It’s a simple analog weight machine. You stand up on the scale, the needle deflects, read the weight – simple and straight forward. It’s big brother – the digital weight machine was far more costlier then.
But to be frank the digital weight machine is far more easier and simple as far as the design is concerned. While the analog machines drifts from zero quite frequently which you have to set by turning a thumb wheel and seeing the needle, the digital weight machine drift can be set easily, besides it’s readings are more accurate and precise.
The following article will describe how to build up a simple cheap yet very effective (5 Kg max) kitchen weight machine for a penny! Change the strain gauge for a bigger capacity and your bathroom scale is just ready – all are just the same.
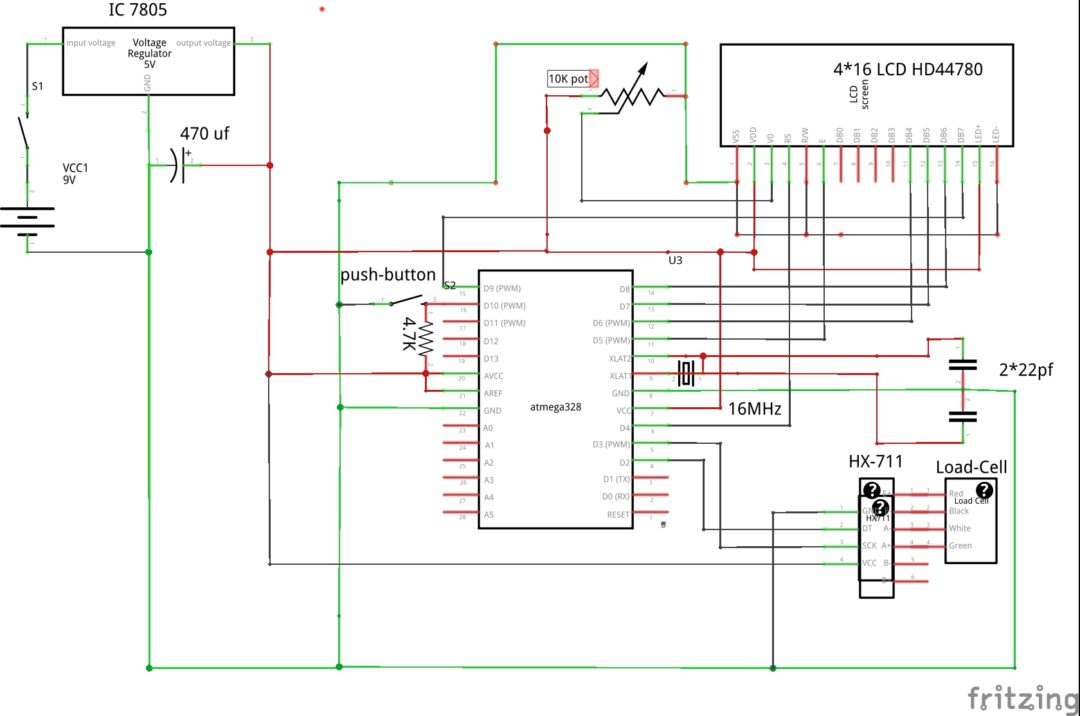
The MCU we would use is an Arduino with boot loader, a strain gauge ,a 16*2 LCD panel , HX711 analog amplifier few contraption, hardware fitting , nuts ,bolts and washers and your weigh machine is up and ready.
Bill of Materials
Arduino (any make) / ATMEGA328 with boot loader – $2 to $3
5KG weight machine (strain gauge) – $3 to $4
16*2 LCD panel – $2 to $3
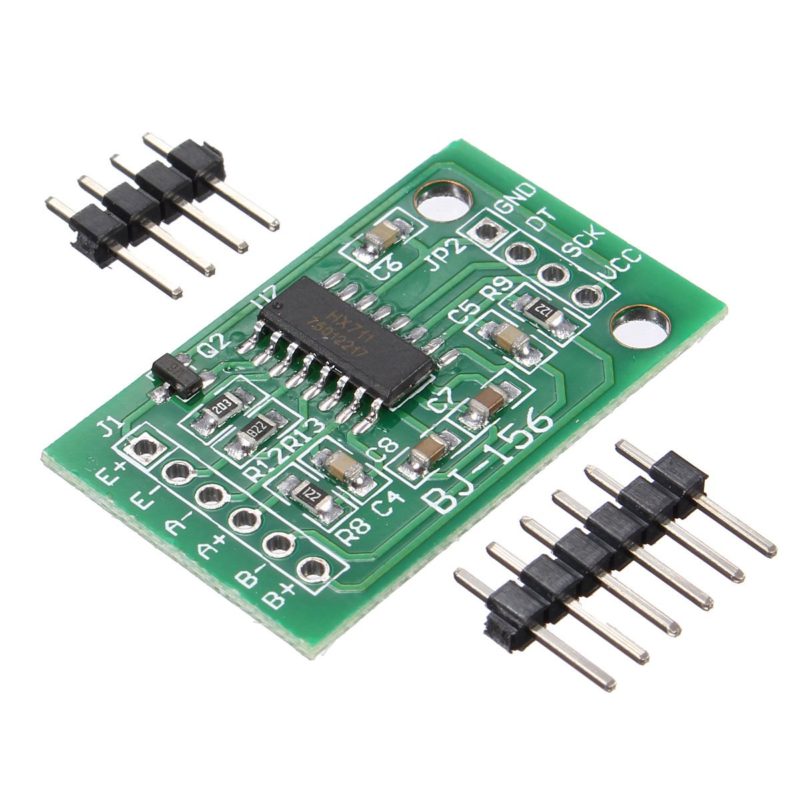
Instrument amplifier HX711 – $1 to $2

While all the above prices are aliexpress.com price some prices are quite comparable from ebay.in & dx.com also.
Preparation
I prefer HX711 over any other instrument amplifier like INA105P because HX711 has a digital output, cheap and it has an adafruit header file for Arduino which makes it further easier to use. The weight scale has a metallic structure surrounded by strain relieving frames which picks up the strain when subjected to weight. The strain gauges are arranged in wheat stone bridge format. One side a voltage is applied while the other side measures the changes in voltage depending on strain it suffers.
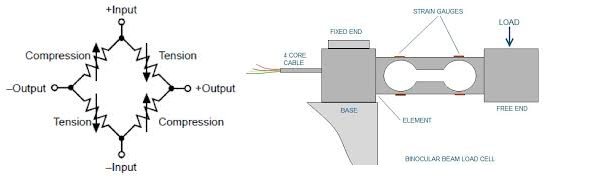
That is a typical load cell arranged in a wheat stone bridge format. The output is clubbed into 4 wires. The load is applied at the free end. The strain gauges are applied on all 3 sides to pick up compression and expansions which is nothing but load signal which is processed and measured for weight measurements. The color code of the 4 wires that comes of it has uniform meaning – Red, white, black & green.

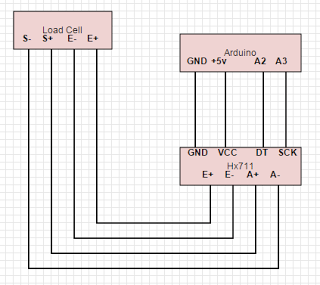
RED = + Excitation : This will go to +5Volt or E+ of the HX711 board
BLACK = – Excitation : This will go to ground or E- of the HX711 board
WHITE = – Signal : This will go to A- of the HX711 board
GREEN = + Signal : This will go to A+ of the HX711 board
YELLOW = (may be there or not) : This is the shield wire, to be connected to ground.
The HX711 has another channel left unused or if you have one more load cell to take average , you can connect it to the other channel : B- & B+
That’s more or less uniform for HX711. See picture.
Operation
The software is built on Arduino-on-board principle. After burning the code into an ATMEGA328 ,the chip is taken out and put onto the production board. The initial reading may have errors as the probe is not yet calibrated. So press the push-button connected to digital pin 10 once and the probe will self calibrate and the initial reading of 0.0 will be shown. The zero set figure will then be stashed into the inbuilt EEPROM of the Arduino. Next time when you restart it after a switch off operation, the zero set reading will be read from the EEPROM and then the internal calibration will be adjusted according to that and would be shown on the top line. The 2nd line will show 0.0.
While taking reading if you find that the reading reduces when you increase load then just reverse the white and green wires and it will be solved.
Calibration
The calibration of the weight machine is an important part of measuring devices. For HX711 there is one calibration factor – 7050 which works well for the adafruit modules. Therefore, I’ve not changed it. The other one is the zero_set factor for which I’ve made provision to do it dynamically during operations. After each calibration the zero_set figure goes into EEPROM memory of the Arduino. Next time when you restart the machine , this value will be fetched from EEPROM and then the zero_set is achieved. Thus the zero_set figure moves with the internal EEPROM of the machine.
However, to change the zero set reading, like weighing milk (in a container) you would not be interested to measure the container weight and then deduct it etc. So you put the container on the scale and press the push-button. The container weight will be added to the zero set reading and then a new zero reading will be shown. Now just pour milk and read the weigh reading. To remove the container from the zero set reading just remove the container and press the push button one more time.
Multiplying factor
Since this load cell comes from China, I don’t know which conversion factor they use. Therefore, change this factor suitably by putting a known weight on the load tray first time. Once this is done, next time your machine is through. See this factor commented in the code section very clearly.
Fitting of the scale
If you look at the load cell, it has strain gauge attached on all three side with suitable strain relieving frames in-built with the design. Put some thick washer and then tight it with the base plate and the load plate so that the strain gauges are free from rubbing with the base plate as well as the load plate – our weigh machine is ready now.
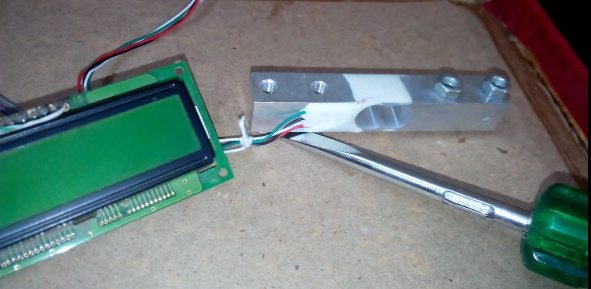
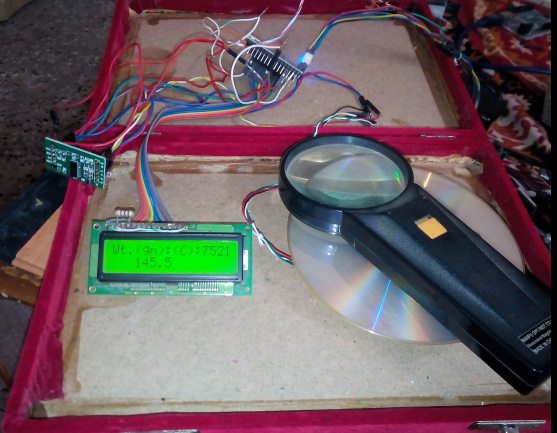
Look at the screw driver – the body of the load cell is cleared of the base plate by using two thick washers. So is the top plate (which is a CD here) is fitted with two thick washers so that the strain gauges fitted on the body of the load cell does not come in contact of the body. Hard flat plates are best suitable for this. This load cell is capable of weighing upto 5KG. I’ve checked with measuring tooth picks (1.7 grams – 4 nos) , plastic tea cup (2.8 grams) to 4.3 KG thick books and each time the same reading appeared. I must say the machine has got excellent repeatability. The error in the measurement is +- 1gm. For precise measurement put the machine in some place where there is no air movement like overhead fan etc.
Software used in this weight machine
The software consists of HX711 header files and the arduino sketch. First add the library files to the Arduino IDE and then run the sketch. To calibrate the probe, press the push button once.
To reduce the number of reading to take for averaging change the following script.
x=scale.get_units(25)*45.3592 ; //convert to gram for 25 readings
scale.read_average(5); //to read 5 average
This line takes 25 or 5 readings and then averages it. To increase the speed ,reduce the number of averages. If it is kept blank ,it will not take any average.
Source Files: click here


Sir plz tell me, how to find out password in all types weighing machine and some tips give me
Hi there,
Thanks for taking interest in this project. I understand you want to know password of any weighing machine if already set by someone. Is that so ?
Then the password is set at the code level and then burnt into the microprocessor. You cannot break it unless you replace the chip or reprogram it.
S. Bera
Hi sir
Hello ,
We are an industrial design studio , we design and develop products of many kinds.
We are developing a digital weight (max 5 kg d:1 gram) and we need 2 quotations please,
A: price quotation for a digital weight, including plastic manufacturing ( we will provide the designed part for the housing).
B: price quotation for all the electrical components, (we will do assembly by our own).
can we incorporate a printer and a keypad to input data to this circuit ??
Hame scales company ki machine or sare password chahiye
I need complete fully functional scale with all features tare ,zero,units,print,cal and menu key to change the scale settings.Full code and option of using other micro controller like pic .
Hello Sir,
Can we increase the weight (instead of 5 kg) with same HX711 & Arduino
Software weing secal reat send
Sir
Code ke chya
Kindly elaborate on your query.
hx711 is directly can we connect or we used any communication protocol. for 7 segment display and communicate with key pad any communication can we required ?
please i wish to calculate the incertitude on the the components of this system, say the load cell and amplifier
Comment:pls can I know the each components what is performed a function in the circuit of weighing machine pls I need this ojant
I want a weight scale 8051 mcu program
8285243650
How are you . Dear Sir or Madam
We are Feras Shoumal Co. we import and export machines and others more than 10 years ago.
I am Ms.Hiba kharsa, responsible for transaction and corresponding dept .
It is my pleasure to contact with you and cooperate with your respectable company.
We are looking for parts for the electronic scale weighing 30 KG
Sensor / inner board / pushers / internal circuit board / screen
If you have please send a quote
Your cooperation is highly appreciated.
Best Regards
Ms. Hiba alkharsa
Mob.:00963988834128
FERAS SHOUMAL Co.
Syria – Hama Badr Aldeen Alhameed street-building no. 21-2nd floor.
Tel.: 00963 33 2522980
Fax.:00963 33 2522981
Website: www. print-trading.com
Connect whatsapp +919029037582
Is it flexible? Can I increase the weight Capacity?