
 This article describes the procedure to set up Arduino as a slave device, which gets all control signals from Raspberry Pi running a Python program. The program presented here provides simple steps to interface Raspberry Pi and Arduino. Arduino as a slave can also be used to control electrical devices including LEDs and servos.
Raspberry Pi, a credit-card-sized computer, has a good amount of computing power but lacks the ability to connect to field devices. This is because it is a 3.3V device and has no analogue channels.
Arduino, on the other hand, is a 5V device that can connect with field sensors, and has many analogue, PWM and digital I/O channels. This article attempts to bring out the best of both the worlds by using computing power of both Arduino and Raspberry Pi that can achieve almost anything.
Tkinter interface is used to build a graphical user interface (GUI) to control an I/O pin of Arduino. (Note: Raspberry Pi 4 and Arduino Uno R3 boards were used during testing at EFY Labs.)
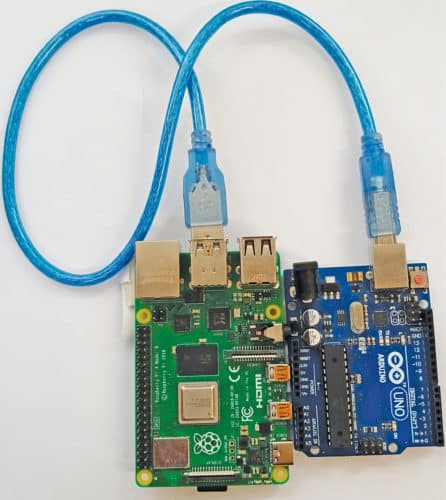
Hardware setup of the project is shown in Fig. 1, and block diagram of the project is shown in Fig. 2.


Software development for this article is divided into three parts, as follows:
1. Installing Nanpy libraries on Raspberry Pi operating system
2. Installing Nanpy libraries on Arduino

3. Writing a GUI with Tkinter to control Arduino onboard LED
Installation of Nanpy on Raspberry Pi
The steps for installing Nanpy on Raspberry Pi are given below.
1. Power on Raspberry Pi and connect it to the Internet using Wi-Fi or Ethernet. Open Raspberry Pi terminal, and the prompt will open as given below.
pi@raspberrypi – $
2. Enter the following command to install all updates on Raspberry Pi and have all packages up to date:
$ sudo apt-get update
3. Install Arduino IDE on Raspberry Pi, as given below.
$ sudo apt–get install Arduino
4. Go to Downloads folder using cd command, as given below.
$ cd Downloads
Downloads folder may have other contents. It is a good idea to clear all contents from the folder.
When you navigate to Downloads folder, the prompt will be as shown below.
$ pi@raspberrypi ~/Downloads/ $
5. Enter the following command to install nanpy folder from Github in Raspberry Pi
Downloads folder:
$ git clone https://github.com/nanpy/nanpy
6. Enter the following command:
$ git clone https://github.com/nanpy/nanpy-firmware
This will install nanpy firmware from Github in Downloads folder.
At this stage if you use ls command, there will be two folders listed: nanpy and nanpy-firmware. Rename nanpy-firmware as nanpyfirmware.
7. Enter the following command, followed by ls:
$ cd nanpyfirmware
This will take you to nanpyfirmware directory. List the contents with a file called configure.sh. Run this file by running the command given below.
$./configure.sh
8. Navigate to nanpy directory using the following command, followed by ls:
$ cd nanpy
It will display the directory contents. nanpy directory will show a file called cfg.h. This file has the option to add Arduino library options that are needed by setting the contents to 1. In Raspberry Pi, contents of the file can be edited using nano or Leafpad. For example, to enable use of servo with nanpy, define the parameter as given below.
#define USE_Servo
(0=Disabled,1=Enabled.)
Likewise, to use One Wire device, define the parameter as given below.
#define USE_Wire
9. Copy nanpy files to Arduino sketchbook. But first open Arduino IDE on Raspberry Pi and make sure that Arduino IDE opens without any errors. Then using File Manager make sure that there is /sketchbook/libraries directory in Home folder.
10. Navigate back to Downloads directory using cd.. command twice. Then, use the following command:
$ cp avr-nanpyfirmware/ ~/sketchbook/
libraries
In some cases, this command will generate an error, so it may be better to copy the files to Home folder and then copy them to sketchbook/libraries.
Installation of Nanpy on Arduino IDE
The steps for installing Nanpy on Arduino IDE are:
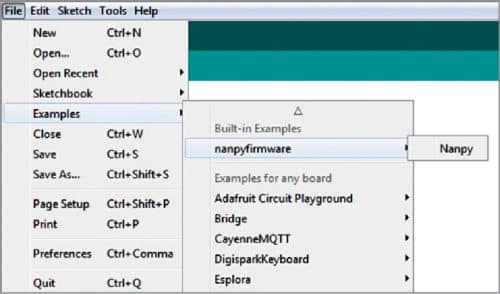
1. Connect Arduino Uno board to Raspberry Pi using a standard USB cable. Open Arduino IDE and navigate to nanpy from Menu on the IDE.
Files→Sketchbook→libraries→nanpyfirmware→nanpy
2. Open Nanpy code from Arduino IDE (Fig. 3) and select Arduino Uno under Tools and the correct COM port. Compile and upload the code to Arduino board.
3. Go back to Linux terminal and navigate to Downloads folder and enter cd nanpy command, followed by ls command. When ls command is executed, files in nanpy directory will be displayed and there will be a file called setup.py.
4. To install nanpy files for Python 3 on Raspberry Pi, use the following command:
$ sudo python3 setup.
$ py install
This will install nanpy files for Python 3 on Raspberry Pi.
5. If Python 2 is used on Raspberry Pi, use the command given below.
$ sudo python setup.py install
After opening nanpy file, download the same to Arduino after verification. Arduino board is now ready as a slave to Raspberry Pi board. It will accept commands from Raspberry Pi and serve as requested.
Python programming and Tkinter to control Arduino I/O pin
In this section we will develop a Python application using Tkinter interface. In the latest operating system for Raspberry Pi, Python 3 and Tkinter come pre-installed.
As an example, we will write a Python code (Nanpy-Arduino_Slave.py) to establish a connection between Raspberry Pi and Arduino. Using two buttons in Tkinter, we can turn on and off the onboard LED connected to pin 13 on Arduino Uno.
Download Python code (Nanpy-Arduino_Slave.py) and open it on the terminal using the following commands:
$ cd Downloads
$ python3 nanpy-Arduino_Slave.py
The program first imports all required modules from nanpy and Tkinter. Then, using Tkinter, a frame is created along with two buttons—on and off.
Now, a GUI will open having two buttons (on and off). When you click on ‘on,’ the onboard LED will glow; when you click on ‘off,’ the LED will be off. The procedure is simple; just write 1 for on and 0 for off to pin 13 of Arduino. The final program output screenshot is shown in Fig. 4.

Download the source folder for setting up Arduino as a slave device: click here
Santhosh Jayarajan is an electronics designer and computer programmer working in a private company in Mumbai


