
 Due to the lack of transport and the non-availability of doctors, a lot of people might not get the right treatment at the right time. This happens because patients living in remote areas do not have access to doctors. So today we have decided to make a remote health monitoring device that will help doctors to assess a patient’s health in real-time.
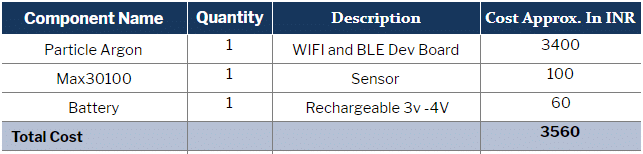
Bill Of Materials
Coding
First, set up the Argon device for mesh networking and add all other devices that you want to work in that network. To do so, download the particle app on your smartphone and follow the given instructions. We can now create code for our device either in particle Web IDE or in VS Workbench. Here we are going to do coding in particle IDE as this allows us to update the firmware wirelessly from anywhere using Over-the-Air (OTA). Log in to the Particle Web IDE.
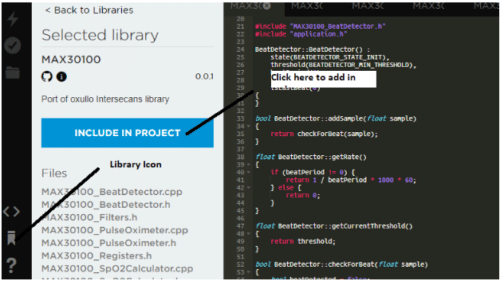
Then add the library in the code. Find the library icon on the left side of the Web IDE and search the MAX30100 sensor. Click on it and then select “insert in code button”. Then select the code file where you want to add.
Next, set the System Mode as Automatic and the System Thread as Enabled. This will help our device to run auto-connect service in the background so that it connects to the Wi-Fi when available without interrupting the main code.

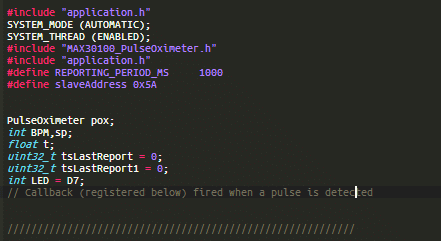
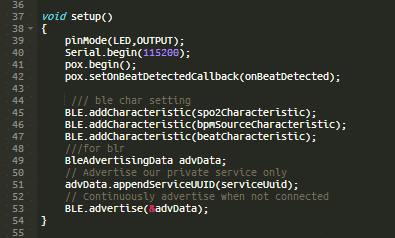
Next, we set the BLE characteristics and services that help our device to transfer the sensor data over BLE. For that, create a setup function where we set the MAX30100 sensor and start communication with the sensor.

After this, we have a loop function that runs repeatedly. In this loop function, we will update the health data as recorded by the sensor and try to push that data to the particle device cloud and also over BLE, so doctors can subscribe to it or access the data of a person from anywhere in the world and thus, perform a check up of that person.
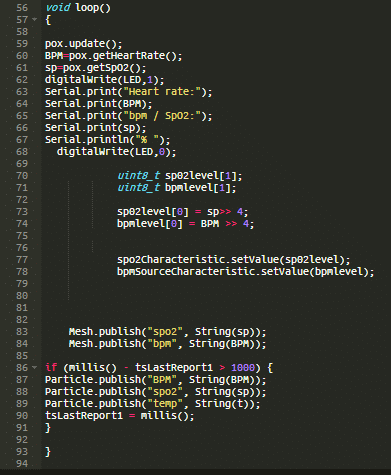
Now power the particle argon and wait a few seconds for it to connect to your Wi-Fi network and the device cloud. Next, upload the code using the Upload Firmware icon found on the top-left side of the Particle Web IDE.

Connection
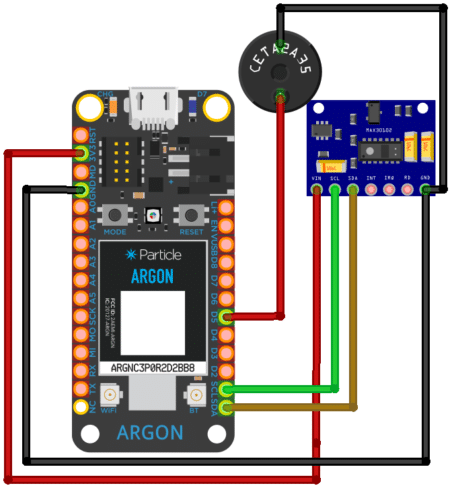
After uploading the code, connect the components as shown in the circuit diagram.
Testing
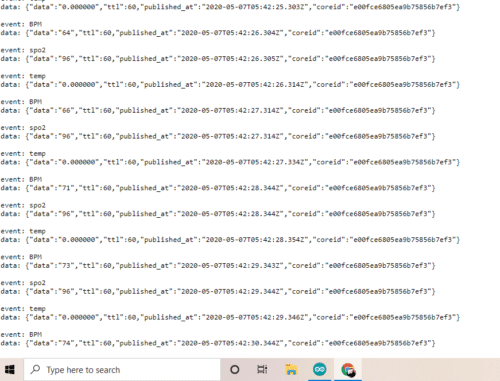
After powering your device with a 3V to 5V battery, wait for a few minutes so that your device gets connected to the device cloud. When successfully connected, the LED on the board starts blinking (like it is breathing). Now open the particle console, copy the URL and paste it in your web browser. Here you can get live health data that can be seen by a doctor from any location.
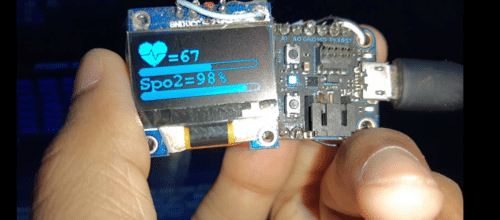
You can also add OLED Display to it here is a pic with OLED display. OLED is extra part project that can increase the cost of development of the project. If you want to add OLED you need to do some changes in code and also need to add the OLED library.


good project applied on pandemic
Hey,
Was wondering if you were able to provide more thorough instructions involving the setup of the OLED display.