
 In this project, ESP-12E WeMos D1 Wi-Fi Uno based ESP8266 shield for Arduino-compatible board and Ubidots website platform are used for sending email or SMS alerts for temperature and humidity monitoring applications. The WeMos D1 uploads the temperature data received from a temperature sensor and continuously sends to Ubidots IoT platform. If the temperature exceeds the set value, an email message is instantaneously sent to the field manager.
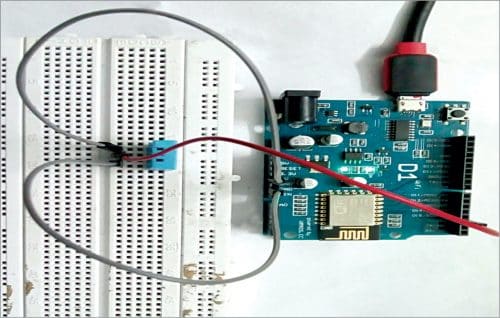
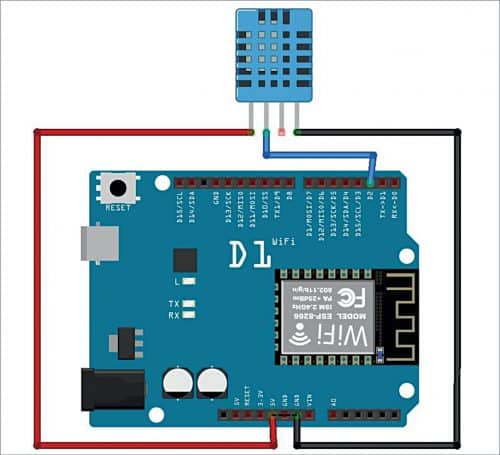
The authors’ prototype of the project showing the WeMos D1 controller board and the DHT11 temperature and humidity sensor is shown in Fig. 1. The interfacing of the sensor with the controller is shown in Fig. 2.
Major components used in this project are described below.
WeMos D1 R1
WeMos D1 is a Wi-Fi development board based on ESP8255 12E. Its functioning is similar to that of NodeMCU, except that the hardware is built resembling Arduino Uno R1. The board looks and works (in most cases) like an Arduino Uno.
Apparently, several shields, sensors, and output devices that are manufactured for the Arduino platform will work on WeMos D1 with the added advantage of built-in Wi-Fi. The WeMos D1 board comes without a USB cable. DHT11 sensor is connected to pin D2 of WeMos D1.The WeMos D1 R1 board used here has one analogue input (3.2V maximum input voltage) and eleven digital input/output pins. (You can also use WeMos D1 R2 board but note the change in position of pin D2.)

DHT11
It is a temperature cum humidity sensor that has four pins. Pins 1, 2, 3, and 4 correspond to Vcc, Vout (output), no connection (NC), and ground, respectively. The output signal is in discrete form with a voltage range of 3.5V to 5.5V DC. In this project, WeMos D1 is interfaced with DHT11 to receive the discrete values of temperature and humidity and upload these values on Ubidots platform. DHT11 is integrated with a high-performance 8-bit microcontroller.
Ubidots
This website provides the users with a platform to create, develop, and deploy their IoT solutions. Typical client experiences begin with the Educational License to prototype projects and get a feel of Ubidots. Then one may migrate to Ubidots for Business once a solution has to be refined or needs a more robust functionality. With Ubidots Education License and credits, users can create IoT applications and explore deployment at no cost.
Once a solution is determined and a proof of concept (PoC) or deployment is needed, Ubidots for Business can be deployed. With additional features, great reliability, and prompt support, Ubidots for Business powers applications from three devices to over 7,500 devices. Ubidots receives the temperature values and represents it in forms like metric, graphical, etc. If the temperature exceeds the set point, an email is sent to the concerned person.

Procedure
The WeMos D1 IoT development board can be set up by following the steps below.
1. Download Arduino IDE software from the link on a computer.
2. Download and install the CH340G USB driver.
3. Version 1.8.5 of the Arduino IDE introduced official support for adding third party boards to the new Board Manager. So, go to github link where you will find a green colour button for ‘Code.’ Click on this button to download the zip file (Download ZIP).
4. Install and open the Arduino IDE software. Go to Sketch→Include library→add .ZIP library. Add the downloaded zip file from your computer drive or files.
5. Go to Files→Preferences. Copy the link and paste it in the additional board manager in the URL text box and press ‘ok.’
6. Now go to the Tools→Board→Board Manager. In the search box, type esp8266 and select ESP8266 Community to install it and then close.
7. To update the board, go to the Tools→Board→Scroll down and choose your WeMos D1 board category and update your board.
8. Download the zip files (ubidots-esp8266-master.zip and DHT-sensor-library-master.zip) for Ubidots and DHT sensor.
9. Add the two header files in the source program Ubidots_temperature_and_humidity_email.ino as shown in Fig. 3.

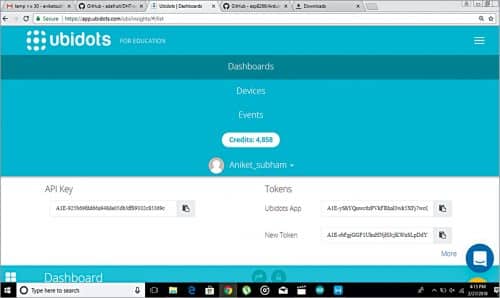
10. Now go the Ubidots platform and sign up. Next, in the right-hand side upper corner, click on the three dash lines icon, select API credentials and token.
11. Copy the token. Paste it in the program source code. Then in the Ubidots site, select Devices option, add one device (for example, monitoring) and add two more variables for temperature and humidity, separately. Copy the IDs of these two variables and add in the program code at ID_1 and ID_2.
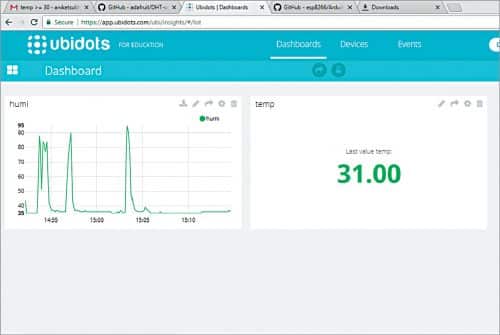
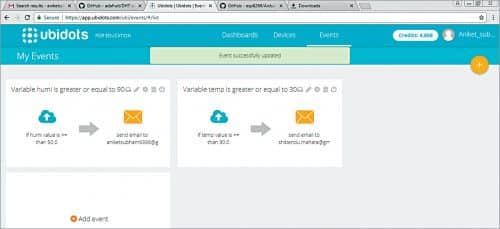
12. In Ubidots, select Dashboard. You can monitor the values coming from DHT11 sensors (see Fig. 5) and at Event you can set the objectives as shown in Fig. 6. For example, if the temperature or humidity rises above the threshold, an email will be sent to the user. SMS messages can also be sent to a smartphone.
13. You can also get the Excel file for temperature and humidity values from Ubidots.
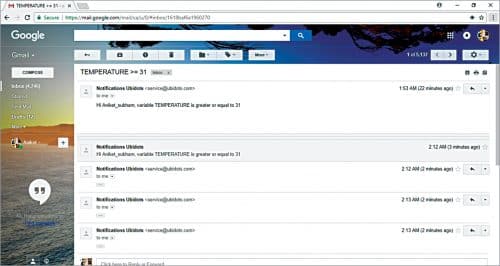
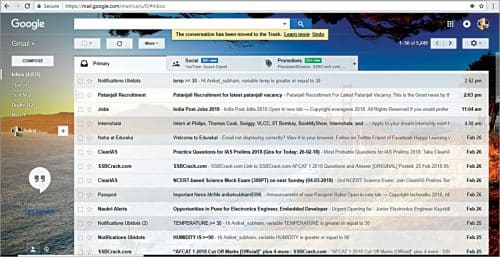
The email messages/notifications or SMS alerts generated by Ubidots are shown in Figs 7
through 9.

Download Source Code
Aniket Subham has a keen interest in designing MCU-based embedded systems
Shibendu Mahata is M.Tech (Gold Medalist) in instrumentation and electronics engineering from Jadavpur University. He has more than twenty papers to his credit in the domain of signal processing in reputed international journals and conferences.
Please note: If you are unable to download the source code, please try to open the page in incognito mode and retry or temporarily turn off the antivirus before downloading.
