
 If you’re still using traditional keyed locks, then you must be always worrying about losing the key or somebody breaking into your house. With traditional locks, there is a higher risk of keys being misplaced or getting into the wrong hands. As a result, many people are now opting for modern biometric locks to enhance the security of their houses. Unlike the traditional lock, a modern biometric lock requires no key to lock or unlock the door. You no longer need to carry a bunch of keys wherever you go, as you just have to use your fingerprint to unlock/lock the door. But as these smart locks are made using biometric sensors, they come with heavy price tags.
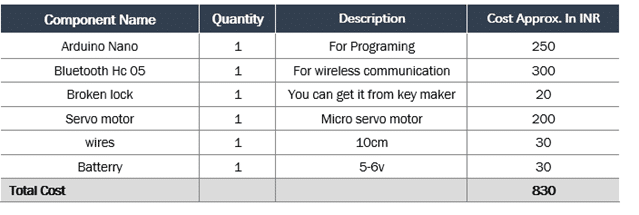
This DIY project will help you to build a low-cost biometric lock. We all have biometric fingerprint sensors in our smartphones. Today, I’m going to use this sensor to make a prototype of the biometric lock at just Rs 850.
Before starting this project first gather these components: –
Bill of Material

Wireless Biometric Lock – Coding
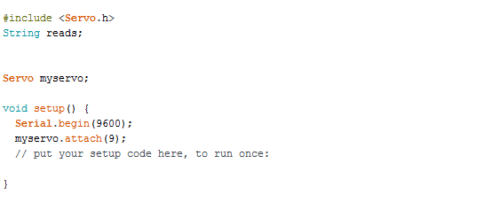
First of all, we will create a program in Arduino IDE and upload it on the Arduino development board. This Arduino program will help create communication between our smartphone and Arduino over Bluetooth. This will enable it to check commands coming from smartphones to perform tasks.
To develop the code, first we have to create a string variable that stores the unique device ID for lock, and then add the servo library. Next, we will set serial baud rate for Bluetooth communication. Here in this code, we have used the baud rate 9600 for Bluetooth communication. You can use different baud rate according to your Bluetooth HC 05. After setting baud rate of Bluetooth HC 05, set the pin for servo motor that we are going to use. (Refer fig 2).
After this, we will create a loop function to store the device ID sent by the Bluetooth in “reads” string. After that we have to create an ‘if condition’ for checking the device ID sent from the Bluetooth. If the fingerprint matches in android app then that app sends the device ID to Arduino. And if this ID matches with the one set in Arduino then the servo motor moves to unlock position.

If the Bluetooth reads the wrong fingerprint, then it automatically turns the servo to lock position. (Refer Fig .3)

App Making
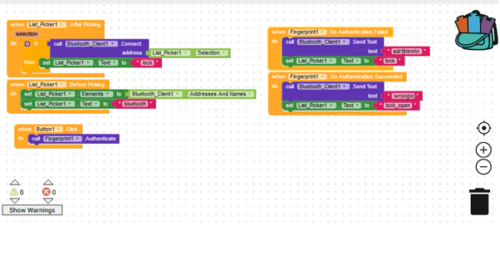
We can make the app in two different ways – one in Android Studio and other in Kodular. In this project, we are going to use Kodular, which basically have different code blocks. You can make an app by combining these blocks. It is easy and saves time in coding. But for the developers who love coding, they can use Android studio. You can ask me in the comment section if you want me to make an app using android studio as well.
Use any web browser and open Kodular website to start making app.
First, we add the following components in layout for app: –
- Bluetooth Clint
- Fingerprint
- List view
- Image Button

After that join the code blocks as shown in the picture below. Then export the .apk to your PC and install that app in your phone.
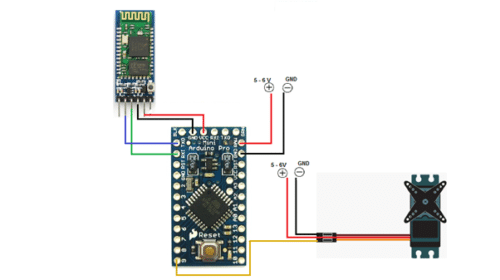
Wireless Biometric Lock – Circuit Connection
As we have completed our app and uploaded the code to Arduino. Now let’s connect the components as illustrated below.
| Arduino | Components | |
| Rx | Bluetooth TX | |
| Tx | Bluetooth Rx | |
| 5V | Bluetooth 5V | |
| GND | Bluetooth GND | |
| GND | Servo Motor GND | |
| Pin 9 |
Servo Motor Signal Wire (Yellow coloured)
|
Making Wireless Biometric Lock
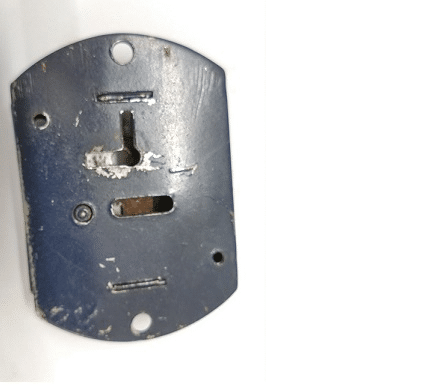
Next, follow the steps given in pic to prepare the lock for the biometric locking system.
Step 1. Get any broken lock from the market or from any hardware shop.
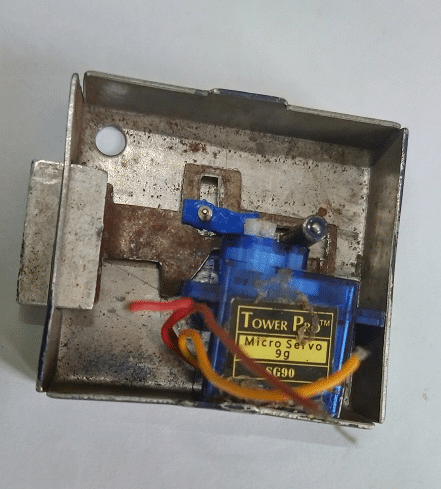
Step 2. Now attach the servo motor moving shaft to the lever of the lock as shown in the pic below.
Step 3. Then close the cover of the lock and connect all electronic components as illustrated in the connection section.
Testing
Now, power the lock and servo with a 5-6 V battery and then open the app that we have created.
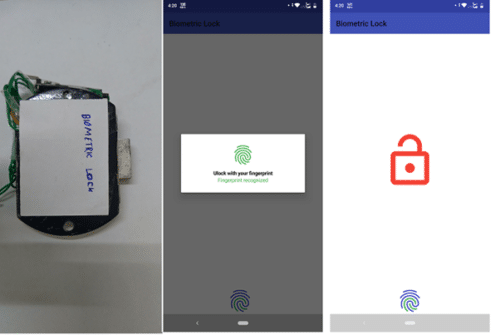
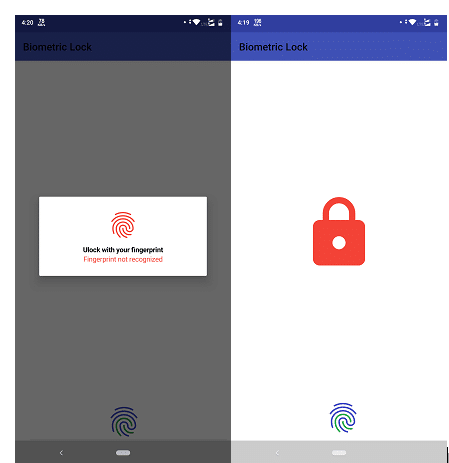
After that turn on the Bluetooth of your phone and then pair the Bluetooth HC 05 with your phone. After a successful connection with Bluetooth HC 05 with your app, the Bluetooth Icon changes into Lock Icon. (Refer to Fig 9)

After that touch the fingerprint icon. When you touch the fingerprint icon, you will get a message box asking you to unlock with fingerprint. Now touch the fingerprint sensor on your phone. If it matches with the fingerprint set in your phone, then it turns the lock to ‘on position’ and at the same time the lock icon changes into unlocked icon. (Fig 10).

If you give the wrong fingerprint then the lock moves back to its locking position (Refer to Fig 11)
You can download the code from the link below-


sir, can you please send me app of Biomatric lock I don’t know how to create please send me imitately as soon as thank you
the app is attached with the .apk format article. click on download button. .aia file is also attached you can import it in kodular and customize it and make your own app using that .Ask me for if you face any problem.
can u please upload the code needed in android studio
I think the app doesn’t work
What problem are you facing can you elaborate.
The servo motor doesn’t move, it’s stuck in the same position even after pairing and right fingerprint. Please help
Have you connected the servo motor pin GND to GND pin of Arduino.Please check.Also check is the Bluetooth is connected with app.If problem still not solved then me revert me back.
There is a error occuring while uploading code
What error?elaborate. Follow these steps below fro troubleshooting
First compile the code if the code compile sucessfully then you need to select the right board and port to upload code to your board.
if compilation give error then send that in the comments.
sir can please the android studio for fingerprint recognition sir
I want to make a door unlock project. I have using 16to2 lcd display 4*4keypad and solenoid .So I want to connect it with mobile fingerprint too for unlocking door lock so help me..
I want to make it with nodeMcu by connecting it with Wifi inbuilt on it.
can u please add code for android studio
How can we code in android studio
How can we code in android studio
Ok will upload it soon
How can we code in android studio. pls help
can i use arduino uno instead of nano???
I too need a reply for this sir…. Pls gelp us
How to lock it back sir?
First When you give right fingerprint then it gets unlocks and when you give wrong fingerprint it locks again.
For unlock :- Right Fingerprints
For Lock :- Wrong Fingerprints
NEED urgent HELP!!
I have used the app and connected to Bluetooth but the servo motor does not move and is stuck on same position ..ive tried multiple programs on the servo ,the motor is working..but I think the app is not working
Sir what unique device ID we have to give in the Arduino code?
Sir what if that phone doesn’t have an fingerprint sensor… Why can’t you add an pin to that app
This project is about bio-metric lock so I can’t use pin. But you can also make this happen with phone. If you want to make pin based lock ask me I will help you.
Hi sir….. Whether we can use arduino UNO instead of arduino nano
Yes Arduino also works code remains same.
Hi sir whether we can use arduino UNO instead of arduino nano
Yes You can also use UNO but if you want to make small and compact nano is a good choice
The diagram you have provided is of Arduino mini. The you have listed as arduino nano.
sir,how to create this project in nodemcu
Code remains almost same for Node MCU.Only change pin number according to node mcu. Tyr yourself if you face any problem or need any help you can ask me.
sir,how to create this project in nodemcu…..plz reply sir
code almost remains same for node mcu also.just edit the pin numbers and do Bluetooth 05 connection according to that
Does the project work? Has anyone done this project? We’ve tried everything fir multiple times but the servo motor doesn’t move. Is there a problem? Please help.
Do some test steps.
First check is the data send from the App to Bluetooth is receiving by Arduino. if not try to swipe the RX TX pin of Bluetooth.
Next test the servo motor by trying the Servo Sweep example. If this example didn’t move your servo you need to change your servo motor.
If still face any problem ask me and elaborate your problem what exactly happening with you device.
Is there any disadvantages
I tried this project everything is good but the problem I face is, when the fingerprint is recognised the servo motor turns to some extent (80°) and returns to its original position immediately. Actually it must turn and stop there, when the fingerprint is again recognised it must come back.Help me to make this, t I think the the problem is with the code.
Check that servo motor with other code is the servo motor is right and working
Can u send the android studio code please
Ok soon I make the same app with Android studio and will share the code
Any updates Sir?
Can you provide us the android studio code for app development
Can you give me the circuit diagram of this project
can you send android studio code
Can you please share android studio code???
Circuit diagram of this project??
Can I purchase this project?
Where to connect servo motor three wires please elaborate…immediately
Connect Servo red wire to 5V +v terminal of the battery and black wire to the -ve terminal of the battery. Then connect the yellow wire to pin 9 of Arduino. Also, connect the black wire of the servo to the GND of Arduino if using a separate power for the servo and Arduino.
What is the type of broken lock we ae supposed to use.. I am not understanding the type of Lock..
COULD YOU PLEASE SHARE A PICTURE of the Broken Lock which has to be used in this project
THANKYOU
Hey ma’am the source code is not opening pls help…can I get it from e-mail ?
I have checked its opening.Wait till the zip folder get download then open. only .ino file will open the .apk file need to install on phone and .aia file for app code you need the MIT app inventor
Thankyou ma’am eagerly waiting for android studio code.
hi is is possible to use DC 12V Solenoid Electromagnetic Cabinet Door Lock
https://www.electronicscomp.com/dc-12v-solenoid-electromagnetic-cabinet-door-lock
instead of broken lock and servo motor
my insta – https://www.instagram.com/deeeepc/
yes, you can use 12V selonoid but you have to drive solenoid using Relay module or MOSFET also need to modify code from servo to digital output for unlock
Hello, I want to buy this product for my semester project. Please Email me if you are interested in selling.
Ask to [email protected] regarding the kits
Hi Ashwini,
I have a use case and thinking of creating a similar product. Wanted to check the feasibility and if we can create a final product suitable for end user.
Let me know if you interested, we could have a discussion about the same. Please email me back if interested