

What pilots see while flying drones is the low-latency analogue video from a first-person view (FPV) camera. FPV cameras are compact and lightweight module mounted on the drone that broadcasts real-time video back down to the pilot with the help of a dedicated video transmitter module. Here are the things to consider when equipping your drone with an FPV camera.
FPV system overview
First-person view, also called video piloting, means flying the drone from the perspective of a true pilot by using an onboard video camera and wireless downlink. In the last couple of years, various vendors have started to sell kits that contain the minimum FPV system components needed to outfit a drone for FPV flight. First, let us go through the various components that you need to upgrade/build a drone for FPV use. 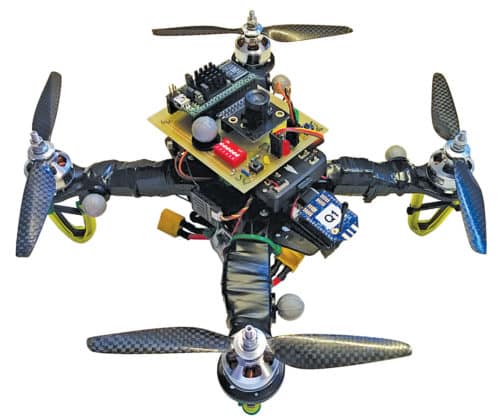
Fig. 1: FPV drone

Video camera
FPV cameras use either an inexpensive complementary metal-oxide-semiconductor (CMOS) or a bit pricey charge-coupled device (CCD) image sensor. The image sensor of the camera fundamentally affects its performance. Also note that a camera with a wide input voltage range offers flexibility when wiring the FPV system.
Video transmitter
Video transmitter takes the analogue signal from the camera and sends it out through an omnidirectional antenna. As the video transmitter is typically designed to work in one of several frequency bands, usually a channel selector switch is provided on the transmitter to set the exact frequency for video signal transmission. 
Fig. 2: An FPV camera module
Video receiver
Video receiver with an appropriate antenna is a vital component of the ground station. Output of the video receiver is fed to a portable video display (small-screen video monitor, or video goggles). Usually, standard lithium polymer (Li-Po) batteries are used as the power source for the video receiver and monitor in all ground stations. FPV camera insights 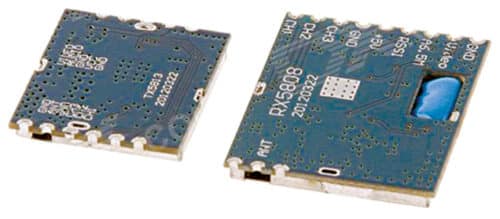
Fig. 3: FPV transmitter and receiver modules
Image sensor
The image quality of CCD cameras is undoubtedly better than CMOS. However, CMOS cameras are cheaper than CCD, and provide good enough performance for most FPV applications.
Latency
The time between a stimulus and the response is called latency. It reflects the processing speed of the camera. Faster processing lowers the latency, and an FPV camera with a latency of less than 40ms is a standard choice. 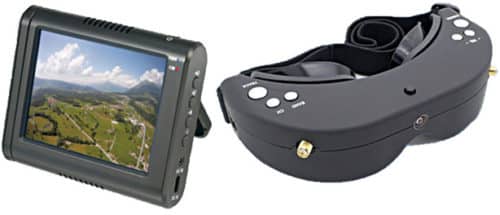
Fig. 4: FPV video monitor and goggles
Field of view
Expressed as an angle, it is a measure of how much the camera can see around. Usually, for FPV applications, having a wider field of view is better as it allows you to see more around you. However, this can sometimes show distorted images with curved horizons.
TVL resolution
TV line (TVL) is a measure of the camera’s horizontal resolution. Cameras with a high TVL resolution can capture highly detailed images. Most FPV cameras work on analogue video, and that’s why the measurement is in TVL, rather than actual pixel counts common with digital video. Common TVL resolutions for FPV cameras are 20, 480, 600, 800 and 1000. 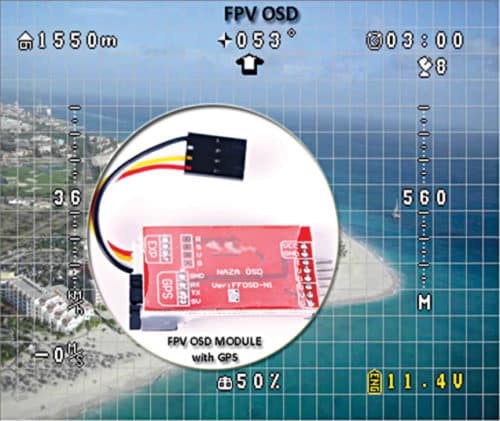
Fig. 5: FPV on-screen display
Aspect ratio
There are two common aspect ratios to choose from, 4:3 and 16:9. While selecting, keep an eye on the native aspect ratio of your FPV monitor/goggles. This is crucial because if you have a 4:3 camera but 16:9 display, the image appears debased, and if you have a 16:9 camera but 4:3 display, the image appears crushed.
Video encoding
PAL or NTSC? Actually, it’s not a big issue as both PAL and NTSC encoding standards are supported by most FPV gears. PAL offers higher resolution, while NTSC allows higher frame rate. So if you want to have good-quality pictures, consider PAL.
WDR
The wide dynamic range (WDR) of an FPV camera dictates how well the camera can record details in very dark and very bright portions of the image. Nowadays most FPV cameras have wide dynamic range by default.
OSD
An on-screen display (OSD) device overlays text/data onto the camera footage. So it can display highly useful information such as the flight speed, altitude, distance and battery status on the FPV display screen.
MIC
Sound is a big part of the FPV flying experience, so if you have an FPV camera with built-in microphone you get many benefits. For example, you can hear the throttle response even when you are far away.
IR filter/LEDs
As with almost all other camera types, FPV cameras have an infrared (IR) filter built into them to block out any infrared light from reaching the camera sensor. However, there are some odd situations when you want to have an infrared-sensitive camera, especially at low light levels. So if you want to fly when it’s darker, look for a starlight FPV camera, which has a very low lux sensitivity and hence can work in very low lighting conditions. As an alternative, you can try a standard FPV camera fitted with some infrared light-emitting diodes (IRLEDs) on its front side.
There are some exceptional 3D FPV cameras, too. In principle, a 3D FPV camera is a perfect blend of two FPV cameras to make the illusion of an actual flight. 
Fig. 6: FPV camera with MIC and IR LEDs
Other things to consider
In the market, you can find several FPV drones with cameras and video transmitters already installed, and video displays built right into the radio-controllers. However, by selecting your own airborne and ground station components, you can put together a much higher performing and flexible drone rig that grows with you as you move on to bigger ones. Well, here is some other practical information about the supporting components of an FPV camera.
Radio frequency and channel
FPV transmitter frequency is the most important thing to consider. Nowadays most FPV equipment run on 5.8GHz, as it is allowed for FPV use in most parts of the globe. Also 5.8GHz antennae are much smaller, which makes 5.8GHz transmitters cheaper and easier to use. You can also use 2.4GHz band. However, since almost all radio-controlled (RC) equipment run on 2.4GHz, you will receive lots of interference in this band. Today, it’s common to find 32-channel (32CH) and even 40-channel (40CH) FPV transmitters. Having a multiple-channel FPV transmitter is useful when flying with other FPV pilots, as each pilot can fly on a different frequency and hence your FPV video will not interfere with theirs. Note that each transmitter has a frequency table that lists the channels, bands and corresponding frequencies. Also, it is very important to ensure that the FPV transmitter is compatible with the FPV receiver, monitor or goggles. Fortunately, today’s 40-channel transmitters are compatible with almost all FPV receivers, monitors and goggles. 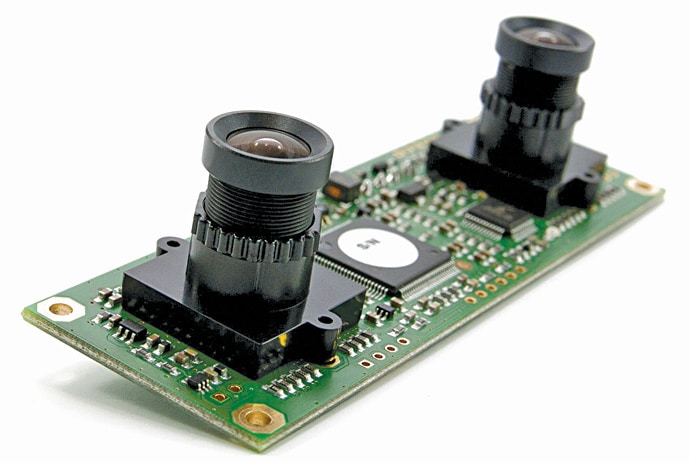
Fig. 7: Nerdcam 3D FPV camera
Antenna
The type of antennae used can make or break an FPV system. Although the antenna that comes with the transmitter/receiver will work well, you need to use a lightweight circularly polarised antenna to get a long range and clear reception. Else, go for the type recommended by the radio module manufacturer.
Electric power
Typically, video transmitters and receivers operate off 3.3V to 5V/12V DC supply. Many FPV cameras also have the same operating voltage range. By using components that operate at the same voltage level, it will be easier for you to wire the system straight to a suitable LiPo battery supply. 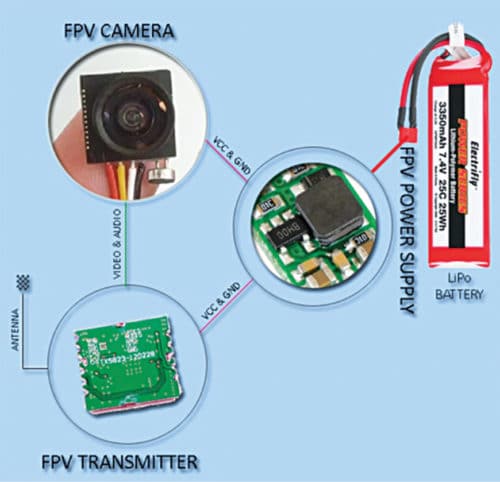
Fig. 8: FPV camera and transmitter setup (airborne)
If the camera and other components need different voltages, or the airborne electrical system delivers a dissimilar voltage, it becomes necessary to use separate voltage regulator modules for each device. A wide variety of miniscule DC-DC step-up (boost) and step-down (buck) regulator modules are available for these purposes. Once you learn to handle diverse components that make up a basic FPV, and build a functioning system with them, you are ready for your first ground test and maiden flight. Go, fly it!


