


A waveform generator is a commonly used test and measurement instrument in electronics laboratories. Waveforms of different functions, frequencies, and amplitude levels are often required to test the functionality of electronic circuits.
Although the circuit presented is not a complete substitute for a laboratory-grade signal generator, it serves as a waveform/signal generator with widely used standard waveforms, such as sinusoidal, square, triangular, and linear forward and reverse ramps under software control.
Moreover, since it is completely software-driven, it provides the added advantage of an ‘arbitrary waveform generator’ allowing users to design and generate custom signal waveforms with adjustable rates (frequencies) or wave shapes.

The device uses the popular Raspberry Pi SBC as the main host controller, along with a few easily available, low-cost components that both hobbyists and professionals can assemble quickly. The software is written in Python for the Raspberry Pi.
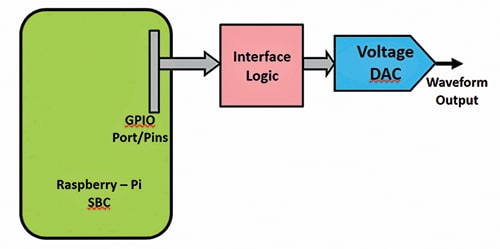
Fig. 1 shows the block diagram of the Raspberry Pi-based waveform generator. The components needed for this device are listed in Table 1.
| Table 1: Bill of Materials (Component List) | ||
| Name (Label) | Value | Comments |
| Raspberry-Pi | Board | For connecting GPIO pins |
| 74HC595 | IC | 8-bit serial shift resistor |
| C1 | 100nF | Ceramic disc capacitor |
| D1 | LED | 5mm red/green |
| J1 | 2-pin header, male | Berg strip output connector |
| J2 | 3-pin header, male | Berg strip (optional); see text |
| J3 | 8-pin header, male | R-Pi interface connector |
| R1 | 1-kilo-ohm | 0.25W, 5% CFR resistor |
| R3, R5, R7, R9, R11, R13, R15 | 10-kilo-ohm | 0.25W, 1% MFR resistor |
| R2, R4, R6, R8, R10, R12, R14, R16, R17 | 20-kilo-ohm | 0.25W, 1% MFR resistor |
| R18 | 4.7-kilo-ohm | Pull-up resistor (optional); see text |
| SW1 | Tactile key 6mm | Key input (optional); see text |
| Jumper cables | 10 | Female-to-female jumper wires to connect the two boards and output |
Wave Form Generator Circuit and Working
