The 12v battery charger-cum-variable power supply circuit presented here can charge a 12V lead-acid battery of 50Ah to 80Ah (even up to 100Ah) capacity and can even be used as up to 18V DC variable power supply of maximum 5A capacity, which is useful for a test bench. The circuit can automatically detect the presence of a battery connection and start charging. At that time, it disconnects the output provided as variable power supply. It also detects the wrong/reverse polarity connection of the battery terminals and raises an alarm. The charger initially charges the battery at a higher voltage (about 14.2V), and once it is fully charged, it maintains the battery charge at a constant voltage (about 13.4V).
Battery charger-cum-variable power supply circuit
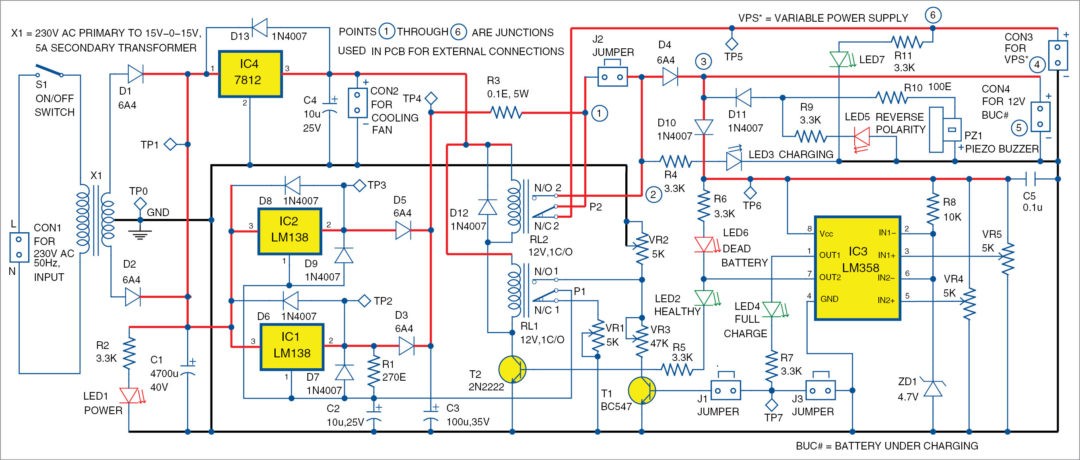
Circuit of the 12V battery charger-cum-variable power supply is shown in Fig. 1. It is built around two LM138 variable voltage regulators (IC1 and IC2), dual op-amp LM358 (IC3), 12V voltage regulator 7812 (IC4), two relays (with normal 12V, 1C/O PCB-mounted and 12V, 1C/O, 10A contact-current rating) and a couple of transistors.
LM138 is a 3-pin, 5A positive-voltage regulator available in TO-220 or TO-3 package. But continuous current flow of 5A generates a high temperature, which shuts down output of LM138 automatically due to its internal thermal protection.
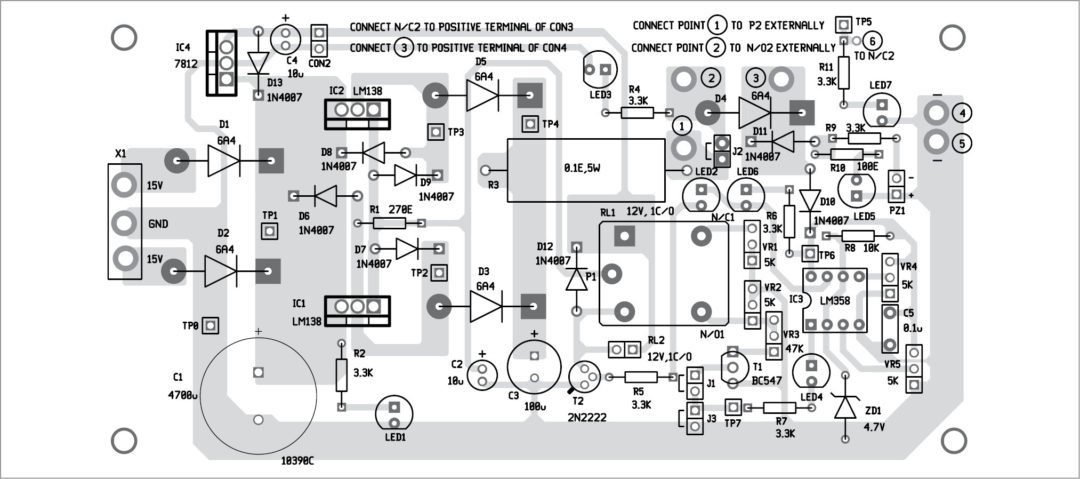
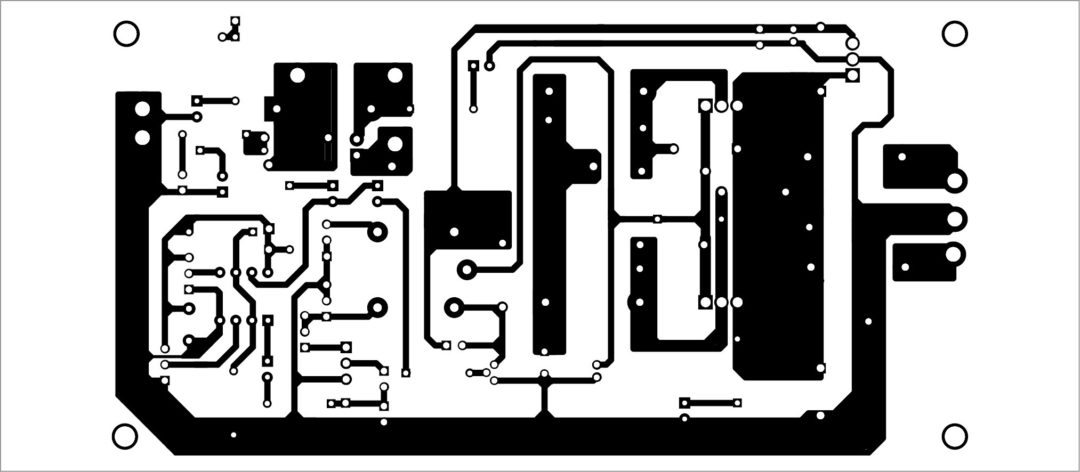
Download the PCB and component layout PDFs: click here
This circuit simplifies higher current handling of LM138 by using IC1 and IC2 in parallel, but still output voltage can be regulated by a single variable resistance. Care should be taken for handling the lines carrying 5A current. Two separate relays (RL1 and RL2) are used to reduce the cost of the project.
Circuit operation
Transformer X1 steps down 230V AC to 15V-0-15V AC that is then rectified by diodes D1 and D2 and smoothened by capacitor C1. This voltage, which is around 20V DC, is fed to IC1 and IC2 that are wired in parallel. Their output voltage is regulated either by VR1 (in case of variable power supply) or VR2 (in case of battery charger), which is selected by relay RL2. Output so obtained is available for the variable power supply or battery charger through RL1.
Dual op-amp LM358 (IC3) is used to control the relays and select the type of output, that  is, whether for battery charger or variable power supply. When no battery is connected for charging, no power is given to IC3. RL1 and RL2 are in non-energised state, and potmeter VR1 can be used to get variable voltage output across CON3 fitted on the cabinet.
When a 12V battery under charging (BUC#) is connected properly to terminal CON4 for charging, IC3 gets power supply from the battery through diode D10. If battery voltage is below ‘dead’ voltage (say, 6-9V and at least above 6V), pin 7 of IC3 pulls low and LED6 glows. If the battery is healthy (say, more than 9V), pin 7 of IC3 goes high and switches on LED2 and conducts transistor T2, and RL1 and RL2 energise.
Output voltages of IC1 and IC2 are regulated by VR2 and are available for charging at CON4. Once the battery under charging attains its full charging voltage, pin 1 of IC3 goes high, as indicated by the glowing of LED4, and T1 conducts, which reduces the voltage at pin 1 of IC1 and IC2.
When a 12V battery is connected in reverse polarity, D11 conducts, which, in turn, switches on the piezo buzzer and LED5 glows. This protection is important while charging batteries externally.
Construction and testing
A single-side PCB for the 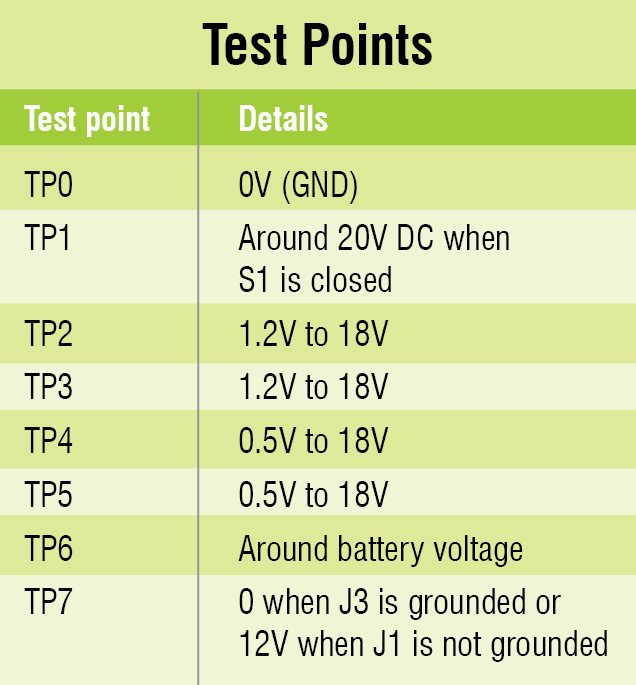 12V battery charger-cum-variable power supply is shown in Fig. 2 and its component layout in Fig. 3.
After assembling the circuit on the PCB, place it in a suitable cabinet. Fit CON3 and CON4 on the front side of the cabinet. CON3 is for variable power supply (VPS*) and CON4 for battery under charging (BUC#).
Connect CON3 between N/C2 terminal of relay RL2 and point 4 given on the PCB. Connect CON4 between points 3 and 5 given on the PCB. Fix VR1 through VR5 and all LEDs on front side of the cabinet, and label these as shown in the circuit diagram.
Place transformer X1 inside the cabinet. Fix CON1 and switch S1 on the rear side of the cabinet. Use proper heat-sinks for IC1, IC2 and IC4, and connect a 12V cooling fan at CON2 for fast cooling.
The circuit works off 230V mains power supply. Refer the test points table for checking the voltages at various points before using the circuit.
Initial setup and testing
- Remove jumper J1 and J3, connect J2 and switch on S1.
- Adjust VR1 and VR2 to get 9V DC (as battery dead voltage or as required) with respect to ground at TP6.
- Adjust VR4 such that you can turn on and off status LED2 and LED6 alternately. RL1 and RL2 also change their states (energise/de-energise).
- Adjust VR2 to get the full battery voltage (say, 13.4V DC with respect to ground) at TP6.
- Adjust VR5 to turn on LED4, if TP7 is connected to ground through J3.
- Once LED4 is set, adjust VR2 to get battery charging voltage (say, 14.2V DC with respect to ground) at TP6.
- Connect J1 (J2 still connected) and adjust VR3 to get battery standby voltage (say, 13.4V DC with respect to ground) at TP6.
- Once the required voltages are set, remove J2. The circuit is ready to use.
- If no battery is connected at CON4, variable voltage is obtained at CON3 by using VR1. Brightness of LED7 is proportional to the output voltage at CON3.
- If 12V (>=50Ah) battery is connected at CON4 in reverse polarity, buzzer PZ1 gives an alarm sound and LED5 glows.
- If the same battery is connected in correct polarity at CON4, status of the battery is indicated by LED2 (healthy) or LED6 (dead). RL1 and RL2 will get energised in case the battery is healthy and the battery will get charging voltage. Once the battery is fully charged, LED4 glows, which indicates that the battery is fully charged and the charger is at standby voltage.
- Use proper crocodile clips for connecting the battery terminals.
EFY note
1. Charging voltage, standby voltage and battery dead voltage may vary as per the manufacturer of the battery. The values indicated here are safe voltage values.
2. Heat-sink with mica insulation must be provided for IC1 and IC2.
Fayaz Hassan is a manager at Visakhapatnam Steel Plant, Visakhapatnam, Andhra Pradesh. He is interested in microcontroller projects, mechatronics and robotics


Thanks Mr. Fayyaz Hassan. Great work that you have brought through this article. May we discuss further if you are interested to be a part of our upcoming project as virtual guide for technical assistance. Please revert back to Mob. No. 9767720880 or report to [email protected].
Thanks for the feedback! We have forwarded your message to author.
Thank You So much for the circuit.
But I can’t find a position for relay Rl2 on pcb. Its not listed in pcb diagram. Kindly guide through it.
Yes correct we are waiting for your answer please
I thing RL2 maybe external relay
During initial setup of circuit, should the battery be disconnected or connected when setting charge, dead, float voltages etc?
Hello
I need an 18v auto charger
If you send an orbit, I will be very grateful
Is this 12 volt circuit up to a 18 volt charger? Which part should be replaced?
How should i make it
Thank you
I am waiting for your mail
the same as the question asked by our friend Mr. Usama Naveed. During initial setup of circuit, should the battery be disconnected or connected when setting charge, dead, float voltages etc?
Do the transformers available in local market rated 5 Ampere output the full 5 A current or only half the current ?
As it’s said that no electrical or electronic device can deliver full 100 percent power, so I want to know whether any transformer available has 100 % efficiency or only 50 % ?
Several modifications must be made to the board, capacitor 1 of 4700uf is very close to lm138 ic1 which makes it difficult to install a chlor heatsink in that area, the same happens with lm138 ic2 it has components around it that do not allow installation of heatsink, I am currently assembling the circuit in proteus for its simulation and the creation of the pcb with its corrections.
You need not use big heat-sinks. You can easily install heat-sinks of suitable size for both the ICs in vertical positions. If you want to use your own PCB layout designs, you can give more rooms as per your requirements.
Hello, Can I ask for this circuit with Arduino uno and code?
Hi, the source code is present within the article and there is no code for this project