


All smartphones are capable of taking pictures, storing and re-display. Therefore, creating another camera is not a very popular task to be considered seriously by anybody certainly not for me. But if using a few discrete items like an inexpensive esp32 with cam and an OLED display, an RTC and a small push button and you can create a battery-operated camera of your own that will take pictures completely under your control. By pressing a button or by the presence of an object, by motion sensor or say standing in front of touchless temperature sensor it discretely takes the picture of someone whose body temperature is not good. This is certainly not a useless idea because you cannot deploy your smartphone in this dumb way! Can you?
Adding a small PIR sensor you can rejig it to take pictures of intruders secretly! Or just the esp32-with-cam & OLED you can make it as an awesome webcam connected on any of the several networks around the vicinity and then publish it on the intranet. Also by deploying the port forwarding feature of your modem, you can publish the picture on the internet. This feature comes in very handy for those who need a second camera for demo purposes of their webinars / online classes. The cost of this ESP32-camera is INR: 900 only.
Bill of Material
- ESP32 with Camera & SDCard = 900.00 [robu.in]
- OLED display 0.96 inches = 250.00 [robu.in]
- Any I2C RTC – DS3231 / DS1307 = 100.00 to 300.00 [robu.in]
- USB to Serial FTDI chip= 250.00 [amazon.in]
- LM1117 3.3 Volt regulator = 20.00
- Battery , PIR Sensor, capacitors etc extra.
Original project
After installing latest Arduino IDE and then selecting board for ESP32 if you go to “file – example – esp32 – camera – webserver” you will get the ESP32 webcam project. Its already available there. These following two projects are extensions of this original project.

ESP32 webcam-with OLED
In the original project there was no multiplicity of WiFi network choice and there was no way to know the IP address of the webcam unless it is connected to a PC to see the serial terminal output. The original project is augmented to cater to connect to any network available in the vicinity and once it is connected, it displays into which network it got connected and what is it’s IP address allocated etc. on the tiny OLED.
Schematic of ESP32 webcam-with OLED
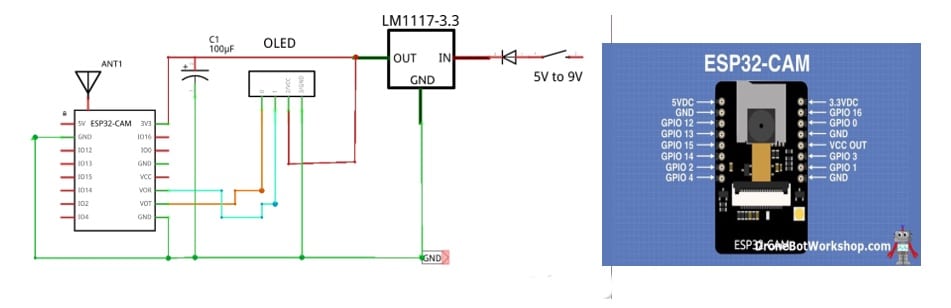
The ESP32_cam is shown on the right side against the schematic on the left. Very few GPIO pin is left for use after the SDCard and the camera is connected. GPIO 4, GPIO 12, GPIO 13, GPIO 1, GPIO 3 only these are the free pins available for our use. GPIO 1 & GPIO 3 is also used as Serial pins for uploading the program in flash mode. Therefore, 1 & 3 pins are to be completely free from any connections while uploading programs.

In the webcam project we can use pins reserved for the SDCard pins easily as we are not using the SDCard facility. However, we have used 1 & 3 as I2C pins for connecting the OLED display and that way we have maximized our free GPIO pins availability.
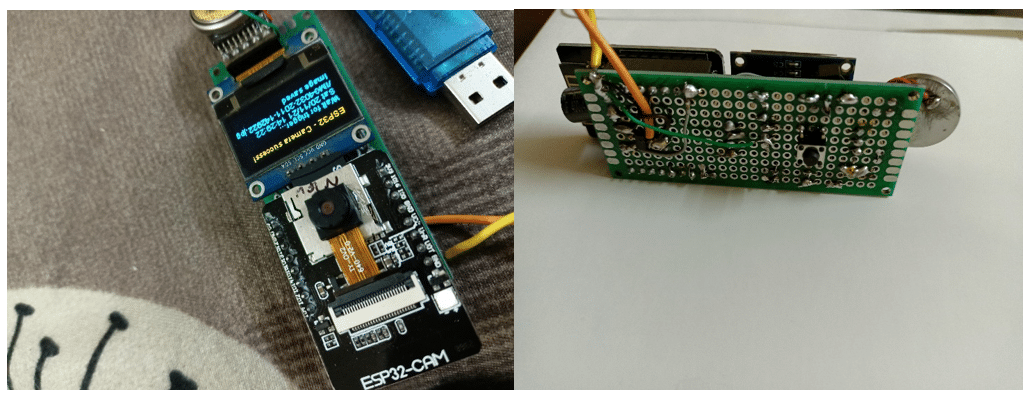
Prototype
Webcam with OLED to display its network name & IP address.

Working principle of ESP32 webcam with OLED
We have made it very simple. The ESP32 will search for available networks provided in the programs and then try to connect serially one after another. Once it gets connected with one network, it stabilizes. The status of the camera-ready shows up on the OLED along with network ID and the IP address it has been allotted to the Web camera. To access the camera one has to connect to that network and then call that IP address in any browser. The port address is kept default [8080]
Software for ESP32 webcam with OLED: click here
Prototype: ESP32 Camera with OLED & RTC and a push_button on the back
Schematic
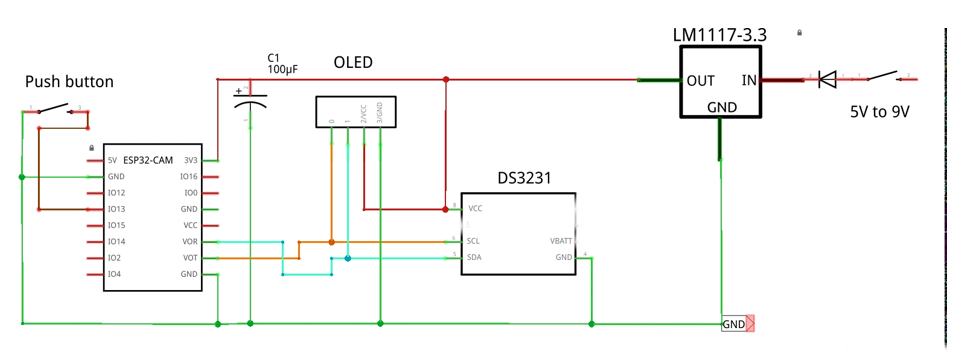
In the camera project, after attaching the camera & the SDCard ,very few GPIO pins left for work. Pin-4 is used for flash light, deploying the built_in ESP-32 super bright LED as an extra light source for the camera. Pin 13 is used as the trigger pin for taking pictures. The program stamps the time on the file name and then stores serially in the SDCard. Normally the ESP32 goes into deep sleep mode after taking a picture. Pin 13 is used up for wake-up pin as trigger button from deep sleep. For triggering, Pin-13 is grounded once and the ESP32 wakes up to take picture. This helps to preserve battery power during idle time when no picture is being taken.
Working Principle of ESP32 camera with OLED & RTC
To have flexibility with availability of free GPIO Pins we have converted GPIO Pins 1 & 3 to I2C pins and then on it connected the OLED and the DS3231 RTC. We assume any I2C real time clock will work with this model with little or no changes in the sketch. To have it triggered the push-to-on switch on Pin-13 to be pressed once. However, the project can be extended from here to any of your imaginations!!!
Triggering mechanism schematic
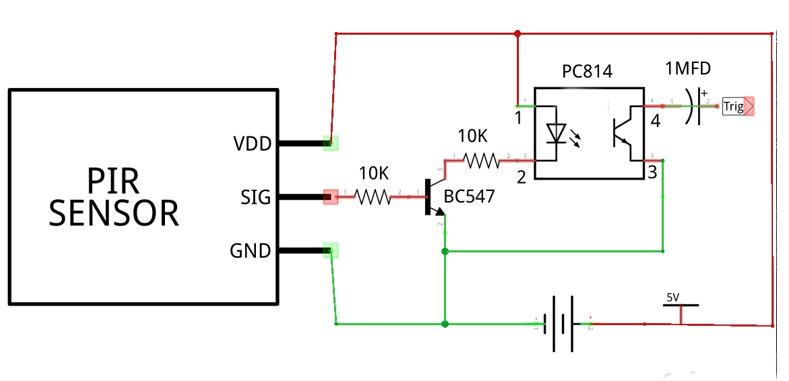
We can use a PIR sensor on 5V [some even works on 3.3 Volt] to trigger the Pin-13 of ESP32 Camera. However, to make it fully isolated, we recommend to use an opto-coupler like this or by a simple relay in its place.
Software for ESP-32 camera OLED-RTC: click here
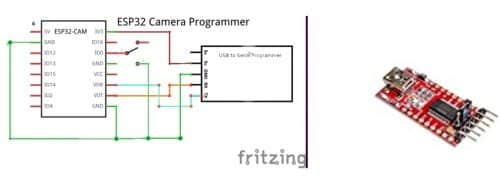
ESP32 Camera Programmer
The ESP32 camera does not come with built in USB to serial interface. Therefore, to upload the sketch one needs to have a USB to Serial programmer which looks like this and comes for INR:250 to INR:300. The schematics shown below. The GPIO 0 to be pulled to ground during uploading mode and the reset button of the ESP32 to be pressed during first few seconds of uploading after that it is to be released.
Schematics of ESP32-Camera programming
Aftermath
ESP32 camera is very cheap yet it has got wide possibilities. By fixing a series of these cameras in line , It can be used as a fixed & wide object scanner [50 to 100 meters] for taking pictures of approaching vehicle number plates to check for over speeding. In solo mode with a PIR sensor, it can be used as a bird snap catcher. For face detection during touch less temperature scanner reading this can be deployed for high temperature detection.