Table of Contents

Presented here is a robust, compact and hand-held mini rechargeable power supply that delivers 9.2V and 5V up to 1A (approx.) and 3.3V up to 500mA. It also includes a female A-type USB connector so you can power and charge other equipment such as mobile phones. Four white LEDs are included to enable its use as a torch-light as well.
The circuit uses a single rechargeable 3.7V Li-ion battery pack (normally used in mobile phones and MP3 players). It uses dedicated Li-ion charging IC which monitors undercharge and overcharge conditions to safely charge the Li-ion battery pack. The circuit not only indicates the charging status but also shuts off the load when the battery is discharged to a certain level.
The power supply is so versatile that it accepts input from various power sources like DC wall adaptors, USB or a solar panel to charge the 3.7V battery. Even if the battery is fully discharged, it can power the load from external power source without disturbing the output regulation and charging of the battery.
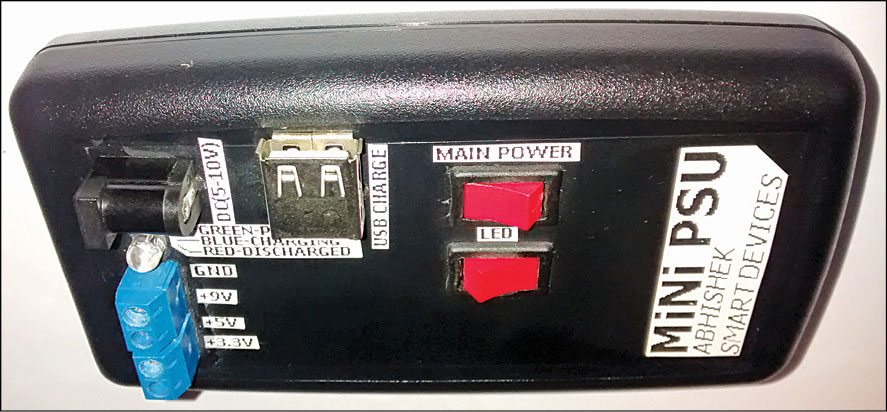
Generally, a power supply derives power from the 230V AC mains and then, using step-down transformer along with circuitry for rectification, filtering and regulation, provides the regulated DC output. The disadvantage is that such power supplies are big and not so portable. The one described here is a battery-based portable power supply. The author’s prototype is shown in Fig. 1.
Circuit and Working
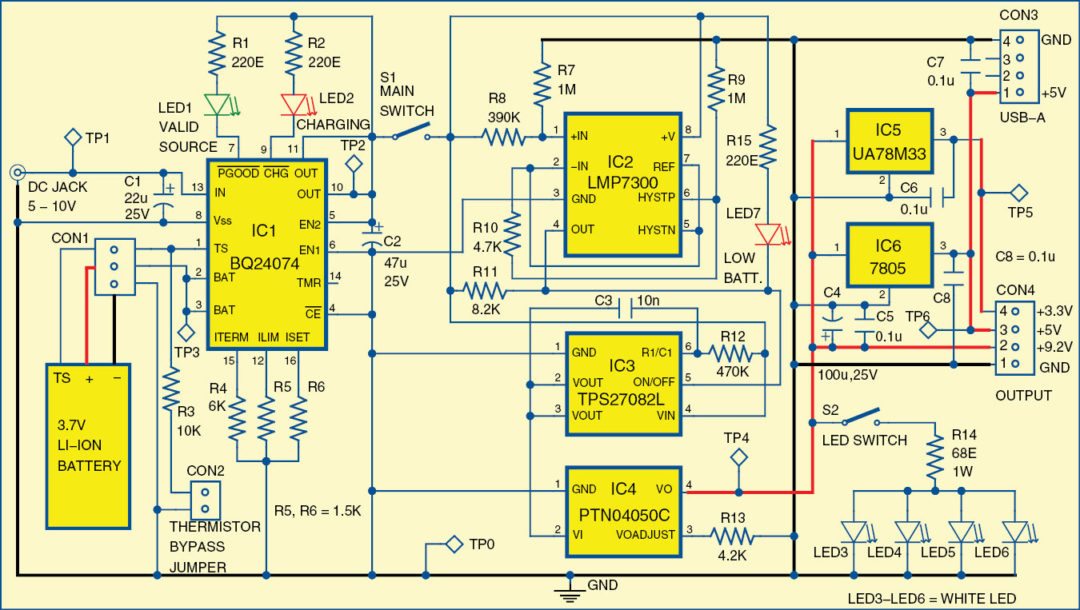
The block diagram of the mini rechargeable power supply is shown in Fig. 2 and its circuit diagram in Fig. 3.

Charging Input Source
The charging input source for the power supply can be anything from 5V to 10V, which can be harnessed using a DC power adaptor, USB port or solar panel. This DC input goes to the battery charge management circuit to which a 3.7V single-cell Li-ion battery is connected. It is to be noted here that Li-ion batteries are very sensitive to charging voltage and current, and need a stable charging source. Directly charging Li-ion batteries using any source may reduce the capacity of the battery and degrade it soon.
 Battery management
At the heart of the Li-ion battery charge management circuit is the Li-ion battery charger IC BQ24074 from Texas Instruments. It is an integrated Li-ion linear charger and system power path management device for space-limited portable applications. The device operates off either a USB port or a DC adaptor and supports programmable charge currents up to 1.5A. That is, we can charge up to 3000mAh batteries at 0.5C, where C is the battery’s capacity.
The BQ24074 features dynamic power path management (DPPM) that powers the system while simultaneously and independently charging the battery. It supports reverse current, short circuit and thermal protection. Its input voltage supports unregulated adaptors.
The battery is charged in three phases: conditioning, constant current and constant voltage. In all these phases, an internal control loop monitors the IC junction temperature and reduces the charge current if the internal temperature threshold is exceeded. All the current settings like charging, input-limiting and termination for the IC are programmable by selecting the right resistor values at appropriate pins.
The charging input source is connected to pins 13 (IN) and 8 (Vss) of IC1 through the DC jack. Most of the Li-ion battery packs have at least three pins—positive, negative and NTC thermistor out. The NTC thermistor is built into the battery pack itself to monitor the battery temperature. The three pins of the Li-ion battery are connected to the TS (pin 1), BAT (pins 2 and 3) and ground pin of IC1.
The IC BQ24074 supports only batteries with 10-kilo-ohm thermistors. If your battery does not have this thermistor option, you attach a 10-kilo-ohm from ground to pin 1(TS) of IC1 by shorting the thermal bypass jumper to bypass the thermal monitoring feature.
As shown in the circuit (Fig. 3), LED1 is connected to pin 7 (PGOOD) which glows if the input charging source is valid and acceptable for charging the battery. LED2 is connected at pin 9 (CHG) which glows to indicate that the battery is in charging mode. BQ24074 IC works on linear topology, so a 22µF (C1) electrolytic capacitor at the input and a 47µF (C2) at the output is required for stability purpose.
Since 1200mAh battery is used in this power supply project, let us go through the designing steps for BQ24074 IC. First, for setting the charging current at 0.5C, we have to find the value of Rset that will be connected at pin 16 (Iset) to ground. For 1200mAh of battery capacity, 1C=1200mA and thus 0.5C =600mA. So, for Iset =0.5C=600mA, the formula for calculating Rset (as per datasheet of BQ24074) is:
Rset = (Kset / Iset )
 Value of Kset = 890
 Thus, Rset = (890/600mA) = 1.48-kilo-ohm
The value of 1.48-kilo-ohm is not a standard value, so we choose the nearest standard value of 1.5-kilo-ohm. It will set the charging current Iset to about 593mA, which is acceptable for the purpose. Thus Rset=1.5-kilo-ohm (which is resistor R6 in the circuit).
For setting the charge termination current at 0.1C = 120mA, we find out the value of Rterm that is connected from pin 15 (Iterm) to ground. The formula for calculating Rterm (as per datasheet of BQ24074) is:
Rterm = (Iterm x Rset)/0.03
Thus Rterm = (120mA x 1.5k)/ 0.03=6-kilo-ohm (which is resistor R4 in the circuit).
Now let us calculate the Rlim value at pin 12 of IC1 that will set the maximum input current consumption limit for IC1, which includes the battery charging current plus the current supplied to the load. We select a nominal value of about 1A for the purpose in our project.
So, for Ilim = 1A
 Rlim = (Klim / Ilim)
 Klim = 1610
 Thus, Rlim = (1610/1 A)=1.610-kilo-ohm
Here, 1.61-kilo-ohm is not a standard value, so we choose the nearest standard value of 1.5-kilo-ohm. It will give us Ilim=1.073A, which is acceptable for the purpose. Thus, Rlim = 1.5k (which is resistor R5 in the circuit).
We can also manipulate the internal charge timer’s expire values for IC1 by calculating the value of a resistor that will be connected from pin 14 (TMR) to ground. If resistor is not used at this pin, it selects the default value of 1800 seconds for pre-charge and 18,000 seconds for fast charge. We used the default timer values in this project. Here we complete the setup for our battery charging circuit.
The output (positive rail) from this section is taken from pins 10 and 11 (OUT) of IC1 and given to the next section via main switch S1. It is this switch which will be used to switch on the power supply.
Battery protection unit
This circuit deploys a low-power comparator LMP7300 (IC2) and a 3A PFET load switch TPS27082L (IC3) from Texas Instruments. It is basically an over-discharge or deep-discharge protection circuitry that continuously monitors the battery voltage levels. The battery should not be discharged beyond 2.7V. The over-discharge protection circuit not only shuts off the load connected to it but also alerts the user through LED indication that the battery is exhausted and needs recharging.
Voltage monitor
The LMP7300 is a combination comparator and reference with ideal specifications for precision threshold detection. The precision 2.048V reference comes with a 0.25% maximum error. It is mostly used for precision threshold detection, battery voltage monitoring and management system, and zero-crossing detectors.
The inverting input pin 2 of LMP7300 comparator is connected to reference voltage pin 7 (REF) while its non-inverting pin 1 is connected to a potential divider network comprising resistors R7 and R8. This potential divider is so designed that its output goes low when the input decreases to 2.8V (slightly higher than the 2.7V standard, to be on the safe side).
When the positive rail (which is the battery voltage) decreases to 2.8V, the voltage at pin 1 goes lower than reference voltage at pin 2, which results in output of the comparator going low, thus stating under-voltage/over-discharge condition. The glowing of LED7 at output pin 4 of IC2 indicates the over-discharge or low-battery status.
Load Switch
IC3 TPS27082L is a PFET load switch which switches on if its pin 5 (on/off) is given voltage greater than 1V. Pin 5 is directly connected to the output pin 4 of LMP7300. So whenever the battery output rail goes below 2.8V, the output of LMP7300 goes low, which switches off the load switch. Thus the load connected to this circuit is disconnected, hence no further discharging of the battery takes place.
Pull-up resistor R11 is provided to turn on the load switch IC3 normally because the output of the comparator is open-drain. Resistor R12 and capacitor C3 in IC3 provide the slew rate of the load switch. The output from IC3 is taken from pins 2 and 3 (Vout) and then given to the boost converter section.
Download PCB and Component Layout PDFs: click here
Boost converter
We used PTN04050C (IC4) boost converter module from Texas instruments. It provides high-efficiency, step-up voltage conversion for loads of up to 12 watts. It is a DC-DC converter that steps up the low-voltage DC to a higher-voltage DC. It can take any voltage of 2.95V to 5.5V and step up to 9.2V. In fact, the boost converter can be configured to a maximum step-up voltage of 15V but, in our case, we step it up to 9.2V only, as that is sufficient for most portable power applications.
The positive rail taken from the previous section goes to pin 2 of IC4. Resistor R13 sets the output voltage of the converter to 9.2V, which is accessible at pin 4 (Vo) of IC4.
Regulator outputs
The 9.2V from IC4 is given to input pins of positive voltage regulators LM7805 (IC6) and UA78M33 (IC5) to obtain 5V and 3.3V, respectively. Some capacitors are provided at the input and output of these regulators for stability purposes.
Thus, from a 3.7V Li-ion battery, we get regulated DC output voltages of 9.2V, 5V and 3.3V. These three voltages are routed to an external connector for the convenience of connecting to your projects.
The regulated (but not current-limited) 5V also goes to a female USB-A type connector so that you can power and charge most of your USB-powered products.
Torchlight
We have four white LEDs (LED3 through LED6) connected to 9.2V rail through resistor R14 and switch S2, serving the function of a torchlight/flashlight. A 68-ohm resistor (R14) is used as current limiter and switch S2 is used as on/off switch for the LEDs.
Construction and Testing
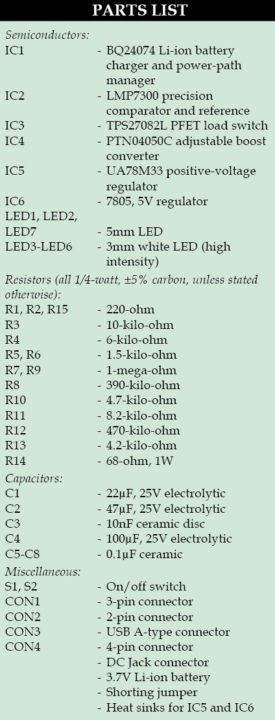
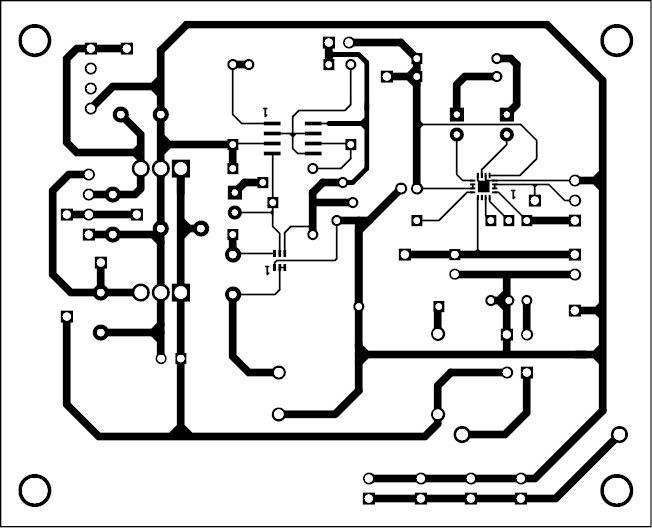
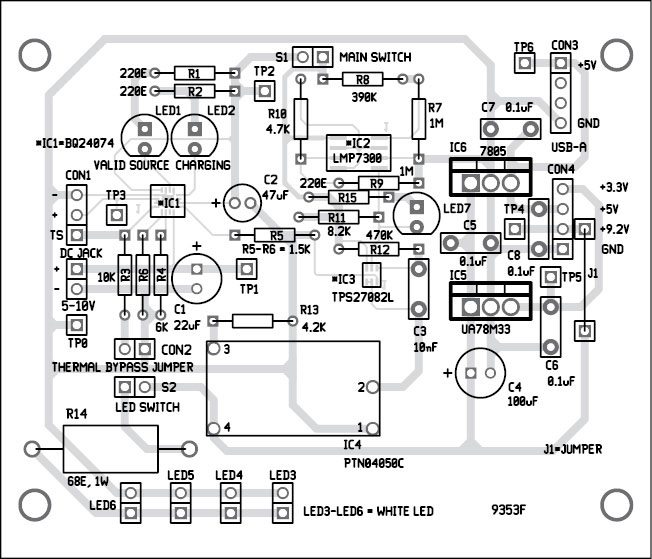
A single-side PCB for the mini rechargeable power supply circuit is shown Fig. 4 and its component layout in Fig. 5. IC1, IC2 and IC3 are SMD components which are to be mounted on the solder side of the PCB. Suitable heat sinks should be used for IC5 and IC6. Connect the Li-ion battery at CON1 and set the thermal bypass jumper at CON2 in the circuit, as explained under ‘battery management’ section.
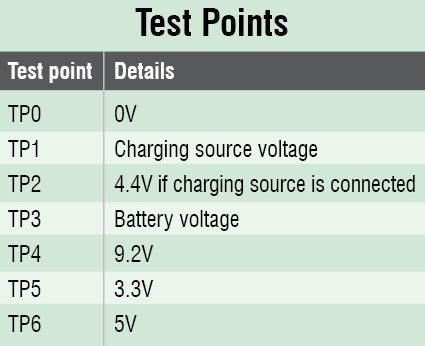
Check that the voltages at various points in the circuit are as per test point table before powering it for the first time. Enclose the power supply circuit in a suitable box. Fix DC jack, CON1 through CON4, switches S1 and S2 appropriately on the box. Fix LED3 through LED6 such that you can use them conveniently for torchlight.
On switching S1 on the power supply should provide 9.2V, 5V and 3.3V at the output terminals (CON4). It is safe to draw about 800mA from the 9.2V and 5V terminals while 3.3V terminal is able to provide 500mA of current only. Switch S2 turns on the torchlight (provided switch S1 is on).
You can connect Li-ion battery up to 3000mAh capacity to the circuit but you have to recalculate the current-setting resistors as described in the previous section. When the battery voltage reaches below 2.8V, LED7 glows to indicate the ‘end of capacity’ of the battery and the loads are automatically turned off.
To recharge the battery, you can connect the circuit to an adaptor producing anywhere from 5V to 10V DC. You can also charge the battery by connecting it to a solar panel providing anywhere from 5V to 10V. If the charge input source is a valid source, green LED1 glows. LED2 glows to indicate that the battery is being charged and goes off after the battery is fully charged. LED2 also flashes at the rate of 2Hz if the IC’s internal safety timers have expired, an error state which indicates that your battery is not in good condition.
The author is a B.Tech in electronics and instrumentation. His interests include embedded systems, software programming and instrumentation.
This article was first published on 1 August 2014 and was updated on 6 June 2020.


