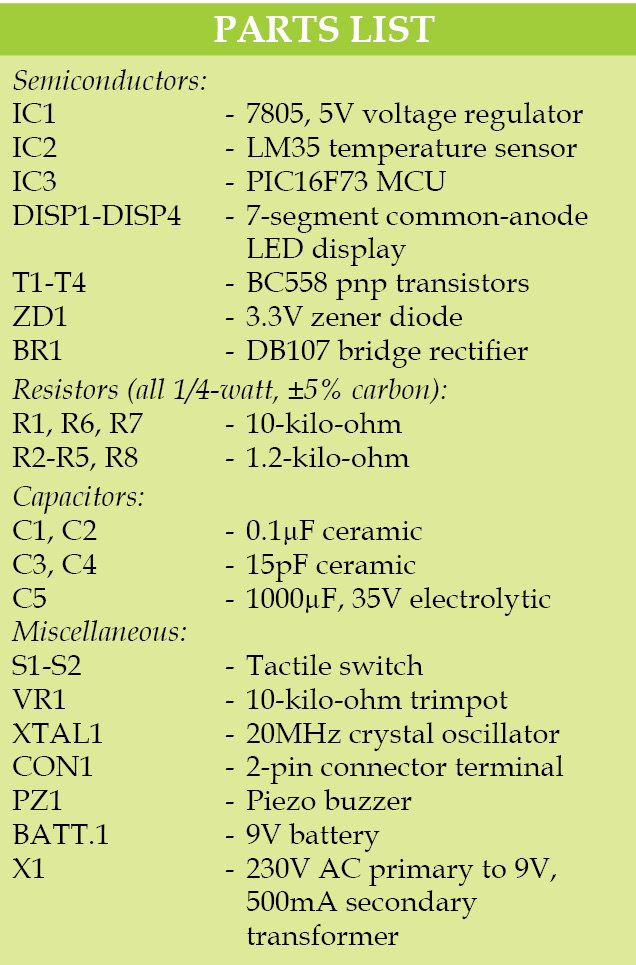
Although many circuits for digital clocks have been published in Electronics For You, this circuit is a PIC microcontroller (MCU) based easy-to-construct gadget, which combines a clock with a temperature indicator in the same display. The display uses four 7-segment common-anode LEDs. It shows the clock, and in every minute for five seconds the display alternates to show the temperature in oC. An alarm facility with buzzer is provided.
Clock’s precision is due to the 20MHz high-frequency crystal that is used with PIC16F73 chip. Second display’s decimal point blinks every second. The display for temperature uses three digits from the left and the fourth digit just shows oC.
For this, the fourth LED is soldered on the PCB upside-down. This places its decimal-point LED on top-left instead of bottom-right so as to show the symbol of degree (°). Hence, we use four separate common-anode LED units instead of a combo LED display component.
 The MCU choice is now for the more convenient PIC chip from the low-cost 16F family. This is a 28-pin chip with ports a, b and c, as well as several internal peripherals like timer, ADC and UART.
Most important advantage of PIC is the ease of downloading a program on to the chip, because it uses flash memory and can be programmed with 5V supply. PICkit2 programmer is used for downloading the hexadecimal code on to the chip. Cost of 16F73 is quite low.
Port pins in the PIC chip have greater power capability than those in the 8051 family. So driving LED segments can be made by directly connecting the segments to the port pins, without any buffer IC. Thus, component count is reduced.
There are several analogue-to-digital converter input channels. Speed of conversion is as short as 20 microseconds. So it is easy to connect any analogue signal and digitise the same for displaying with LEDs. Here, the analogue signal is that of temperature.
Texas Instruments chip LM35 is a low-cost temperature sensor and is connected to the analogue input pin of the PIC chip. It can measure temperatures in the range -50°C to 100°C, but in this unit, it is mounted on the PCB only to show room temperature.
Circuit Explanation
Fig. 1 shows the circuit diagram of the alarm clock-cum-temperature indicator. PIC16F73 IC has its reset on pin 1. A resistor and capacitor junction is tied to this pin to perform reset on applying power. The 5V power supply is obtained from a low-voltage transformer (X1), rectifier (BR1) and voltage regulator IC 7805 (IC1).
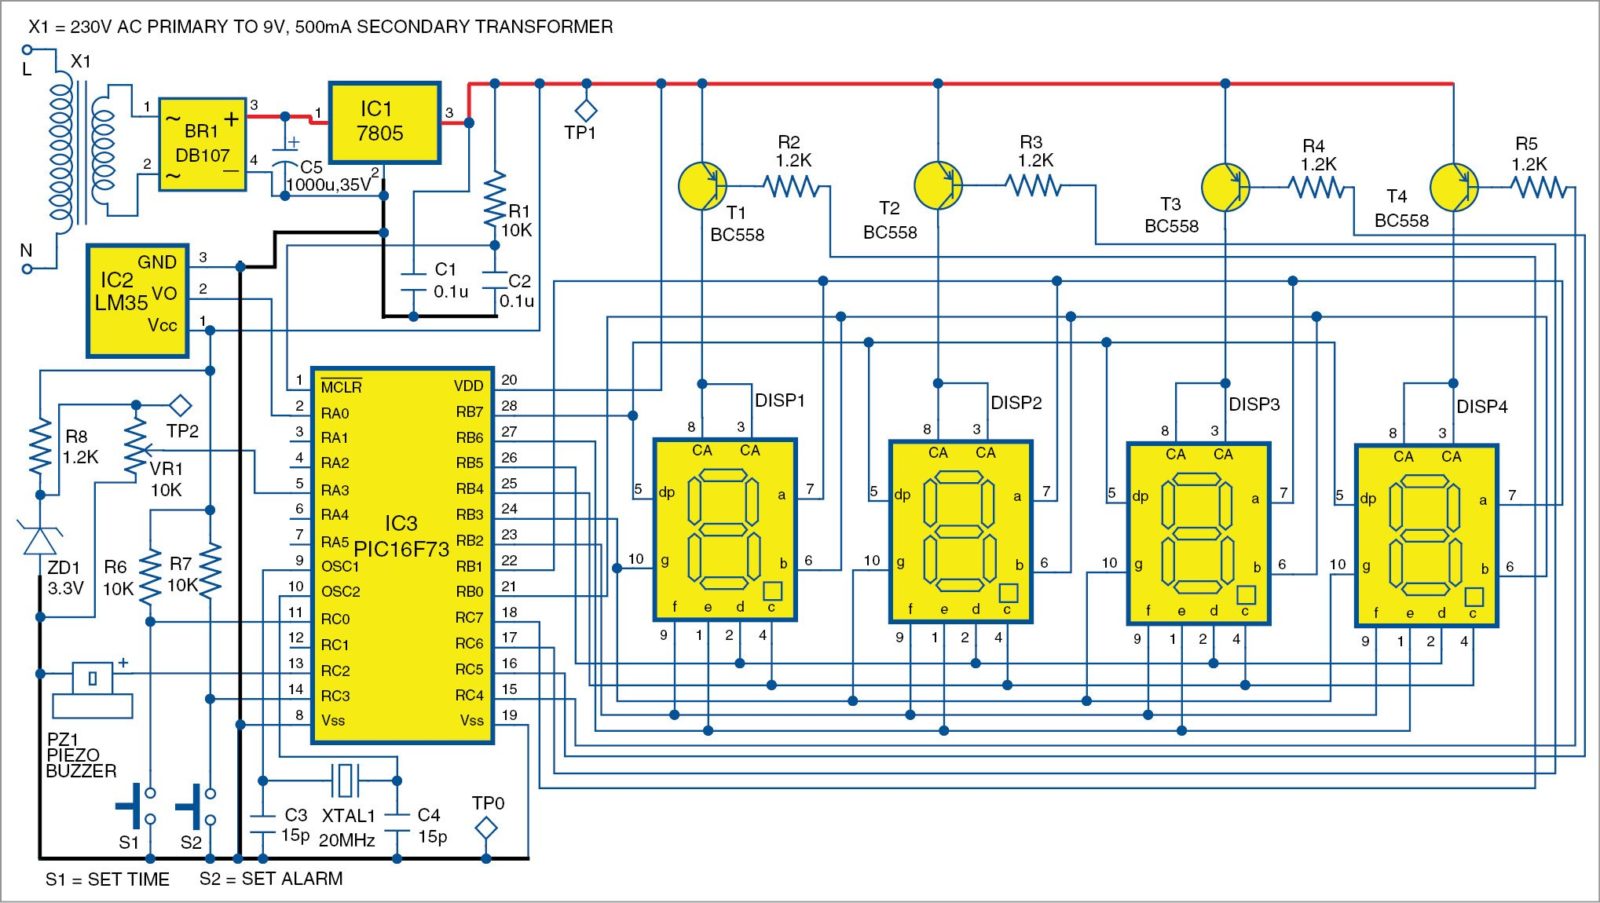
Pin 20 is Vcc and pins 19 and 8 are grounded. Pins 9 and 10 are for connecting a crystal for the oscillator. Any crystal frequency is alright, but it is better to use the highest 20MHz crystal for speed. Two capacitors, each of 15pF, are tied to the end of the crystal to ground. This frequency is called high speed, or HS. There is a configuration register inside the chip, which should be programmed for HS, among other choices, such as XT, RC and LP. The configuration byte we use is 52 hex.
Input and output ports
Port A pins are programmed as input pins and pin 2 (AN0) is used as analogue input pin from temperature sensor LM35. Output is programmed through Port B. Port C pins 4 through 7 are used for driving the anodes of the four LEDs.
Pin C.0 is used as input pin for connecting switch S1 to high logic in order to set the time of clock or alarm time. By continuously pressing it, time changes and the switch has to be released immediately after the required time is displayed.
Pin C.3 is used as another input pin. It is used for setting the alarm time. S2, which grounds this pin, will set the alarm time to be the time currently on display. Thereafter, S1 is to be pressed to adjust to the current clock time.
Pins C.2 and C.1 are used for seconds blinking (not used here) and for clock alarm output. A piezo buzzer of a musical type is connected to it.
Port B pins are used for sinking the currents from the segments of the four LED displays. Segments of all LEDs are connected together and a multiplexed drive lights one LED after another with a delay of 1ms. Multiplexing is done by port C pins 4 through 7, which go low one after another in sequence. This low-going signal pulls the bases of transistors T1 through T4 in sequence, causing current to flow from the collector pins to anode pins of the LEDs. Emitters of the transistors are all tied to 5V line. Transistors are therefore of pnp type. We can use 2N2907 for bright displays; BC557 can also be used.
Working of the system
While signal from the temperature sensor is given to AN0 pin (2), pin 5 is connected to a supply voltage of 2.55V. This is necessary because ADC of the chip converts to values from 0 to 255. Reference voltage is derived from a zener of 3.3V (which has the least temperature variation among all zener values) and a preset. This pin 5 is programmed to be the reference voltage pin for the ADC. This is done by ADCON1 register bits of the chip. By writing 01 to this register, choice of reference voltage for the ADC to work is from pin 5.
Since LM35 gives a linear 10mV output for each degree of temperature, it will output a value of, say, 250mV for 25oC. This will be read by the ADC as 25 because it is one-tenth of the reference voltage. For a temperature of 100°C, it will give 100 x 10 = 1000mV or 1V. This will be shown as 100 on the ADC. Value of ADC register ADRES is used to show the temperature on the display.
Understanding the output
In order to convert the ADC value to decimal, divide the value by ten to get the high digit; balance or remainder will be low digit. First three LEDs show the 3-digit temperature value and the fourth digit is programmed to show oC. Therefore the fourth LED is turned top-down in the PCB while soldering.
It may be noted from the circuit diagram that order of the segments of the LED displays is not in sequence while wiring port B pins. So port B pins 0 through 7 are not wired in sequence to segments a, b, c, d, e, f, g and DP. Rather, order is changed in order to ensure that PCB tracks are easily routed. Order used is b-a-f-g-c-d-e-DP.
It is to be understood that, according to this connection, look-up table for the segment code for each and every digit displayed is to be prepared. For example, to show number 3, segments a, b, c, d and g have to be made low to sink the current and make these glow. As per the above-mentioned order, this gives the code as 0-0-1-0-0-0-1-1. This byte is 23, which is the look-up table entry for number 3.
Software
Code for the clock as well as the temperature indicator was developed using Oshon PIC simulator _IDE software. It provides high-level BASIC for code development and has all peripherals available for simulation of a program under development on the computer screen.
Complete program is in .ASM format and the program code in hEX is in a hex file. Using PICkit2 programmer it can be entered into a fresh PIC chip. Note that the configuration byte is 52 hex. You use 42 hex if you want to protect the code from being copied.
Download source code: click here
Construction and testing
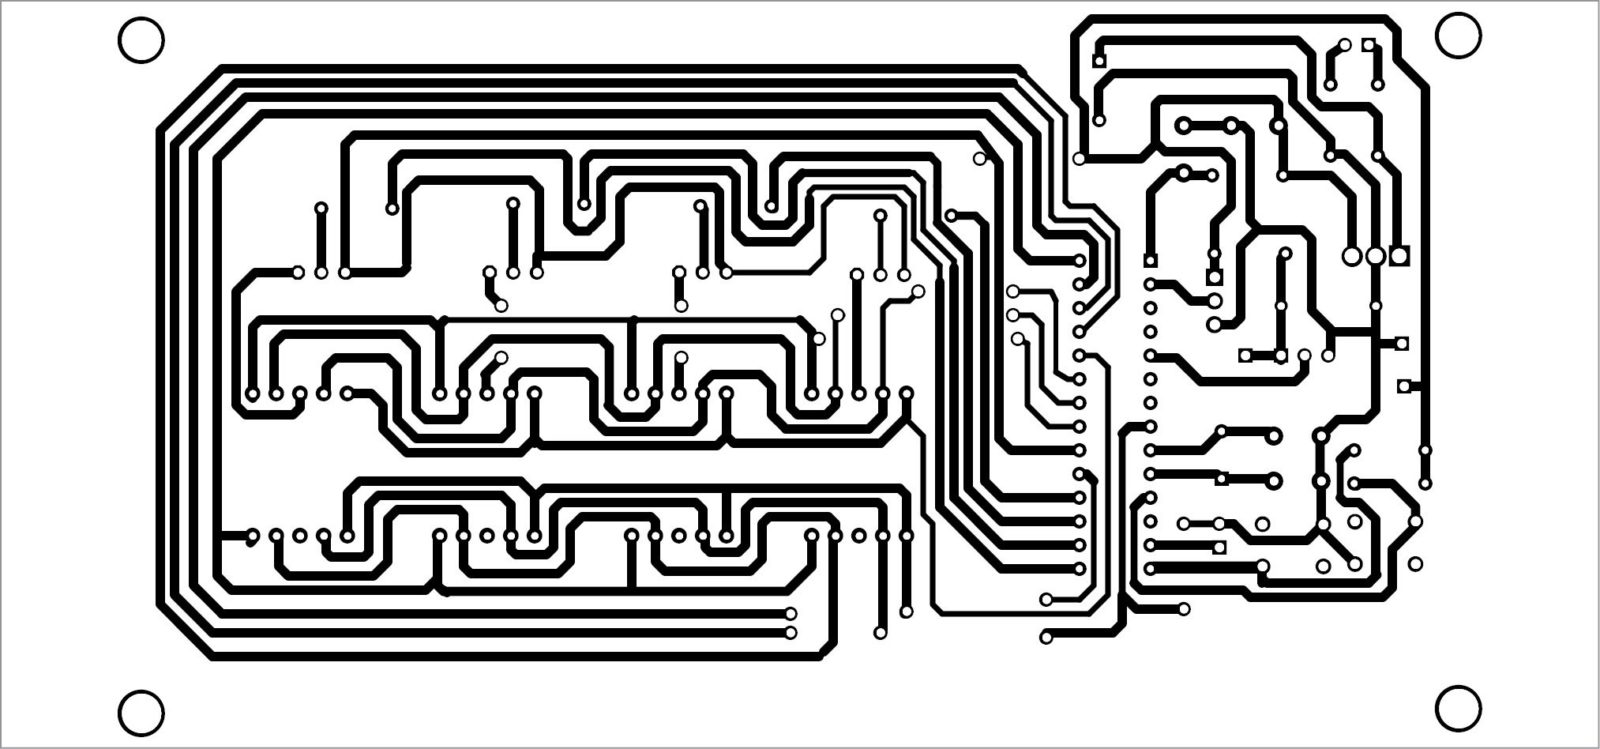
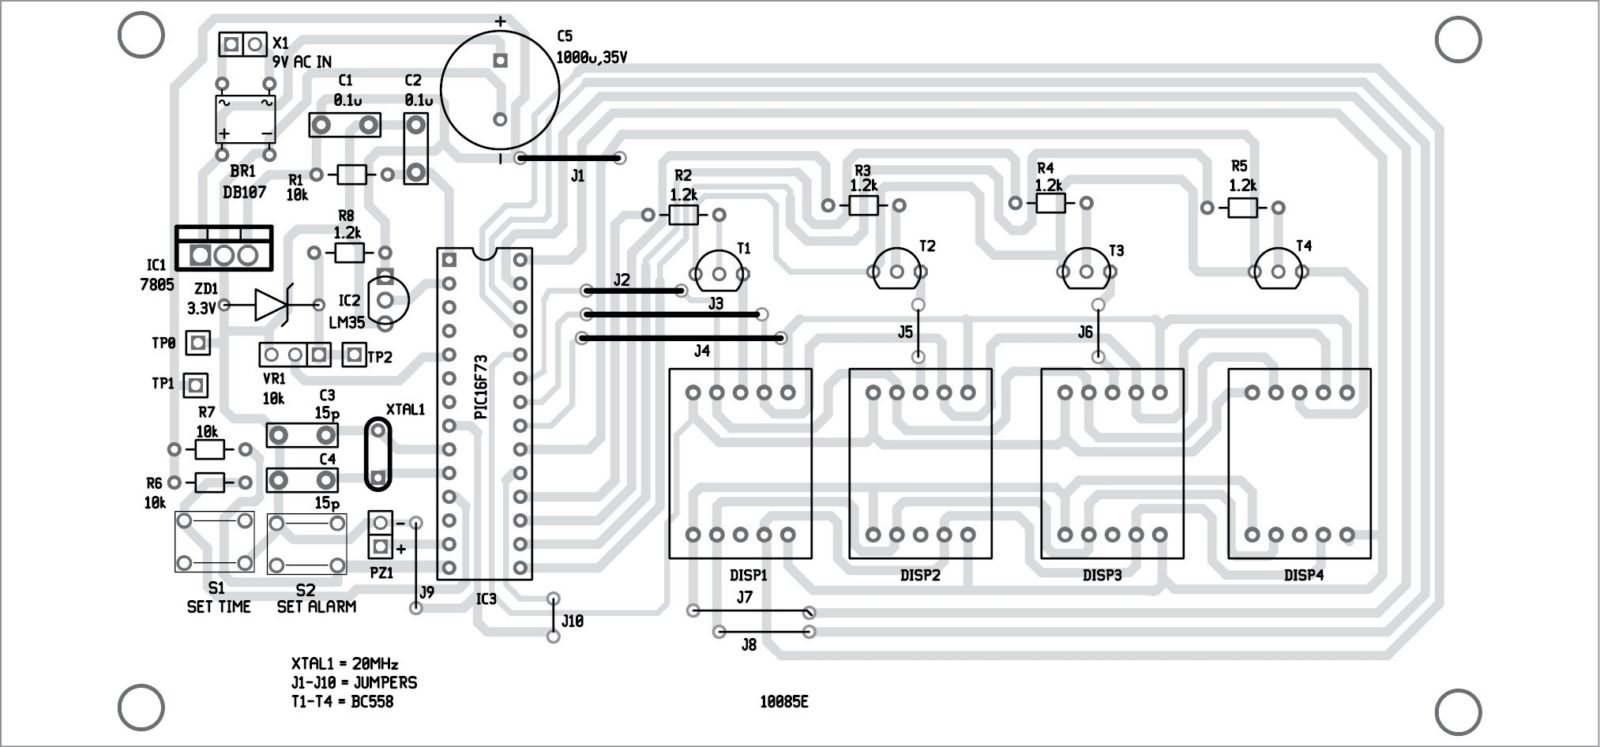
An actual-size, single-side PCB of the circuit is shown in Fig. 2 and its component layout in Fig. 3. Assemble the circuit on the PCB as it minimises time and assembly errors. Carefully assemble the components and double-check for any error(s). Use a proper IC base for the MCU.
Download PCB and component layout PDFs: click here
Download Source code: click here
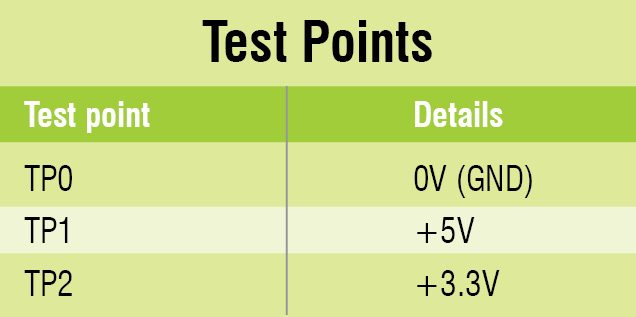
CON1 is a 2-pin connector used to connect a 9V battery. For trouble-shooting, verify the voltages are as listed in the test points table.
After powering on the circuit, a default value will be displayed. Press S1 to set the desired time. After setting the time, press S2 to set alarm time. Now, present time will be shown on the display. The buzzer (PZ1) will sound at the time set for the alarm.
Prof. K. Padmanabhan is an emeritus professor at Alagappa college of Technology, Guindy, Chennai


OK, I’ll bite. What is “cum” in this context?
Dear Gregory Berardi,
Here is the meaning of the word “cum”: http://www.oxforddictionaries.com/definition/english/cum
xD – The reason I clicked this article
Its not working perfect as mentioned in the article. I made this circuit using bread board and PCB but no time output except temperature. Disappointed.. 🙁
the circuit not working i made this but no display
There is only a single switch for setting Time and Alaram . Don’t know whether these switches work in
Fast Mode or Slow Mode. Unless both modes are given it will be very difficult to set Time.
Have you checked all the test points as listed in the table? If yes, are you getting these voltages. Check proper connections to MCU and displays (DISP1-DISP4). Also make sure the correct polarities of the transistors. Check the oscillation frequency of XTAL1 in oscilloscope.
i I Have Better Solution For This
sir i have checked all the voltage at tp point and connection according to circuit diagram but still no display . when i tuch the pin no 9 then some number show on display and running from right to left.
Please re-check proper ground connections including crytal oscill. circuitry.
sir
i have use extream burner pic programmer please post the correct fuse bit.default fuse bit 3FF1 no0t working . when i use this bit there is no display.
SIR
please provide correct fuse bit because 3FF1 not working . when i use this 3FF1 clock have no display .
sir,i tried this experiment.It is just showing the counter..and i am unable to understand what is the problem with it?
i have made the connection on the pcb..also on the breadbard but no use…no counter is shown..n i have programmed it using pickit3…still an issue..
please reply as soon as possible.i have selected this exeriment as my project.
I want the hex code…plz post it…
It’s urgent..
The article is updated now with the source code.
The programming configuration is done with using 16f72…n ‘v are using 16f73….
Which ic is to be used?…
N what extra thing is updated?…
Reply…urgent
I TOO HAVE THE SAME CONFUSION REGARDING THE SOURCE CODE.
THIS SOURCE CODE IS OF (16F72) BUT THE PRESCRIBED IC IS (16F73).
PLEASE REPLY AS SOON AS POSSIBLE .
16F73 AND 16F72 ARE THE SAME. Some programmers do not recognize the 16f72 but recognize the 16f73 you must program 16f73 all the program made in 16f72. We have this problem when we use the Winpic
Perhaps the problem is that the program indicate the 16f628 and not the 16f73. Look at the asembler files
sir how to and where to connect power backup battery in this circuit
You can apply PIC16F72
my curkit dispay not opreting please halp me.
Please check the connection or reconnect.
I see no source code or reference to download??
Hi Mike, the source folder and reference designs are present at the end of the page.
Yes…hear is not connection about battery back up system(DS1307).If the power failed can it back up time???Please tell me about this system…It is urgent…And one more question…can i use bigger size display…please give me a solution and circuit diagram Please urgent….
The DS1307 will maintain clock even after power is removed. But display will not be seen of course
When power is switched on, display will show then time correctly.
The same circuit can be used with a 2 inch size LED displays.
But here DS1307 is not used, you will not get correct time, you have to set when power resume
Sir, i can access the code as it says 404 error when the link is clicked can you please provide it again
Thank you
Thank you for your comment. We have updated the article with correct code. Please refresh the page.