


 Sometimes, we need frequent sensor data transmission from one end of the world to the other for which we use online servers and services like ThingSpeak, an IoT analytics platform service that allows you to aggregate, visualise, and analyse live data streams in the cloud. Our machine might be powerful enough to send data every second, but the ultimate throughput is decided by slow data path allowed by those online servers.
This project can help us send sensors’ data very frequently and also free and independent of bandwidth of the severs that are provided by WebSocket. (WebSocket is a computer communications protocol, providing full-duplex communication channels over a single TCP connection.) We achieve this using a better, secure yet globally accessible freemium, cross-platform, cloud based instant messaging service—the Telegram Messenger. We can send data every couple of seconds using a low-cost ESP32 development board to a Telegram bot channel and then receive it on the other end of the world using a simple Python code.

We have a remote telemetry station which sends data every four seconds. The data comes to the base station built around ESP32 board. The ESP32 is connected to internet Wi-Fi connection on the other end like a router. It re-sends data to a Telegram bot channel and at receiver end a normal computer connected to the internet runs Python3 to receive data continuously and put it in use. The working could be like this:
Field Sensors→To ESP32→To Telegram Channel→To Cyberspace→To far end Receiver→Wi-Fi Internet+ Python→Reproduce data.
The author’s prototype is shown in Fig. 1 and its bill of material is shown in the table below.

Install the Telegram app in your mobile phone, tablet, or laptop. The app is available free at Google Play Store (for Android phones) and App Store (for iPhones), etc. Create a channel in Telegram to communicate with the ESP32 board.
After installing the app and setting up your account, search Botfather in the app. As soon as you open Botfather, you will see a Start or a Restart button. It will open a list of commands and their applications. Click on the /newbot command.
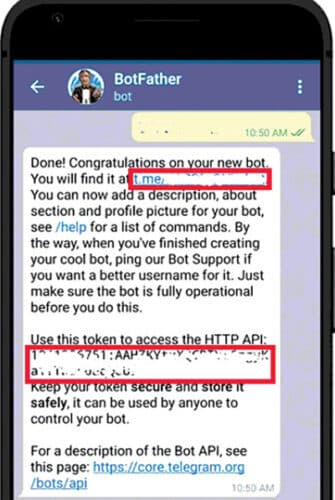
After this command, you need to give your bot a name. I named it bera_arduino. Next, set the username. While setting the username, keep in mind that it should be unique and it should end with the word bot, like bera1bot. As soon as you set the username, your bot is created, and you will see an API token. Save it somewhere as it will be needed later.
Fig. 2 shows the Telegram bot AI and Fig. 3 shows the Telegram bit setting.
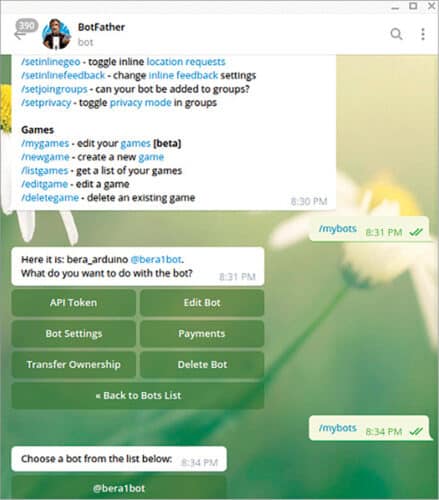
Now, two parameters need to be found out for this (bera_arduino) channel—chat_id and bot_token—to prepare the Sketch software. After having created the chat name and user ID, give /mybots command; it will open your bots. Select your chosen bot and you will be presented with a graphical window. Press the API_token and you will receive the write bot_token for your bot. Image of the Telegram bot token is shown in Fig. 4.

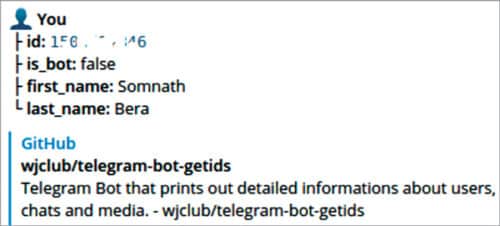
The only other data required is your chatid. To get it, find the bot named @GetIDsBot. You will be presented with a window describing your chat ID. Fig. 5 shows Telegram bot app ID.
Well, now you are all set with the credentials to run your chatbot in Telegram. Write down these two ghostly looking numbers clearly for using them in the sketch.
Python prerequisite
Two Python pip modules need to be installed to have the Python ready for Telegram: python-telegram-bot and telethon.
$ pip3 install python-telegram-bot
$ pip3 install telethon
In Linux, you may sudo it for installation, while on Windows just clicking would do. The script is used in Python3 version. Once you run the script file in the same directory where your @bera1bot.session file is residing, the data will start appearing endlessly.
somnath@somnath-Satellite-L855:~$ python3
get.py
Telegram with Python
The above setup is alright for getting messages on Telegram app on a mobile phone. But to get Telegram interfaced with Python, you must do the following:
In a browser open https://my.telegram.org and enter the same mobile number that you have set up on the mobile app (like +91942345xxxx). This will send you an SMS into the Telegram bot in the phone app of Telegram (Telegram channel inside Telegram). Enter that code into the next window. You will be ushered into anoher window where you have to give some name to the app title and short name (such as bera2 bera2).
Press Next and you will be presented with two important identities: api_id, api_hash. The username is already there, which you had setup while creating the bot @bera1bot. Now, only these three parameters are essential for accessing the incoming messages in a Telegram channel in a Python script. Let us see how it works.
With TelegramClient(name, api_id, api_hash) as client, run the code:
@client.on(events.NewMessage() )
async def handler(event):
async for message in client.iter_
messages(‘’):
print(message.text() )
client.run_until_disconnected()
Well, that is the main loop for continuously getting messages as they arrive in the channel. You can get the above code with article and named revice.py and run on Python.
On first run of the Python code on computer, it will ask for the session parameters. For that, it will ask your phone number that you used earlier. On entering that, it will send a code through SMS into the Telegram bot in the phone app of Telegram. Enter that code in the next window and the session file will be created and your Python code will start working.
To make your code truly portable, you have to give away both the files—the Python code and the
@bera1bot.session file together.
Arduino sender unit
The Arduino sketch is simple and straightforward. ESP32 is provided with a series of Wi-Fi usernames (IDs) and passwords. It connects with the suitable Wi-Fi connection first. If unsuccessful, it restarts on its own and selects the next ID/password. After establishing connection, it gets the data string and then using CHAT_ID and BOTtoken it creates a https datastring, which is pumped out to Telegram using http.GET(). An LED connected to pin 23 will blink continuously when the data uploading is taking place successfully.
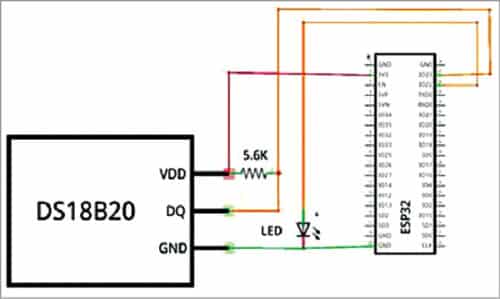
After uploading the Arduino code, connect the ESP32 as shown in Fig. 6.
The sample project
The sample project is divided into two parts: the sender unit and the receiver unit. The sender unit is based on ESP32 with a DS18B20 connected to it. It creates a simple CSV data stream comprising date and time taken live from the NTP server. It adds up a few arbitrary data streams with the temperature added at the last, such as 08/09/2021, 06:35:42, 0746, 0876, 3278, 3563, 2795, 3012
The last data (3012) is the temperature (30.12°C). Hold the DS18B20 in your palm and you would notice that the value is changing due to the heat of your palm. The whole string is uploaded to the Telegram channel by using the simple GET statement of ESP32:
https://api.telegram.org/bot$token/sendMessage?chat_id=$chat&text=Hello+World+how+are+you
The same can be achieved using a computer as well, but the ESP32 used is a continuous, small, automatic, and a real hardware for delivering data to Telegram (without a bulky computer) and using just a fraction of the power of a 3.3V source.
(The author has suggested this simple version of the project that can be deployed easily, but the actual project made by him is much more sophisticated. It has a remote sender unit, which sends field sensor data over a LoRa network to another ESP32, which in turn pumps data to the Telegram channel using LoRa on one side and Wi-Fi on the other side—just like a router.)
Receiver unit
This is the crux of the project. You can receive highly secured and encrypted data on your phone. The first test data reaches your mobile only. But you can hardly process that data to do something meaningful, like putting it on a web database for trending, run a relay, or to run a system to perform differently depending on the value of data.
Therefore, replace the mobile phone with an internet connected computer with Python3 installed in it. The Python script will gather data and then re-display it on the computer at the same speed at which it is being sent at the sending end. Since all data is available as variables inside Python, one can process it any desired way.
While IoT analytics platforms like ThingSpeak can give you a maximum of four data strings per minute, in Telegram you can pump as many as thirty data strings per minute, and yet all are highly secured and encrypted. Below is a data string that arrives every two seconds and it is received in the Python Telegram terminal at the other end of the globe with not a single stream lost:
08/09/2021 08:22:15 0746 3563 0876 2795 3278 2962
08/09/2021 08:22:16 0746 3563 0876 2795 3278 2962
08/09/2021 08:22:18 0746 3563 0876 2795 3278 2962
08/09/2021 08:22:20 0746 3563 0876 2795 3278 2962
08/09/2021 08:22:21 0746 3563 0876 2795 3278 2968
08/09/2021 08:22:23 0746 3563 0876 2795 3278 2968
08/09/2021 08:22:25 0746 3563 0876 2795 3278 2968
08/09/2021 08:22:26 0746 3563 0876 2795 3278 2968
08/09/2021 08:22:28 0746 3563 0876 2795 3278 2962
08/09/2021 08:22:30 0746 3563 0876 2795 3278 2962
Software arduino_sketch.ino and python_script.py can be download from the link https://www.electronicsforu.com/electronics-projects/hardware-diy/published-telegram-received-python
Testing
After connecting ESP32 with the senor and powering the board, and making sure ESP32 and receiver system both have net connectivity, run the Python file at receiver end. You will be able to see the sensor message in Python terminal. You can also get the live sensor data in Telegram as chat.
Once you have successfully learnt to run the sample project, you will be able to deploy Telegram for a real use. On the other end, after receiving it on Python3, you can further process it to run your devices or dump it in a database. With fibre-to-home internet connection, the author could get thirty readings per minute (one 49-character long data reading every two seconds), which is extremely good. If the network slows down, the number of uploads will of course be reduced.
EFY note. One can increase the throughput ‘once per second’ even but that means immense trafficking in the telegram highway—which is deprecated by the telegram and they will make you debarred in no time. Therefore, never try to increase the data trafficking less than a two second period.
Download source code
Somnath Bera is an electronics and IoT enthusiastic working as General Manager at NTPC
