


Machines are developed to reduce efforts by human being, so are the Artificial Intelligence which combined with machines does reduce effort at the same time decides when to apply the effort.
The decision part which was so far a human faculty has now been shifted to machines.
The following project will identify on its own when a massive gearbox starts leaking and then it will raise an alarm or stop the machine depending upon the nature of the leakage.

Project Background
The Coal Handling Plant [CHP] which is responsible for feeding 60000 to 70,000 tons of coal everyday to the 5000 MW thermal power plant boilers, the largest plant of India, is a big network of several belt conveyors, coal chutes, silos and a four truck hoppers.
Several thousand liters of lubricating oil & transmission oils besides tons of greases are required every year to maintain these labyrinth of conveyors.
Everyday some gear fails or some conveyor breaks down due to myriads of reasons!
I’m the in-charge of this behemoth and to help me I have several managers, senior managers & supervisors. But is it enough!
The crux of the problem is the coal itself. The Indian coal has poor calorific value [average 3150 ~ 00 Kcal / kg], besides being hard.
As a result of which huge quantum of coal needs to be transported, crushed & fired for running these boilers at full load.
The 40% ash content & about 1% Sulpher content of coal is the main erosive & corrosive agent respectively which creates havoc for all the machines that processes this coal.
Managing corrosion becomes simple if we can control the coal spillages & coal leakages. Coal spills from belt conveyors and falls on floors, return side belts, machines, gear boxes, hydraulic couplings etc.
Whereas while coal transfers from one conveyor to other conveyor [we call it transfer points – TP ] it slides on the chutes , erodes it due to hardness & corrodes it by sulpher.
Eventually the walls of the TP thins down & leaks and coal falls on everywhere.
Also not to mention that if a conveyor does not stop at right time [when situation warrants like stoppage of the leading conveyor…] it will overflow the TPs causing huge spillage. All in all, coal is everywhere…
The fine coal dust enters all the fine gaps including gear boxes, bearings, couplings and eventually the oil leakage starts. Oil being the color less, identifying the leaking parts need continuous monitoring.
Number also matters: 90+ conveyors, 65 TPs are way too high to have it in one gulp…
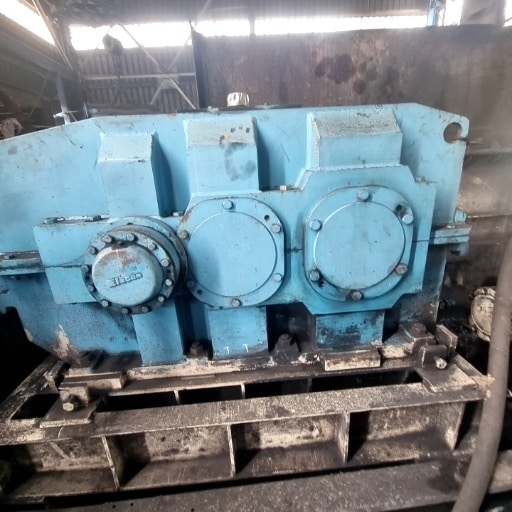
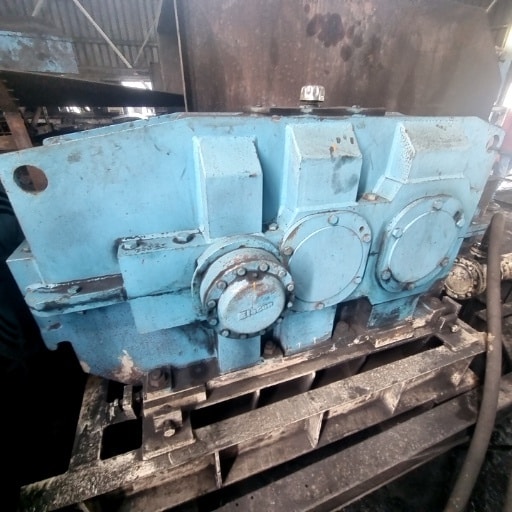
Shown here a typical gear box of a conveyor. It’s nothing but a huge reduction gear trains. Reduce 1450 RPM of motor to about 50 RPM of the mighty conveyor driven shaft. When speed reduces, the torque increases thus helps to run the conveyor.
The gear box has three rotating shafts, each meshed with a gear. All the gears are submerged in oil. There are 3 end caps on each side of the gear box. These end caps [6 nos] are great sources of leakages.
The leakage can happen in all directions of bolt positions [top, bottom, sides]. However, in case the gear box gets pressurized, the oil can leak in the form of jet from the end cap bolts.
Our project is to identify the oil leakages [not oil leak in jet form] from the end cap bolts.
Edge Impulse: If you know edgeimpulse.com then believe me, half of your job is already done! For the rest, you just need to tweak your model to fine tune it for an acceptable level of performance. The computer AI model works like a child!
Imagine how you learnt ‘A for apple’ and ‘B for ball’. You were shown apple from various angles and then you were taught to name it apple. Same goes for ‘Ball’.
Now from all possible angles a child will identify an apple and a ball fairly easily! So is AI to identify them easily.
Difference between knowledge and Wisdom!
Now consider there is a basket where seemingly apple-size-balls and ball-size-apples are mixed and all look same from the point of view… being a child what would you do?
With your only knowledge of apple & ball you would simply miss! So is AI would miss too. But consider the fruit basket is displayed by a vegetable vender then in all probability neither of them is a ball! And some or all of them could be apple!
This trick of connecting an apple with a vegetable seller is called wisdom which you cannot expect neither from a child nor from AI unless it is specifically taught otherwise.
However, we the human being over the years learnt many more associated knowledges which eventually gives us enough wisdom to connect apple with a vegetable seller than otherwise.
However, AI is improving pretty fast. The look wise difference between a ball & apple is identified by AI even before a human eye finds & determines!
Lots of different model with different capability is available in edgeimpulse to test & experiment by you.
Therefore, you better teach the model for apple & ball from all possible angles to perform them without any confusion.
[like the texture profile of an apple, it’s stem, it’s creases on its body, look from top, bottom vis-a-vis uniform & isometric view of a ball etc.]
However, AI is improving so fast that someday it will have wisdom to work upon…
The Project
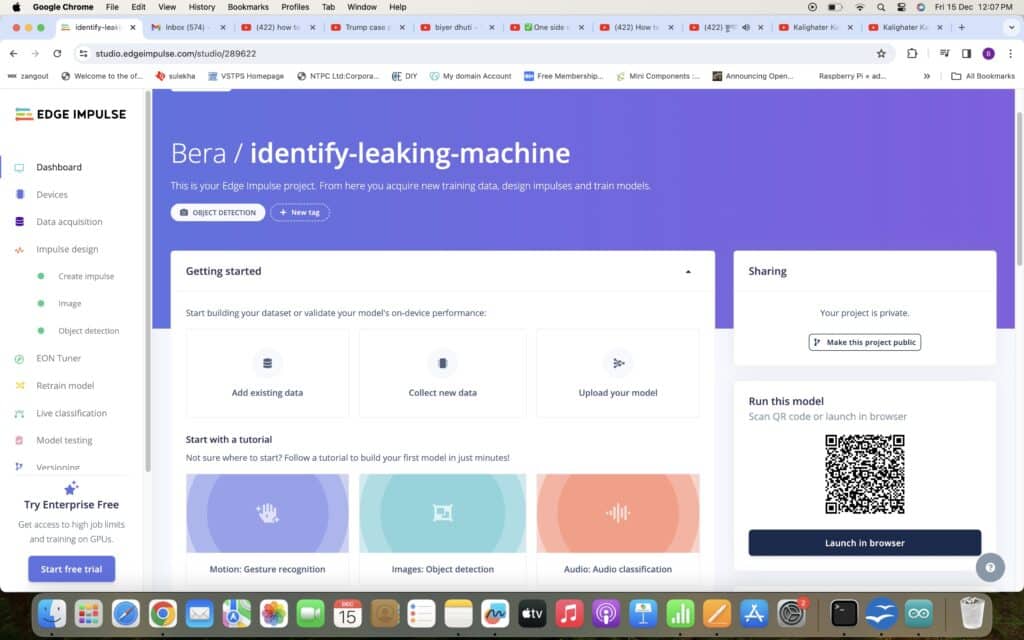
First, open an account on edgeimpulse.com which requires an email ID. Collect picture types of leaking gear & non-leaking gears handful numbers.
If you open the site from a Raspberry Pi computer, using the camera of the Raspberry Pi computer [either USB connected or cam port connected] you can collect images of gears from several angles [which is required while the model is deployed in real working field].
Edge impulse has provisions to connect your cell phone or laptop etc. as an input device for collecting data which is also more convenient for data acquisition in the edgeimpulse project.
The edge impulse project is broadly divided in the following steps:
- Data acquisition – this could be image, sound, temperatures, distances etc. Part of these data are separated as test data while all other data are used as train data.
- Impulse design – this is sub divided into Create Impulse – sub divided by
- Input parameters – image [ width, heigh], sound [sound parameter]
- Processing block – How to process the input data
- Learning block – [object data of this model]
- Image processing – Generate Feature of the collected images
- Object detection – Select your Neural Network model and train the model.
In the final part – the object detection part needs your expertise or I would rather call it – trial and error effort so that the accuracy of the model becomes 85% or above. There are quite a handful models which you can try and see the accuracy level of the model.
Anything above 90% is great but certainly it should not be 100% accurate! If it is so then you have something wrong in your data – could be very less data or insufficient features are there. Recheck & retry again for that case!
For this project the first F1 score was a dismal 37% , we removed the outliers and the F1 score improved to 52%. We understood that our sample collection was not perfect. We have to take snaps facing parallel to the gear box and our score improved to 67%.
We removed more outliers and the picture area reduced from 200×200 to 190×190 pixel and the accuracy or the F1 score improved to 87%.
Model Testing
You can test your model on the test data first. Go to deployment page in the same window and then see the classification result.
To see how it works on mobile device just find the scan image on the project page of edgeimpulse. Then point your device to the scan image.
It will seek permission of your camera and then you are ready to check it on real field.

In the dashboard of the edge impulse opening page this feature is available. You can scan the image on your mobile and then run the model there or you can straight away run it in the browser, the data will be accumulated
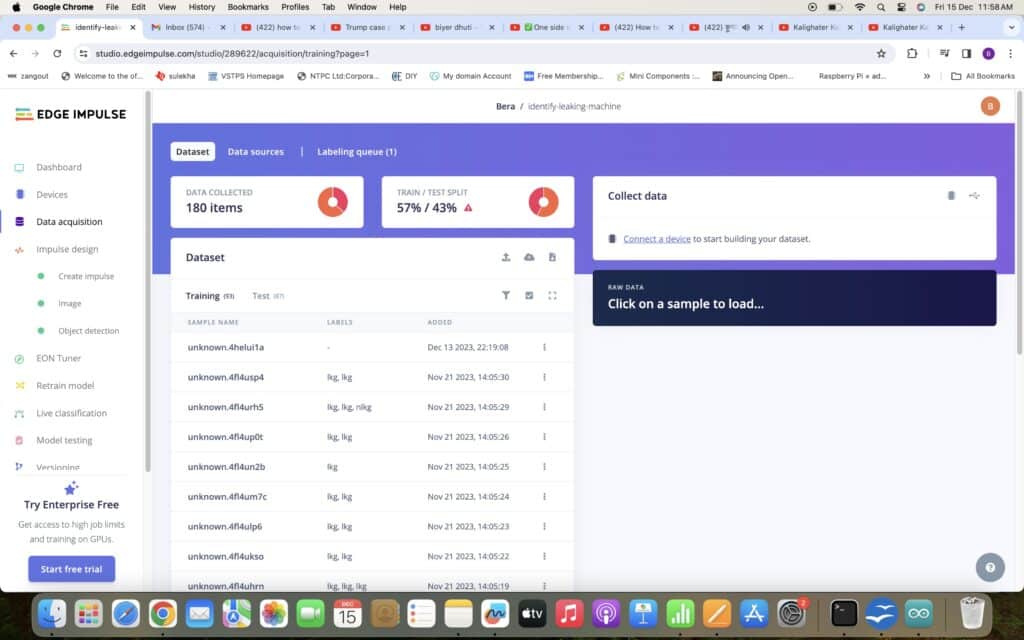
Data Acquisition
Raspberry Pi deployment: For running the model on Raspberry Pi computer you have to download the *.eim file on raspberry pi computer.
But unlike for other hardware [Arduino, Nicla Vision, ESP32 where you can download directly] in case of Raspberry Pi you have to install edge impulse on the Raspberry Pi computer first.
From inside that edge-impulse-daemon software you have to download this file. But don’t worry, edgeimpulse has devoted a full page for installing edgeimpulse on Raspberry Pi.
Look at here – it’s pretty easy.
OK, so you have installed edgempulse on the Raspberry Pi computer. Now fun begins. Run
edge-impulse-linux-runner [Remember to keep the Internet on for Raspberry Pi now] from any terminal of Raspberry Pi computer terminal and see it connects to your edge impulse page [run edge-impulse-linux-runner –clean to switch projects].
This command will automatically compile and download the AI model of your project and then start running on your Raspberry Pi computer.
[see command] In the field, point the camera to the gear box and see the output.
Deploy Model in Python
OK so far so good. In the above deployment, it would work as it is intended in the edge impulse model. To make it work for your special purpose , say raise an audio alarm / run a relay when it identifies a leakage, you have to find some other means!
Here comes python3 to help you out. Linux-sdk-python needs to be installed now in your computer or in a Raspberry Pi computer.
Edge impulse SDK [Short form for Software Development Kit] is available for many models –Python, Node.js, C++ etc. It’s an OSS therefore, You can install it anywhere. This link is for taking you to the page for SDK python page.
Once the Linux-SDK-Python is installed then go to the linux-sdk-python/examples/image directory and run the python file for image identification. Don’t get confused.
In the example directory there are three sub directories – one each for audio data, image data and custom data.
In the image directory the video classification file is also available for video input data. The custom directory is for customizing other kinds of data [For experts area only!].
$> python3 classify-image.py /home/bera/downloads/model.eim # the model file *.eim is to be loaded from respective directory of it’s location. Lest you can copy it in the SDK directory as well!
That’s how you have to load the python file with the downloaded model.eim file. The program will automatically find the camera module [USB connected or Cam-Port connected] and will start running!
On the top left corner a small 190×190 camera window will open and the identifier will clearly be visible as lkg or nlkg.
Aftermath
At the time of writing this write up, we are not finished yet. Rather we are adding one more dimension to the leakage philosophy. So far this is identifying only leakage from flange cover.
Now there can be leakage from flange in the form of a jet stream from a loosened bolt, leakage of which may go away from the flange in all possible directions [top, bottom, sides etc.] This happens only when the gear box gets pressurized due to many reasons!
Attachment: link for running the project
