


The smart IoT RGB lighting system makes your Christmas celebrations look awesome by radiating millions of colour combinations that are wirelessly controlled
We are now in Christmas week and many of you would have started planning for Christmas. To make this season full of joyful surprises, EFY brings you an exciting project series that will add more fun to your Christmas and New Year celebrations. Be it friends or family, colleagues or acquaintances, everyone can join in this season of giving.
In today’s project, you will learn to build a smart IoT lighting system that gives millions of RGB colour combinations in a single IoT light module.

What’s even better is that you can wirelessly control and change the colour effects over WiFi from any digital device – be it an iOS or Android smartphone, or mac, Linux or Windows laptop. Simply add the light to your home decorations and surprise your friends.
Sounds cool !!?? Let’s begin building this exciting project by shopping for the following components.
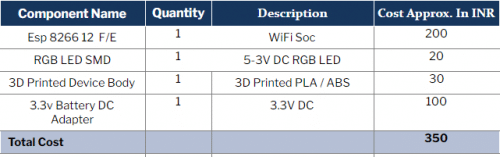
Bill Of Materials
Preparing ESP Module For OTA Firmware Upload
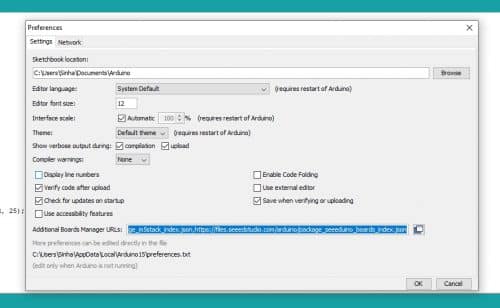
For controlling and changing the IoT light, employ ESP8266. The coding for the project will be done in Arduino IDE. By default, it doesn’t have an ESP board in its list of options. Therefore, go to Preferences sub-menu option in Arduino IDE and add the following link.
Next, open the Board Manager sub-menu option, search for ESP and install it in the Arduino IDE.
After that, install the OTA library and other libraries for the code using the Library Manager sub-menu option.
Upon installing the necessary boards and libraries to Arduino IDE, upload the basic OTA code to ESP8266.
This tiny firmware will make the ESP SoC compatible with a wireless update. However, it will require more memory in the ESP SoC for storing the new OTA firmware. But don’t worry. Your ESP-12F module has enough space, that is, 4MB.
Now open the basic OTA and connect the ESP pins as shown in the circuit diagram. Upload the OTA firmware by selecting the correct port and baud rate of the board.
Connect the GPIO nos. 2 and 15 to GND for firmware update and put the ESP in boot mode. Note that it is a one-time process. Once the OTA firmware is successfully uploaded, you no longer need to boot ESP in the firmware update mode. The old OTA will be automatically replaced by the new firmware.
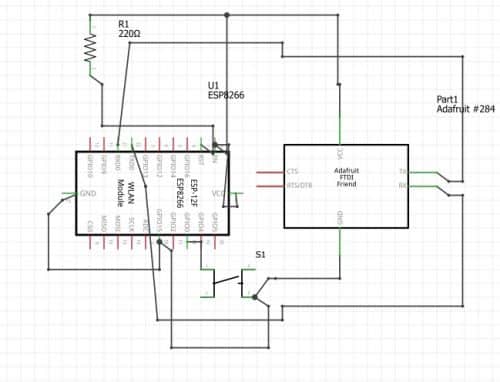
After the OTA firmware update, remove every connection and power the ESP in working mode. Make sure to connect RESET, VCC and CHPD to the positive power source terminal and GPIO15 and GND to the negative part.
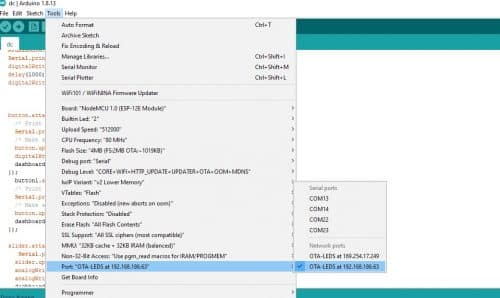
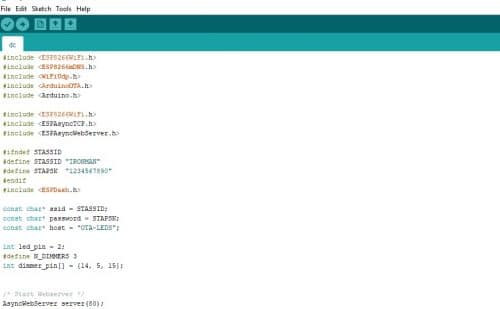
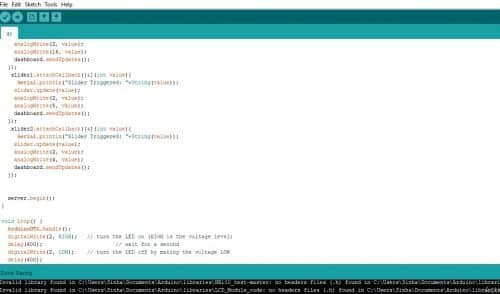
Now wait for the ESP to connect to your home WiFi network set in the OTA firmware update code. Connect the PC having the Arduino IDE with the same home WiFi network. After a few seconds, the network port of ESP in the Arduino IDE port section will become active. Now select that network port and upload the following code for changing the RGB LED light colours.
Designing
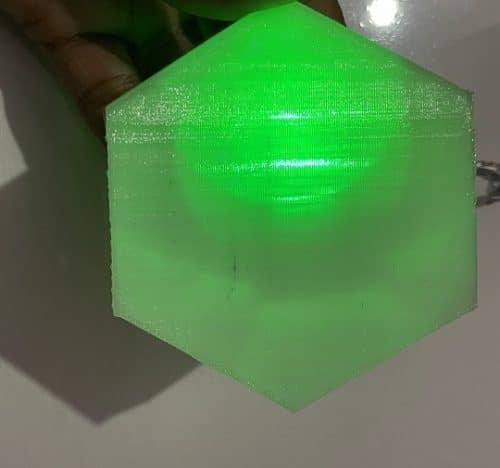
Now design the body of the IoT lighting system as per your choice. Here, I have made the LED light in a hexagon shape that resembles a honeycomb.
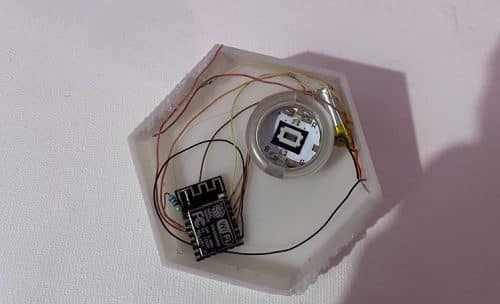
For the IoT light body/case, you can 3D print your design on your own or order from an online printing service. Then solder the VCC and RESET pins of ESP-12F to the battery or power source of 3.3V DC. Connect the GND and GPIO15 to the GND of ESP and the negative battery terminal.
Identify the RGB LED type, whether it’s a common anode or common cathode and then connect the common terminal with respect to the battery and ESP pins. If the RGB SMD is a common positive type, then connect it to the positive terminal of ESP and solder the rest of the RGB pins to PWM pins of the ESP, that is, pins 4, 5 and 16.

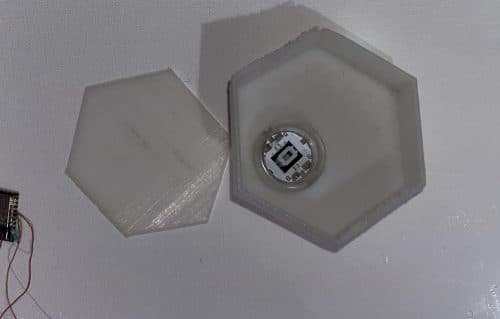
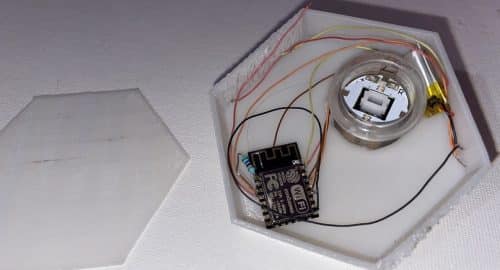
After soldering the SMD light and battery/power source terminal, assemble everything in the IoT light case as shown below and cross-check every connection. Finally, cover the top of the IoT light case with a thin cover.
Testing
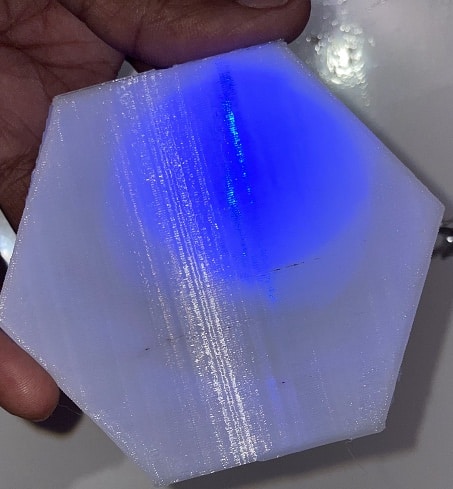
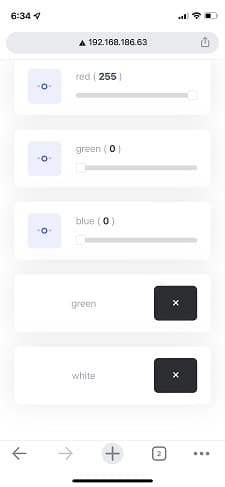
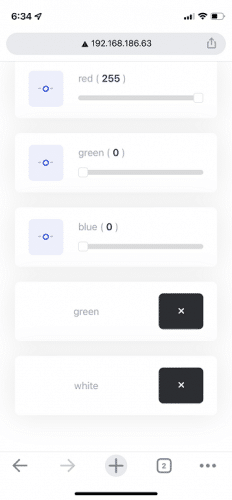
Obtain the IP address of the ESP that is connected to the home WiFi connection and enter it in Google Chrome or any other web browser on your phone or laptop. You will then see the IoT device’s UI display having a few sliders, which are to be used for selecting the value of RGB colours to control and change the IoT light.
Congrats !! Your IoT LED light with 10 million colours is now ready. Show your magic to your friends this Christmas party and have fun.
The multipurpose IoT light can also be used for birthdays, Diwali and any other joyous occasion.
Download Source Code
