


Frequently, we are in need to do audio troubleshooting of electrical and electronic components, installations and equipment. E.g. we may need to check, test and evaluate:
- microphones
- loudspeakers
- headphones
- audio filters
- preamplifiers
- the presence or absence of audio signals at different points of audio amplifiers
- the noise of power supplies
- the noise from some electronic components
- the signals in electrical cables and installations
- the noise introduced in electrical cables and installations, etc.
For these and many more cases we are in need of audio amplifier with two channels with the following main features:
- high input impedance, e.g. above 1 MOhm
- high adjustable gain, e.g. to more than 1000
- capable of driving loudspeakers, headphones and acoustical systems
- capable of producing around 0.5W of output power over 8 Ohm loudspeakers
- capable of working from 6V and 12V rechargeable batteries, from USB, +5V, +6V and 9V batteries
- low quiescent current, e.g. below 20mA.
Here we will see a low cost solution for these and many more requirements.

The solution is practical, simple and effective dual channel audio amplifier built around one TL062 and two LM386.
Description of the dual channel audio checking and troubleshooting tool
Figure 1 presents the circuit diagram of the simple and effective dual channel audio troubleshooting tool working with stereo headphones or with two loudspeakers.

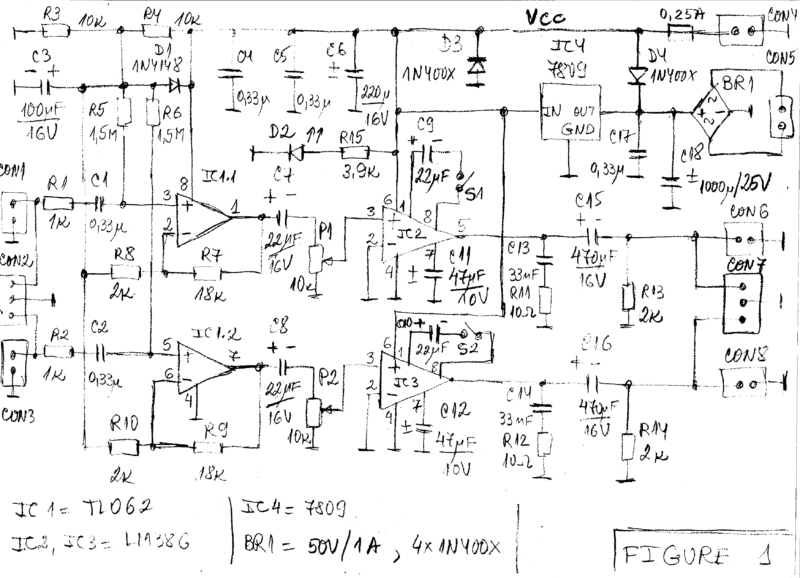
We may use any two headphones, earphones or loudspeakers with resistance above 8Ohm. Also we may use large acoustical systems with resistance of 8 Ohm or above for better evaluation of the output signal.
The circuit has two channels of low power amplifiers built around three popular and low cost ICs. Both channels are independent and may be used for different purposes. In case of needs we may use only one of the channels.
The input stages of the amplifiers are built around the dual operational amplifier (OA) TL062. We may use other OAs with JFET inputs as TL072 or TL082 but they have larger power supply current.The input resistance of the channels is fixed mainly by R5 and R6 to 1.5MOhm. That is good for checking most of the audio circuits, microphones, acoustical sensors and cables. In case of needs we can increase that resistance to more than 10MOhm.
The gain of the first stages of both channels is fixed to 10 according to the formulas:
Av1 = 1 + R7/R8 = 10
Av2 = 1 + R9/R10 = 10
We can select other values of the voltage gain in case of needs. The output stages are built around the two low power audio amplifiers LM386. The gain of each of the power amplifiers can be set independently to 20 or to 200. If we open the switches S1 and S2 the gain of the corresponding LM386 is set to 20. If we close the switches S1 and S2 the gain of the corresponding LM386 is set to 200. The output connectors CON6 and CON8 are for external loudspeakers or external acoustical systems. The output connectors CON7 is for external stereo headphones.
If we use stereo headphones we should pay attention about the maximal output power in order not to damage the headphones or the personnel working with the headphones. The volume of both channels is adjusted independently with the potentiometers P1 and P2 according to the needs.
Power supply
The dual channel audio troubleshooting tool with stereo headphones has built-in power supply. It is built around the bridge rectifier BR1 (e.g. 4x1N400X) and fixed voltage regulator 7809. We may apply AC or DC voltage from 12 to 20V on the connector CON5. As result we will obtain +9V regulated power supply on the connector CON4. Also we may apply well regulated power supply on the connector CON4. In that case we should not apply any voltage over the connector CON5.
The circuit can work from 4.5V, 6V, 9V and 12V dry batteries or rechargeable batteries connected to CON4. The power supply Vcc is limited by the allowed power supply range of the amplifiers LM386 and the required output power.
Conclusions
The tool has wide range of applications limited mainly from the technical competence of the personnel using the tool. Care should be taken about the electrical voltages presented in the checked and troubleshooting circuits and installations. If we connected appropriate inductors at the inputs we may follow electrical installations with strong signals. The circuit does not need any adjustments and will start to work immediately after the proper montage is done.
