


Have you ever pondered the repetitive nature of mastering certain tasks, where the key lies in constant repetition? This holds true in the realm of computer systems, where executing specific keyboard or mouse operations in a predefined sequence is often a necessity. Enter the following DIY project—a solution designed to empower computer users by harnessing the efficiency of automation through HotKey emulation. This straightforward and user-friendly script was crafted to simplify the Copy-Paste process during the creation of extensive reports, transforming what would be a laborious and time-consuming endeavour into a seamless operation.
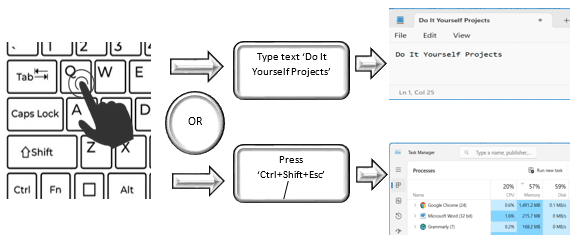
Scripts are different from programs in the sense that scripts communicate with different tools. Python scripts are useful in many automation works. In this project, Hotkeys are emulated using Python scripts. Hotkeys are the keyboard keys which complete a set of clicks/presses other than its original functionality. For example, we can use the key related to the letter ‘Q’ to type ‘Do It Yourself Projects’ by a single press, Or it can be used to open ‘Task Manager’. The block diagram in Figure 1 pictorially describes this idea. Emulation is closely tied to hardware, replicating its behaviour, while simulation is more aligned with software, mimicking program execution and system responses.
Work Environment
The script is written in Python language. Following are the specifications of the system on which the script is coded, and tested.
System: Core i5 Processor, 16 GB RAM
Software: Python IDLE 3.8 32-bit
Libraries: pynput, PyInstaller
OS: Windows 11 Home
The script is available in a folder. The folder contains two main files as listed below.
1. CopyPasteHotKeyEFY.py located at ‘..\EFYHotKey\’ 🡨 Pyhton Script file
2. CopyPasteHotKeyEFY.exe located at ‘..\EFYHotKey\dist’ 🡨 Windows executable file
Procedure
The project described here alternately emulates ‘Ctrl+C’ often known as ‘Copy’, and ‘Ctrl+V’ often known as ‘Paste’ by a single key press of ‘Ctrl’ which is on the left side of the keyboard. This key is also referred to as the ‘Left Ctrl‘ key. The ‘Right Ctrl’ key is kept free for other operations by the user. The diagram in Figure 2 shows how the algorithm works. The decision box ‘Alternate Press?’ helps alternate emulation of Copy and Paste functions. This process is implemented in the script with the help of a status variable.

The code can be tested either by using a Python installation (Steps 1 to 5) or by directly running the Microsoft Windows ‘.exe’ executable file (Step 6). If no script customization is needed, you can proceed directly to Step 6.
Python installation
Step 1: Visit the python.org website, and download the latest version of Python IDLE which is available for Windows. Select Windows installer 32-bit or 64-bit based on your system. Install Python IDLE using the downloaded file.
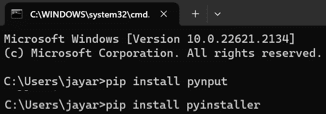
Step 2: Press W+R keys, this should open the ‘Run’ window. Type ‘cmd’, and press enter. In the Windows terminal type, ‘pip install pynput’, and press enter. Once again type ‘pip install pyinstaller’, and press enter. This should complete the installation of Python libraries.
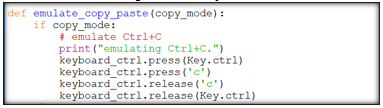
Step 3: Run Python IDLE and open the ‘CopyPasteHotKeyEFY.py’ file from the ‘EFYHotKey’ folder. Make changes in the code to get your desired requirements and functionalities. You can change/add/delete 4-digit PINs from the code segment shown in Figure 4. One def function is shown in Figure 5, which helps emulate the ‘Ctrl+C’ function when the ‘left Ctrl key’ is pressed. Once you have changed the script, ‘Save’ the file.

Step 4: The script can be tested by executing it in the Python shell by selecting ‘Run Module’ under ‘Run’ from the Python IDLE menu bar. The script should run successfully as shown in Figure 6.

Step 5: The script which is ready for execution can be converted to a Windows executable file such as ‘.exe’ using the PyInstaller library. Open the Windows terminal as done in Step 2 and navigate to the folder where our script is located. Use the pyinstaller command to get the ‘.exe’ file. The procedure is shown in Figure 7.

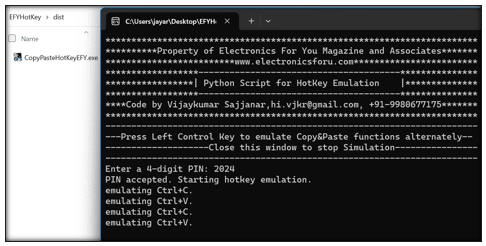
Step 6: Double-click the ‘.exe’ file generated in the folder ‘..\EFYHotKey\dist’. The Windows shell should open and complete execution as shown in Figure 8.
Discussions and Future Scope:
The versatility showcased by this DIY project not only underscores the power of feature-rich Python scripting but also opens the door to a multitude of applications across diverse domains. From enhancing efficiency in code development to simplifying daily tasks in data entry, graphics design, content creation, and system administration, the possibilities are expansive. Furthermore, the incorporation of mouse emulation through the pynput library can add an extra layer of automation finesse. As these scripts are easily shareable and executable on various systems through Windows executable files, the potential for collaborative innovation and seamless integration into different workflows becomes even more apparent. This DIY endeavour sets the stage for ongoing discussions and exploration of Python’s scripting capabilities, pointing toward a promising future in the realm of automation and efficiency.
Author: Vijaykumar Sajjanar, Assistant Professor, Department of Electronics and Communication Engineering, BLDEACET, Vijayapur
