


 Musical bell is the choice of many over ding-dong type bell or door-lens for which you have to go to the door to look out. An IoT based smart musical bell can be rung through the conventional bell switch as well as by a motion detector sensor like an infrared (IR) sensor, passive infrared (PIR) sensor, or ultrasonic sensor, and even through a mobile phone.
Members of a family can use a smartphone application providing separate programmable tunes so that those at home can identify which member is ringing the doorbell on hearing the tune. Separate tunes can be set for different members of the family, and for guests and others a unique tune can be generated through a sensor. This musical bell can also be used in an office as a call bell that is operated through the executives’ smartphones.


Circuit and description
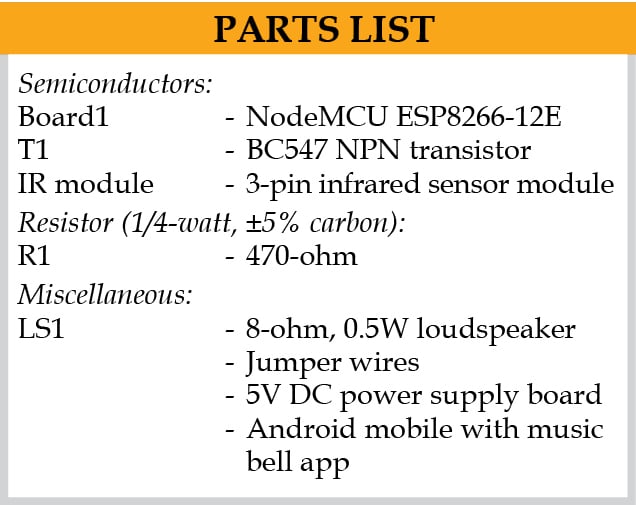
The circuit diagram of the smart musical bell is shown in Fig. 1. It comprises NodeMCU board Board1, an IR sensor module, BC547 transistor T1, loudspeaker LS1, and 5V DC power supply. The NodeMCU is a single-board microcontroller that uses Wi-Fi chip ESP8266 meant for IoT applications. Its open source hardware and firmware uses Lua scripting language.
The ESP-12 NodeMCU used here has the following features:
- An analogue input (10-bit integrated ADC)
- 13 digital I/O pins (alternate functions like USART/I2C/SPI)
- Micro USB port for power, programming, and debugging
- Two 2.54mm, 15-pin headers with access to GPIOs, SPI, UART, ADC, and power pins
- Reset and Flash buttons
- 5V power supply via micro USB port
- Wi-Fi support (802.11 b/g/n, 2.4 GHz, WPA/WPA2)
- Integrated low-power 32-bit RISC MCU (L106)
- 64kB instruction RAM, 96kB data RAM
- Integrated TCP/IP protocol stack
- Integrated TR switch, balun, LNA, power amplifier, and matching network
- Integrated PLL, regulators, and power management units
- Antenna diversity support
- Standby power consumption of <1.0mW
- +20dBm output power in 802.11b mode
- Operating temperature range of -40°C~125°C
The pin diagram of NodeMCU is shown in Fig. 2.

When a person is near the IR sensor, it produces logic 1 at the output that is connected to GPIO4 (pin D2) of NodeMCU. Program is written in such a way that when D2 pin is high, the guest tune is played. All family members will have the Android application installed in their smartphones and use the Wi-Fi at home. So, when any member rings bell the corresponding tune will play and identify the member.
IR sensor is for guests and strangers while smartphone application is for family members. If a family member is not carrying his smartphone or doesn’t use it, he/she will have to ring the bell like a guest and guest tune will play whenever finger comes near the infrared sensor. It will also thus work as a touch-free bell in the present Covid-19 situations and help prevent spreading of the virus.
Software
NodeMCU board can be programmed with Arduino IDE that can be installed, along with NodeMCU support, using Board Manager. This installation process is not being included here as it has already been published in EFY and can be seen at this link.
After writing the source code MusicalBell.ino in Arduino IDE, press upload button to send code to NodeMCU board. Open the serial monitor by clicking on serial monitor option from Tools menu, select the baud as 19200 and press RST button on NodeMCU. NodeMCU will connect with the Wi-Fi network. Note down IP address because you will need it for the Android app later.
Download source code
Construction and testing
Wire the circuit on a breadboard or general-purpose PCB and upload the code to NodeMCU. Install Android app Musical Bell.apk in your smartphone, open the app and enter the IP address of NodeMCU in your mobile application as shown in Fig. 3. Once connected successfully, you can press any of the buttons (Chandresh, Priya, Ekta, or Guest) to ring the doorbell. Each button produces a unique tone.
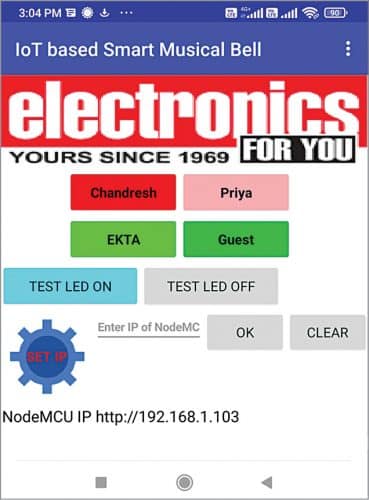
You can change the name of each button as per your requirement in the Android source code. You can also install the IR sensor module near the existing doorbell switch. Cover it with suitable enclosure so that it is not disturbed by any source of light including sunlight.
The front side of the sensor should be facing outside such that when you put your hand near the sensor, the doorbell rings. This IR sensor is for the guests or those who do not have the mobile app in their smartphones.
Dr C.H. Vithalani is professor and head of Electronics and Communication Department, Government Engineering College, Rajkot.