


The Internet is full of articles about building chatbots on platforms like Telegram. However, in this article, readers get some insights on how to code for a chatbot in Python. Understanding the package used in this article will enable the adventurous to extend the functionality of this chatbot in Python on their own.
To get started with building the chatbot in real-time, there are some prerequisites, which are as follows:
- Basic knowledge of Python and using Pip/Conda to install packages.
- A Python IDE (I use Jupyter Notebook, while you could pick any of the popular options like Spyder, PyCharm, Visual Studio Code, or Eclipse (with PyDev)).
- You need to install Telegram on a mobile phone and also on your desktop.
- You will need the Python library python-telegram-bot.
How the bot scheme works
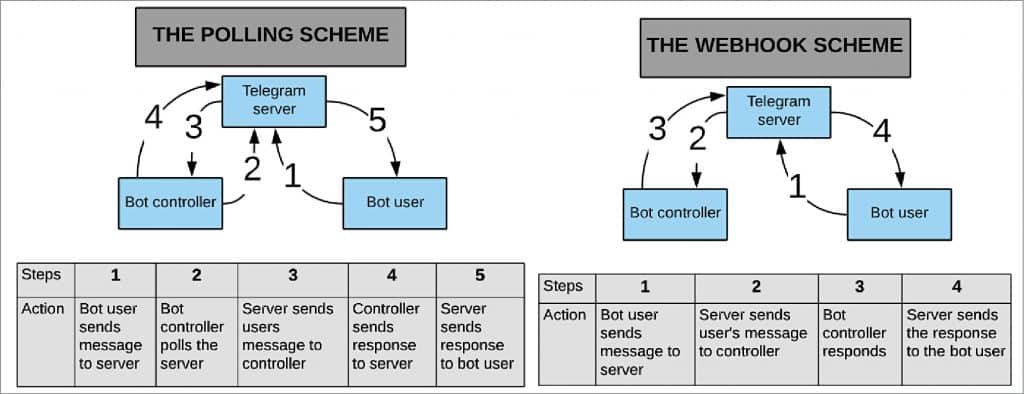
You need to understand that there are three actors in the scheme—the bot user, the Telegram server that hosts the bot, and the bot controller (which is from the Python script that we write and execute).

Also, note that you can use the following two ways to control the bot:
The ‘polling’ scheme
Here the Python script (which controls the bot) will periodically access, i.e., ‘poll’ the bot on the Telegram server, check if there are any new messages from a bot user, and respond accordingly.
The webhook scheme
This is the more efficient scheme. Here the bot controller script does not ‘poll’ the bot; rather, it is the bot that informs the bot controller that a new message has been sent by a bot user. This scheme, however, requires two additional things—a permanent IP address of the server where the bot controller is located, and that the server hosting the bot controller must be HTTPS enabled. In this article, I am only describing the ‘polling’ scheme.
Using @BotFather to create your bot
The steps in creating a Telegram bot are as follows:
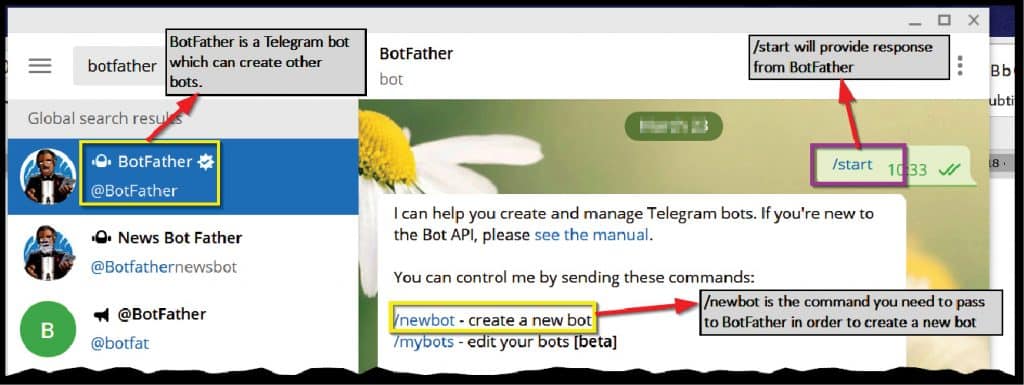
1. Telegram has a bot named @BotFather which can create a bot for you. So, as a first step, go to your Telegram app and search for @BotFather.
2. Then send it the message /start. The scheme works like this—if it is a message without a leading forward slash (/), then it will be interpreted as a text message. However, if it has a leading forward slash, then it will be interpreted as the function / method. A Telegram bot cannot respond on its own (to reduce spamming by bots). It must receive a text message (one without a forward slash) or a command (one with a leading forward slash) to respond to such messages.
3. Now create a new bot using the command /newbot and give it an appropriate name, which must end in the word bot. @BotFather will send you a message, which will include a token. The token should look something like what’s shown below:
1104497538:AAEbXXXi PegAxUXXXX_
TevmyPG01GnXXLY
(Some letters have been replaced with X to preserve privacy.) Fig. 3 shows the process on the Telegram app.

4. Note that your newly created bot is hosted on the Telegram server, and you can now access your bot on a Web browser by using a command of the format:
https://api.telegram.org/bot/getme
The above URL has three parts: (1) https://api.telegram.org/bot ; (2) ; and (3) /getme. The first two parts of the URL will allow your browser to access your bot (which resides on the Telegram server) and the last part will give the appropriate command to your bot. Here the command is /getme and so it will provide details of your bot in the form of a JSON object (similar to a Python dictionary). Fig. 4 shows this.

Now there are two ways to interact with the bot. The first is, of course, the method we used earlier, where we used a Web browser and a URL of the format https://api.telegram.org/bot/getme
There is, however, a second method in which we can use a Python script to access the messages/commands coming from the bot user to our bot hosted on the Telegram server. In the next section, we will look at creating a bot controller through a script written in Python.
Writing a Python script to create a bot controller using python-library-telegram
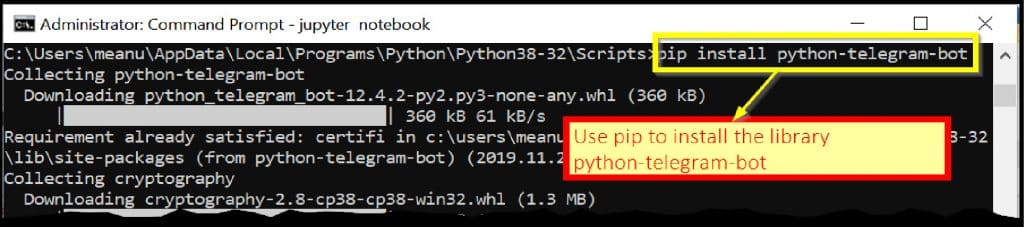
To create a bot controller script, we shall use a Python library python-telegram-bot; so download this using Pip:
pip install python-telegram-bot
This is shown in Fig. 5.
To write the Python script, you can use any popular IDE. Some common ones are PyCharm, Visual Studio Code, and Eclipse (with PyDev). You need to know some of the classes and methods of this library in order to truly understand how the code works. Remember, we are using the polling and not the webhook technique.
We shall use instances of (i.e., we will create objects of) two classes from the telegram.ext sub-module, namely, telegram.ext.Updater and telegram.ext.Dispatcher. The Updater class gets updates from Telegram and passes them on to the Dispatcher class.
When you create an Updater object, it will create a Dispatcher object for you and link them together with a Queue. This Dispatcher object can then be used to sort the updates fetched by the Updater according to the handlers you registered, and deliver them to a callback function that you defined.
The above para may be a bit confusing, so I have elaborated on it, as follows:
Step 1
Create an object (we will call it my_updater) of class telegram.ext.Updater. To do this, you need to import the Updater class from telegram.ext. Also, when you create your Updater object, namely my_updater, you will need the HTTP API key for the bot you created earlier. The code to create this object will be like what follows:
my_updater = Updater(token=’your_bot_
token’, use_context=True)
Note
In the example code on the website (Ref 2 & 3), this variable is often called Dispatcher, but I have used my_dispatcher to specify that this is not some method of a class but an object of class Updater, which I have created.
Step 2
Now, this Updater class has an attribute called Dispatcher. This attribute returns an object of class telegram.ext.Dispatcher. Don’t get confused by this scheme. This is a typical method by which many libraries of Python work. So, you can create an object of Dispatcher class (we will call it my_dispatcher) by using the dispatcher attribute of the object of the Updater class (which here is my_updater). The following code snippet shows this:
my_dispatcher = my_updater.dispatcher
Step 3
Here, we will write a function named start. So, whenever the bot user types a message /start, this function gets triggered. The way the Telegram package is written is such that when you write a function (like /start here), the Telegram server will pass it two attributes. So, you must have two attributes in your function definition and, by convention, these are called update and context. I don’t want to get too technical but for those interested, the attribute update will get an object of class telegram.update.Update. While the attribute context will get an object of class telegram.ext.callbackcontext.CallbackContext
The attribute update is actually a Python dictionary. You can confirm this by putting a print(update) command somewhere in your get() function. This dictionary has a key named effective_chat and the value of this key is another dictionary, which contains keys like ID, first_name, last_name, etc. So, using a format of type update.effective_chat.id, you can get the ID of the chat. In our bot code, we will ‘extract’ three parameters of the bot user—(1) id, (2) first_name, and (3) last_name
In this step, we will do the following things:
- Extract id, first_name, and last_name from the parameter update.
- We will use the first_name and last_name to send a reply back to the bot user.
- To send a reply back to the bot user, we need to use the following command:
context.bot.send_message(chat_id, text=out_text)
To make the code more readable and easier to follow, I have split this in two lines as:
my_bot = context.bot
my_bot.send_message(chat_id, text= out_text)
For the technically inclined, you may note that my_bot (which is the return value of context.bot) is an object of class telegram.Bot. Further, this object, i.e., my_bot, being an object of class telegram.Bot, has a method send_message(). So, you can use this method to send a message to the bot user.
Note
You can confirm that the return of context.bot is actually an object of class telegram.Bot by looking at the source code for this in the file callbackcontext.py. You can find this file on GitHub at this link. You will find the definition of bot() around lines 155-157. Also, the class telegram.Bot has a method send_message() by looking at the source code of the file bot.py. You will get the code for the method send_message() around lines 265-275.
But, in the above scheme, there is one problem—you need to register this command, i.e., get() in the dispatcher. To do this, the module has a class Handler, and from this class many other classes are inherited such as CommandHandler, MessageHandler, etc. Here, since get() is a command, we will use the specific Handler meant to handle commands, which is Commandhandler. Note that the class Commandhandler sub-classes the class Handler, i.e., it inherits from the class Handler. So, the scheme works like this.
You first create an object of class CommandHandler (I have named it start_handler) and pass to it the name of the command as the first parameter and the name of the callback function as the second parameter. So, the line of code will be as follows:
start_handler = CommandHandler(‘start’, start)
Note
You can see the source code for the Dispatcher class in the file dispatcher.py at this link.
Having created an object of type CommandHandler, you can add it to the Dispatcher class object (which in our code is my_dispatcher), using the method add_handler() of the Dispatcher class. So, the code will be as follows:
1 from telegram.ext import Updater, CommandHandler
2 my_updater = Updater(token=’Your_token_here’, use_context=True)
3 my_dispatcher = my_updater.dispatcher
4
5 def start(update, context):
6 chat_id = update.effective_chat.id # Get id of the chat.
7 f_name = update.effective_chat.first_name # First name of bot user
8 l_name = update.effective_chat.last_name # Last name of bot user
9 full_name = f_name + ‘’ + l_name # Full name of bot user
10 out_text = ‘Hi {0} {1} from bot’.format(f_name, l_name)
11 # The print functions are to show the contents of the variables
12 # You can remove the print functions
13 print(update)
14 print(‘effective_chat ->’,update.effective_chat)
15 print(‘chat_id->’, chat_id)
16 print(‘bot->’, context.bot)
17
18 my_bot = context.bot # my_bot is an object of type telegram.Bot
19 # print(my_bot)
20 my_bot.send_message(chat_id, text=out_text)
21 start_handler = CommandHandler(‘start’, start)
22 my_dispatcher.add_handler(start_handler)
23 # my_updater.start_polling() starts the bot, and the bot begins
24 # to start polling Telegram for any chat updates.
25 # The bot has its own separate threads so it wont halt your Python script.
26 my_updater.start_polling()
27 # my_updater.idle() command is used to block the script until
28 # the user sends a command to break from the Python script such as ctrl-c
29 on windows
30 my_updater.idle()
The complete code for this bot is available on GitHub at this link.
Further extensions
You can improvise and extend the functionality of the bot. This bot accepts only one command, namely, /start. You can create a message handler. For that you will need an object of class MessageHandler. You can also try using Webhooks or install your bot on a remote server like Heroku, PythonAnywhere, etc.
Anurag Gupta is an engineer by education but a police officer by profession. He is a Python enthusiast who has recently co-authored a book on Python named Python Programming: Problem Solving, Packages and Libraries.

