


 The article demonstrates the use of Message Queuing Telemetry Transport (MQTT) protocol in smartphones and Raspberry Pi.
MQTT, a machine-to-machine Internet of Things (IoT) protocol, is useful for connecting with a remote client where a small code footprint or very low Internet bandwidth is needed. It has been used in sensors communicating to a broker/server using satellite link, and in a range of home automation and small devices. It is ideal for mobile applications because of its low power usage, small size, minimised data packets and proper distribution of information to one or many receivers.
MQTT protocol was first designed in 1999. With the growth of the IoT and the need to communicate between low-powered devices, it has become quite popular in recent times.

How MQTT works
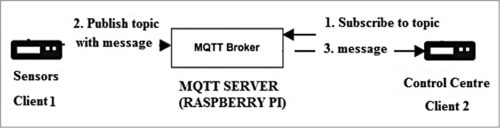
MQTT protocol uses a publish/subscribe architecture unlike HTTP, which uses request/response architecture. MQTT protocol is event-driven and enables messages to be pushed to clients. The heart of MQTT protocol is MQTT broker (server), which is responsible for dispatching messages between senders and receivers (clients).
Every client that publishes a message to the broker includes a topic/information into that message. Each client that wants to receive a message needs to subscribe to a particular topic. The broker delivers the message with the matching topic to a particular client. Clients do not need to know each other as they only communicate using the topic over MQTT broker. The block diagram of the MQTT communication protocol is shown in Fig. 1.
Understanding MQTT using a practical example
There is a free server (http://test.mosquitto.org/) where you can test your first MQTT message. Default port for MQTT is 1883; since it is not encrypted (not secure), it is not advisable for commercial usage.
You need two Android phones or two PCs with an Internet connection on both. For now, let us use two Android phones (phone1 and phone2) and follow the steps given below.
- Download MQTT Client (Webneurons) application on both phones from the link.
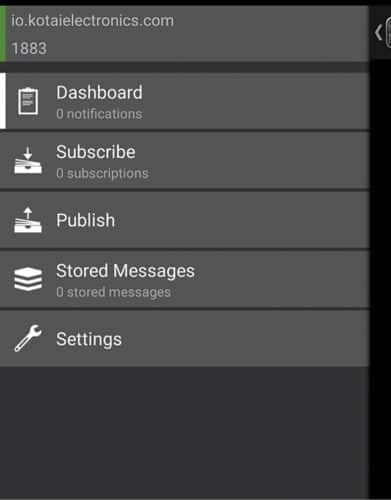
- Open the application and enter the details under Settings, as shown in Fig. 2.

In the first text box, enter io.kotaielectronics.com URL of MQTT server (broker). In the second line/text box, enter port as 1883. Leave the username and password spaces blank. Press Save and then Connect. Enter the same details on the second phone.
3. You will see a green colour on the top-left corner, which indicates that MQTT has been successfully connected (Fig. 3).
4. Create a topic in phone1 from the page, as shown in Fig. 4.

On the top-right corner of the application, press Upload near Settings to publish the topic. You will see a page as shown in Fig. 5.
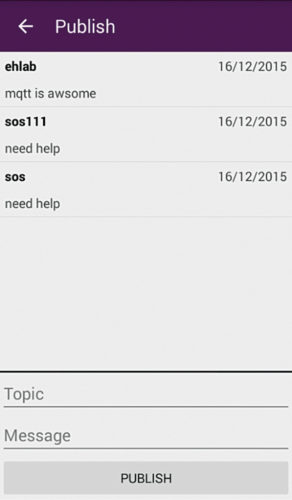
In Fig. 5, there are two text boxes: topic and message.
Create a topic as sos111, and the message as need help. Press Publish on phone1.
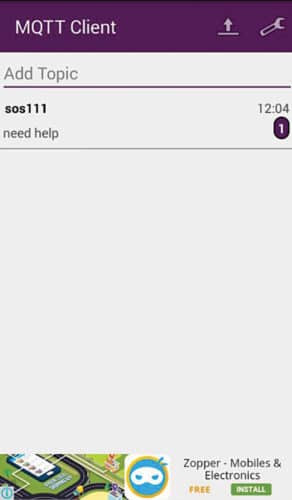
Next, subscribe to sos111 in phone2. For this, go back to the application and in Add Topic text box, as shown in Fig. 4, type topic name as sos111, same as in phone1. You will get need help message on phone2.
Setting up MQTT broker on Raspberry Pi
You can set up your own MQTT server/broker on any cloud server, a local machine or Raspberry Pi. In this section we learn how to set up a local MQTT server on Raspberry Pi. Raspberry Pi 2 board with an Internet connection was used during testing. Follow the steps given below.
Install some dependencies in Raspberry Pi before compiling and running MQTT server. For that, run the following commands on the terminal:
$ sudo apt-get update
$ sudo apt-get install libssl-dev
$ sudo apt-get install cmake
$ sudo apt-get install libc-ares-dev
$ sudo apt-get install uuid-dev
$ sudo apt-get install daemon
Next, download libwebsockets.
Unpack it using the following command:
$ tar zxvf libwebsockets
Change directory using the following command:
$ cd libwebsockets
Make a build directory inside libwebsockets using the commands given below.
$ mkdir build
$ cd build
Then, to build, the command is:
$ cmake .. #(note the ..)
Run the following command to install:
$ sudo make install
Next, rebuild the library cache using the following command:
$ sudo ldconfig
Change the directory to Home using the following command:
$ cd
Download the source code of MQTT broker, Mosquitto, using the following command:
$ wget http://mosquitto.org/files/source/mosquitto-1.4.1.tar.gz
Unpack it using the following command:
$ tar zxvf mosquitto-1.4.1.tar.gz
$ cd mosquitto-1.4.1
Open and edit config.mk from any text editor using the following command:
$ cd config.mk
Change WITH_WEBSOCKETS:= no to WITH_WEBSOCKETS:=yes
Then, go back to Home and compile using the following command:
$ make
Install it using the following command:
$ sudo make install
Then, create a config directory inside /etc folder using the following command:
$ sudo mkdir /etc/mosquitto
Copy default config file to /etc folder using the following command:
$ sudo cp mosquitto.conf /etc/mosquitto
Add the following two lines to /etc/mosquitto/mosquitto.conf at the end of the file:
listener 9001
protocol websockets
Next, add a user for mosquitto using the following command:
$ sudo adduser mosquitto
Reboot and login with the username as mosquitto. After successful login, open the terminal window on Raspberry Pi and run following command:
$ mosquitto_sub -h localhost -t test
Open another terminal window on same Raspberry Pi and run the following command:
$ mosquitto_pub -h localhost -t test -m
“hello world”
You will see hello world message on the first terminal window.
Congrats, your first MQTT server is up and running! You can now communicate with any other device using MQTT client installed on your Android phone.
Satya Sankar Sahoo is director of Kotai Electronics Pvt Ltd. He has more than ten years of experience in embedded and IoT domain. He loves building circuits, coding for microcontrollers, automation, security and healthcare devices
