


 This project can make life easier for bedridden patients and older people as their voice command can trigger the control section that adjusts their bed’s position. It can even control home appliances like lights, fan, AC, and TV, based on the command. Even children can operate the lights at night using voice commands without their parents’ assistance.
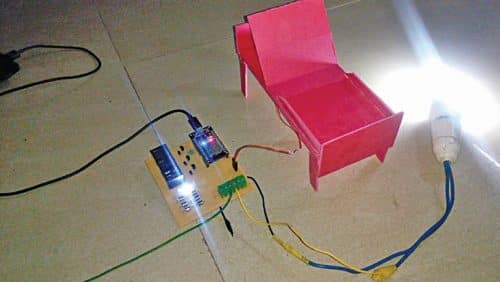
There can be an option for text commands instead of voice commands. The proposed system is user-friendly, and no technical assistance is needed for its operation. The author’s prototype is shown in Fig. 1.
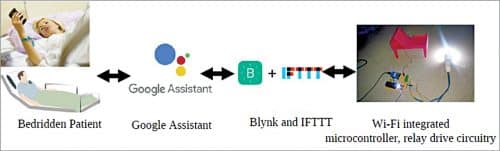
A wireless headset worn by a person transmits the person’s voice to a smartphone that uses Google Assistant app. The app has voice recognition software for interpreting and translating the voice command into digital data that is understandable by the microcontroller to do the required task(s). The control section includes microcontroller with integrated Wi-Fi, relay, and associated circuitry.

Circuit and working
Block diagram of the system is shown in Fig. 2 and functional block diagram of the developed system is shown in Fig. 3. The system receives voice commands through Google Assistant running on the smartphone. If the command is valid (for instance, Light On), the ‘If This, Then That’ (IFTTT) applet will send the web service request to Blynk server and convert it into digital data, understandable by the microcontroller, and transfer the data to microcontroller wirelessly through Wi-Fi and actuate the device as per the voice command.

As shown in the circuit diagram in Fig. 4, the system uses an ESP32 board (Board1), which has a microcontroller integrated with Wi-Fi transceiver. When it gets voice command, it enables the relay driver circuitry. In this example, 5V relays are used to switch on/off light, fan, and TV. (A 3-channel relay module may be used in place of individual relays.)


Whenever a valid command is received by ESP32, the program triggers a high or low signal to its GPIO pins connected with relays, which control the home appliances. The servo motor is used to change the bed’s back-rest position up or down.

Software implementation
The software, along with Google Assistant app, involves programming of ESP32 using Arduino IDE, configuring Blynk server, and IFTTT applets in the smartphone.
The Blynk app can be configured using the following steps:
- Download Blynk app from Play Store or App Store.
- Open the app and create an account. If you have already created an account, you may log in.
- Start by creating a new project.
- Create a project name (say, Bedridden_IOT) and choose device as ‘ESP32 Dev Board’ and connection type as ‘WiFi’.
- Press Create button. A window will pop up which says “Auth Token was sent to: your email.” Tap Ok button to proceed. You can open your email to check your authentication key. This key will be used in your Arduino code and IFTTT configurations later on.
- Tap anywhere on the canvas to open the widget box. All the available widgets are located here.
- Tap on the particular widget to change the settings. Select the Button widget and rename it as Light and digital output as gp2 and change Mode to Switch option. Similarly, select another Button widget and name digital output as gp4 and gp15. Here, gp2 corresponds to lamp/light connected to GPIO2 of ESP32. Similarly, gp4 and gp15 are connected to GPIO4 and GPIO15 of ESP32 for fan and TV, respectively.
- For servo motor, rename Button as Servomotor. Click the output box, select Virtual pin as V1 and change Mode to Push option (Fig. 5). Similarly, select Button again and rename it as ServoV2, output box as V2, and Mode as Switch option.
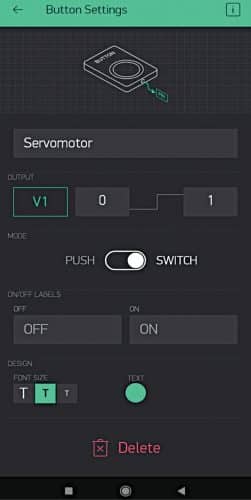
Fig. 5: Servo motor’s setting in Blynk app - When you are done with the above settings, press the Play button. This will switch from Edit mode to Play mode where you can interact with the hardware. While in Play mode, you won’t be able to drag or set up new widgets. Press Stop and get back to Edit mode.
- Next, open Arduino IDE, download the Blynk library from the link.
Download this zip file, extract it, and then copy this library file to Arduino library files. After installation, you can find your Blynk library file → examples → Blynk → Boards_WiFi → ESP32_WiFi.
Insert the Auth Token key, your Wi-Fi details in the Arduino code (bedridden.ino), compile the Arduino code and upload it to ESP32 board.
For controlling the appliances over the Internet using Google Assistant you need to do the following:
- Go to website of IFTTT. Install it on your mobile phone.
- Signup using your Google account (the same Google account that you are using with the Google Assistant).
- Once you are signed in, click on ‘My Applets’ and select ‘New Apple’ which will trigger relay to turn on the light.
- Now click on ‘If This’ as shown in Fig. 6 and, in the search bar, search for ‘Google Assistant’ and tap on it. A window will pop up as shown in Fig. 7.

Fig. 6: IFTTT on Android phone 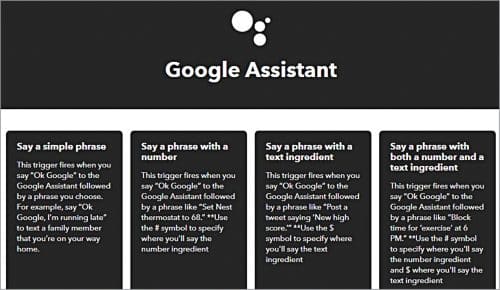
Fig. 7: Google Assistant on IFTTT platform - Select ‘Say a simple phrase’ option for the triggering action. Click on Connect to give permission to trigger action.
- Next, in the first text box, type the phrase that you would want Google Assistant to trigger the action. For example, “Turn on the light.”
- For the next two text boxes, you write alternate commands like “Switch on the light,” and “Light on” for the same action.
- In the fourth text box, type the response to be given by Google Assistant, for example, “Okay, I will turn on the light.” Click on ‘Create Trigger’ button.
- Next click on ‘Then that’ button.
- Type ‘webhooks’ in the search box, select it and click Connect. Webhooks will allow us to send commands to the Blynk server. To do that you need to connect it to your Google account.
- For relay control, you need to enter the following URL along with IP address of Blynk app, Auth Token, and GPIO pin in the text box: https://188.166.206.43/your auth token/update/D2
(D2 is the GPIO2 of ESP32). Here you need to paste in your Auth Token in the URL. - 12. Next, select the Method field as ‘PUT’, Content type as ‘Application/JSON’ and Body type as ‘[“1”]’ for turning on the light.
Similarly, you need to follow the same steps for turning on fan and TV. - 13. For servo motor control, use the following URL: https://188.166. 206.43/your auth token/update/V2
(V2 is the virtual pin D23 of ESP32 for servo motor control defined in the source code and for position control [“1”]). Here, V2 corresponds to 90-degree position (vertical) and V1 corresponds to 0-degree position (flat). - Next, select the Method field as ‘PUT,’ Content type as ‘Application/JSON’ and Body type as ‘[“1”]’
- Now click on ‘Create Action’ and then on ‘Finish.’
- Next, create another applet in the same way to turn off the light/fan/TV. That is, you need to fill the same data as above but with slight changes in the Body type. For turning off the device, the Body type should be ‘[“0”]’
In the servomotor, the URL should be https://188.166.206.43/your auth token/update/V1 - Hit ‘Finish’ to complete the software settings.
Next, activate Google Assistant app from your mobile phone, so that it is running in the background. Now, you can control the appliances either from your Blynk app with your finger or by just giving voice command to switch on/off the devices. For servo motor, you can use voice command such as “bed up” for the servo motor to turn 90 degrees to lift the bed’s backrest. When you say, “bed down,” servo motor will turn to 0-degree position to bring the bed back to normal position.
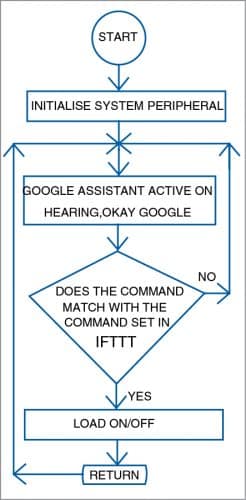
Flowchart of the project is shown in Fig. 8 and the source code (bedridden.ino) is listed below:
Source code
#define BLYNK_PRINT Serial
#include
#include
#include
#include
Servo servo;
// You should get Auth Token in the Blynk
App.
// Go to the Project Settings (nut icon).
char auth[] = “Your auth token”;
// Your WiFi credentials.
// Set password to “” for open networks.
char ssid[] = “Your SSID”;
char pass[] = “Your password”;
void setup()
{
Serial.begin(9600);
Blynk.begin(auth, ssid, pass);
servo.attach(23);
}
void loop()
{
Blynk.run();
}
BLYNK_WRITE(V1)
{
servo.write(0);
}
BLYNK_WRITE(V2)
{
servo.write(90);
}
S. Maheshwaran is an electronics hobbyist. His areas of interest include automation, embedded systems, and robotics
Dr K. Vairamani is Assistant Professor, Department of Electronics, St. Joseph’s College (Autonomous), Tamil Nadu. He received his PhD in instrumentation from Madurai Kamaraj University, Tamil Nadu. His areas of interest include embedded systems, wireless sensor networks, and sensor instrumentation

Hi
Looking Electronic Engineer to Design the Group Communication Product.
any one interested please call 9323033514
Thanks
Hi Dhiraj,
You can send your requirements to [email protected]