


This is a simple “Weather Station using STM32 with ThingSpeak IoT” powered by STM32 ARM Cortex (Blue Pill), this system detects environmental parameters such as temperature, humidity, and Soil Moisture. DHT11 is a Temperature and humidity sensor that as the name implies is used to measure the atmospheric temperature and humidity in a particular environment or in a confined closed space and a Soil Moisture Sensor is used to measure the Soil Level on the Earth.
Now how to interface the popular DHT11 Temperature, Humidity sensor, and Soil Moisture Sensor with STM32 microcontroller using Arduino IDE as shown below Block Diagram. For those who are new, the STM32 also known as the Blue Pill development board consists of the STM32F103C8T6 microcontroller from ST Microelectronics. It is a 32-bit ARM Cortex M3 controller with a high clock frequency suitable for high-speed and power constraint applications.


Construction & Working principle
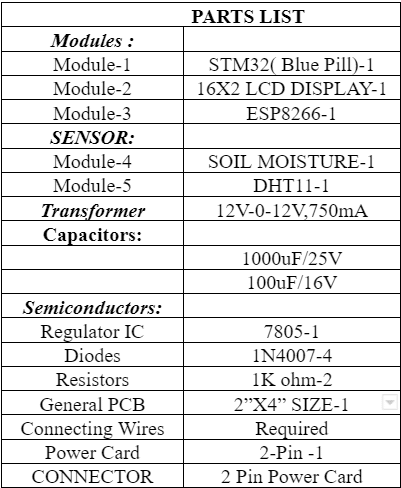
The main elements used in this project are
- STM32 (Blue Pill)
- DHT11 Sensor
- Soil Moisture Sensor
- ESP8266 WiFi Module
- 16X2 LCD Display
The detailed description of each element is discussed here as follows.
DHT11 Sensor:
The DHT11 sensor is used to measure Temperature and humidity. The sensor comes with a dedicated in-built NTC to measure temperature. It has an 8-bit microcontroller on board to output the values of temperature and humidity as serial data through the one-wire protocol. This means, that the sensor has only one data pin through which both the temperature and humidity values can be read, thus saving pins on the microcontroller side. The sensor is also factory calibrated and hence easy to interface with other microcontrollers.
DHT11 Specifications:
- Operating Voltage: 3.5V to 5.5V
- Operating current: 0.3mA (measuring) 60uA (standby)
- Output: Serial data
- Temperature Range: 0°C to 50°C
- Humidity Range: 20% to 90%
- Resolution: Temperature and Humidity both are 16-bit
- Accuracy: ±1°C and ±1% as shown below in figure 2.

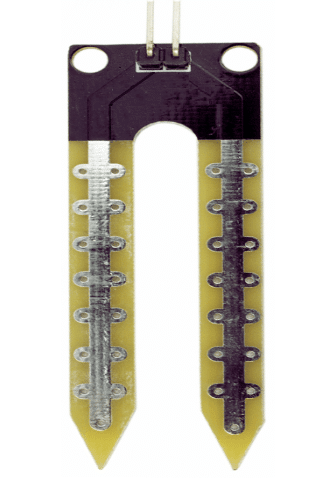
Soil Moisture Sensor:
Soil moisture is basically the content of water present in the soil. This can be measured using a soil moisture sensor which consists of two conducting probes that act as a probe. It can measure the moisture content in the soil based on the change in resistance between the two conducting plates. The resistance between the two conducting plates varies in an inverse manner with the amount of moisture present in the soil as shown in figure 3.
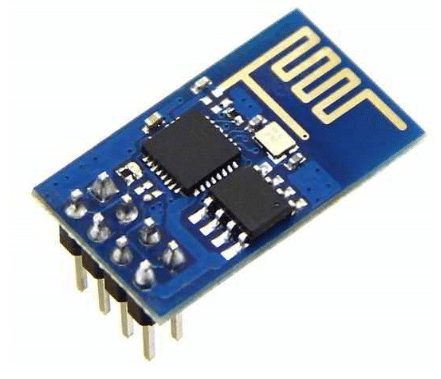
ESP8266 WiFi Module:
The ESP8266 wifi module is a low-cost standalone wireless transceiver that can be used for end-point IoT developments. ESP8266 wifi module enables internet connectivity to embedded applications. It uses TCP/UDP communication protocol to connect with the server/client. To communicate with the ESP8266 wifi module, the microcontroller needs to use a set of AT commands. The microcontroller communicates with ESP8266-01 wifi module using UART having specified Baud rate (Default 115200) as shown below in figure 4.
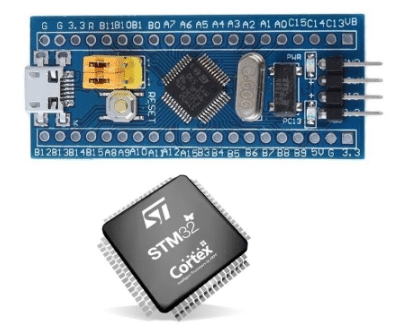
STM32F103C8T6 (Blue Pill):
As shown below in Figure 5 the real view of the Blue Pill Controller. These boards are extremely cheap compared to the official Arduino boards and also the hardware is open source. The microcontroller on top of it is the STM32F103C8T6 from STMicroelectronics. Apart from the Microcontroller, the board also holds two crystal oscillators, one is an 8MHz crystal, and the other is a 32 kHz crystal, which can be used to drive the internal RTC (Real Time Clock). Because of this, the MCU can operate in deep sleep modes making it ideal for battery-operated applications.
STM32F103C8T6 Specifications:
The ARM Cortex M3 STM32F103C8 Microcontroller is used in the Blue pill board. Unlike the name, “Blue Pill” the Microcontroller’s name STM32F103C8T6 has a meaning behind it.
- STM » stands for the manufacturer’s name STMicroelectronics
- 32 » stands for 32-bit ARM architecture
- F103 » stands to indicate that the architecture ARM Cortex M3
- C » 48-pin
- 8 » 64KB Flash memory
- T » package type is LQFP
- 6 » operating temperature -40°C to +85°C
Now let us look into the specifications of this Microcontroller Table-1.

Working
The working principle of the project is to measure the weather monitoring parameters continuously and post all weather monitoring parameters like Temperature, Humidity, and Soil Moisture values on a 16X2 LCD Display as well as upload them into a cloud platform. Here I am using the ThingSpeak IoT Platform to store the data in a real-time environment. The circuit Diagram implementation is shown below in figure 6.
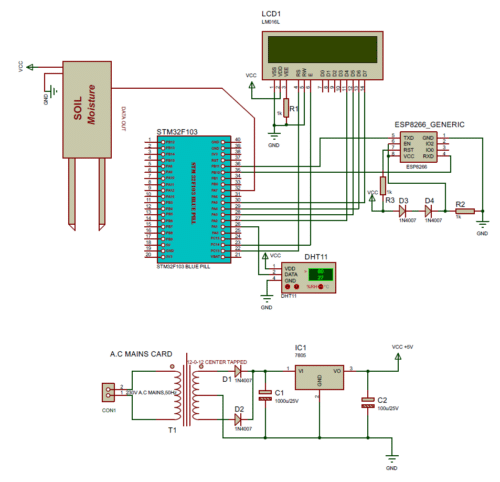
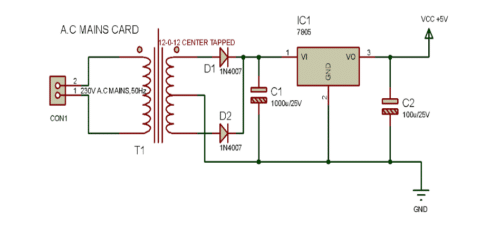
The power requirement of the project is 5V for STM32 also known as Blue Pill Development Board 3.3V~3.6V for ESP8266 Wi-Fi Module. Here I simply converted 5V to 3.6V using a Potential divider circuit, the diodes D3, D4, and 1K ohm Resistor is connected in series form, and each silicon diode is cutin voltage 0.7V. Here I am using two diodes in series 0.7V+0.7V=1.4V so the total voltage 5V-1.4V ~=3.6V. the circuit diagram of RPS (Regulated Power Supply) is shown in figure 7.
How to upload the data in ThingSpeak IoT Platform and registration process steps as follows
1. First of all, the user needs to Create an Account on ThingSpeak.com, then Sign In and click on Get Started.
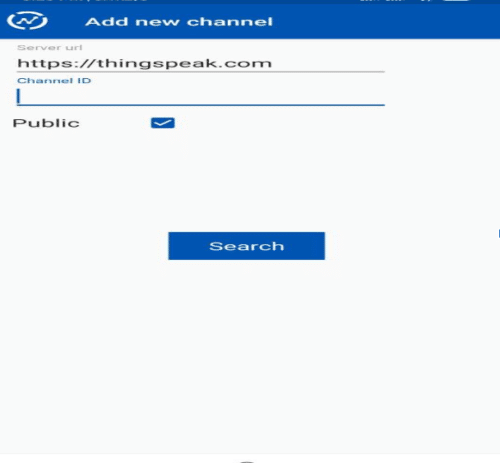
2. Now go to the ‘Channels’ menu and click on the New Channel option on the same page for further process.

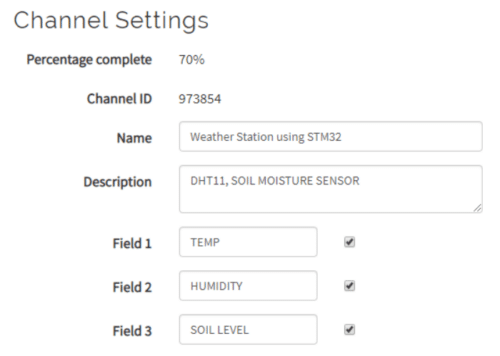
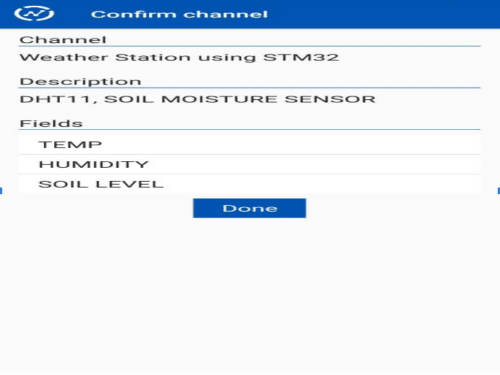
3. Now you will see a form for creating the channel, fill in the Name and Description as per your choice. Then fill ‘Temperature’, ‘Humidity’ & Soil Level in Field 1, Field 2, and Field 3 labels, and tick the check boxes for all three Fields. Also, tick the check box for the ‘Make Public’ option below in the form, and finally Save the Channel. Now your new channel has been created.
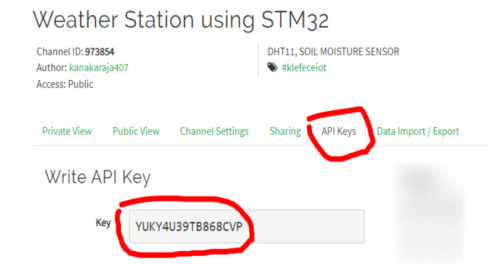
4. Now click on the ‘API keys’ tab and save the Write and Read API keys, here we are only using the Write key. You need to Copy this key in char *api_key in the Code.
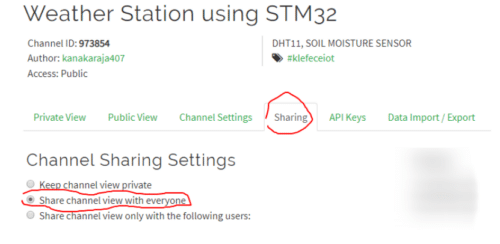
5. After it, in the sharing option, you need to select the “Share channel view with everyone” in the list which means the channel is configured as a public mode, and the Weather station data can access anywhere in the world as shown below.
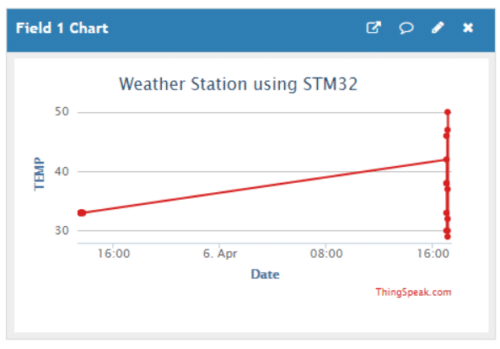
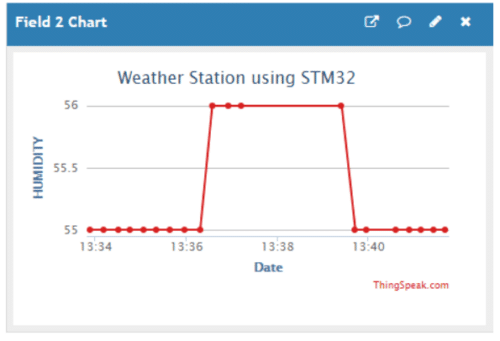
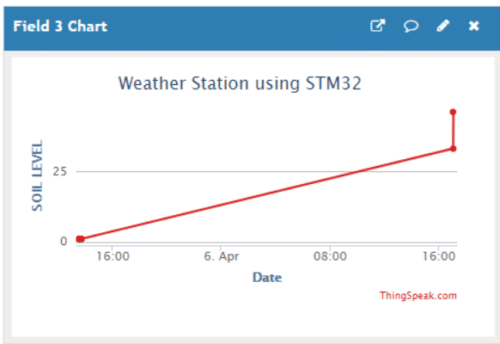
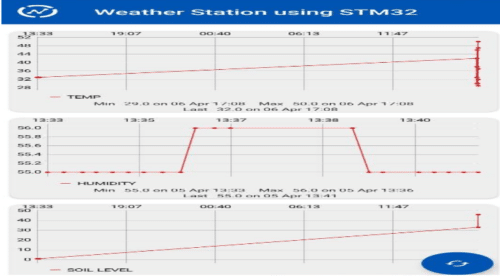
Now finally The captured data Temperature, Humidity & Soil Moisture Sensor data as shown below in the figures
The above images are taken in System (Desktop or Laptop) captured images we can monitor the data in the system and as well as android Mobile images with the help of Thingview Android app it is available in the google play store, Here I am providing google play store link especially to monitor Weather station data in mobile when you are in outstation or you are in the journey as shown below mobile screenshots.
How to Program STM32F103C8T6 STM32 Blue Pill Board
The STM32 is just another microcontroller from the STMicroelectronics family. So all the existing methods to program an ARM chip can be used for the STM32 board as well. One famous and commonly used IDE is the Keil ARM MDK and apart from that we can also use IAR workbench, Atollic TrueStudio, MicroC Pro ARM, Crossworks ARM, Ride 7, PlatformIO+STM32, etc.
But what made this board a lot popular is its ability to be programmed with the Arduino IDE. This way people can get started and build projects with STM32 in no time since many will be familiar with Arduino IDE and its easy-to-use programming language and readily available libraries. So in this STM32F103C8T6 Arduino IDE tutorial, we will use the Arduino IDE to get started with STM32.
Programming SMT32 through Micro USB Board
Now you might be wondering if we are using the micro-USB port to program the board. Actually, the STM32 Blue Pill development board when purchased does not come with a bootloader to make it Arduino IDE compatible. However, this bootloader can be flashed into the STM32 board, and then the micro-USB port can be directly used to upload the programs.
Here I have provided the Youtube link
How to load Bootloader tutorial Based on this tutorial you will easily upload Bootloader programming. After successful completion, you will use an onboard micro USB Board.
Preparing the Arduino IDE for STM32 (Blue Pill)
Follow the below steps to download and prepare the Arduino IDE to be used with the STM 32 Development board.
Step 1: If you have not yet installed the Arduino IDE, download and install it from this link. Make sure you select your correct operating system.
Step 2: After Installing the Arduino IDE open and download the required packages for the STM32 board. This can be done by selecting File -> Preferences.
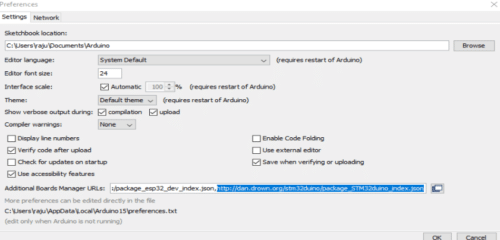
Step 3: Clicking on Preferences will open the below-shown dialog box. In the additional Boards Manager, the URL text box pastes the link and press OK. As shown below in figure A.
Step 4: Now go to Tool -> Boards -> Board Manager. This will open the Boards manager dialog box, search for “STM32F1” and install the package that appears.
Step 5: After the package, installation is completed. Go to Tools and scroll down to find the Generic STM32F103C series as shown below. Then make sure the variant is 64k Flash type, CPU speed is 72MHz, and change the upload method to Serial as shown below in figure B.

Step 6: Now, connect your Micro USB board to the computer and check to which COM port the STM32 board is connected using the device manager. Then, select the same port number in Tools->Port
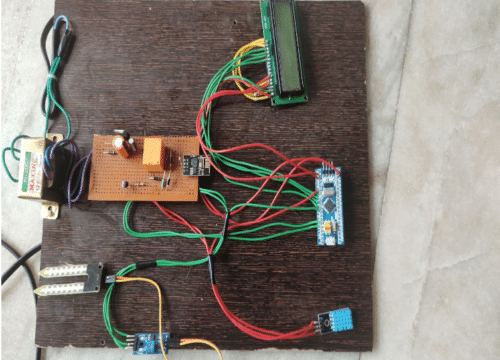
Step 7: After all the changes are made, check the bottom right corner of the Arduino IDE and you should notice the following setting being set. My STM32 (Blue Pill) board is connected to COM9 but yours might differ, Now the Arduino IDE is ready to program the STM 32 Blue Pill Development Boards Finally the prototype of the project is shown below in Figure C.

Good project. What is the total cost of the project.