


 Presented here is a motion-sensor-based security system using Cayenne and Arduino Uno. Cayenne is the simplest and easiest platform for the Internet of Things (IoT) systems. It allows you to connect regular boards like Raspberry Pi, Arduino and LoRa, and does not require much coding except some editing in readily-available codes. The code (sketch) is automatically generated by Cayenne and, hence, there is no additional code provided for this project.
Circuit and working of IoT-Based Motion Detector Using Cayenne
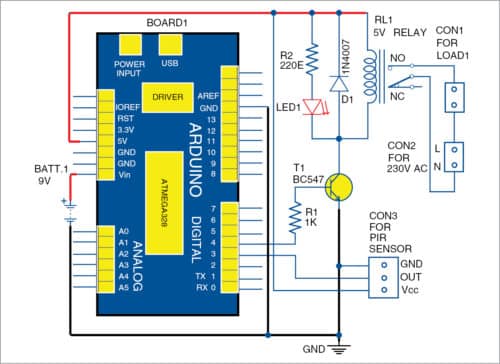
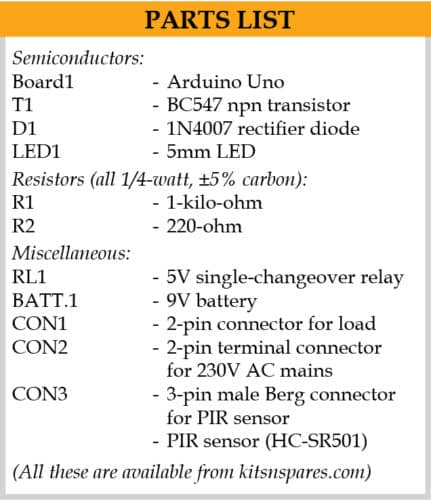
The circuit diagram of the motion-sensor-based security alert system is shown in Fig. 1. It is built around Arduino Uno board (Board1), 5V single-changeover relay, PIR motion sensor and a few other components.
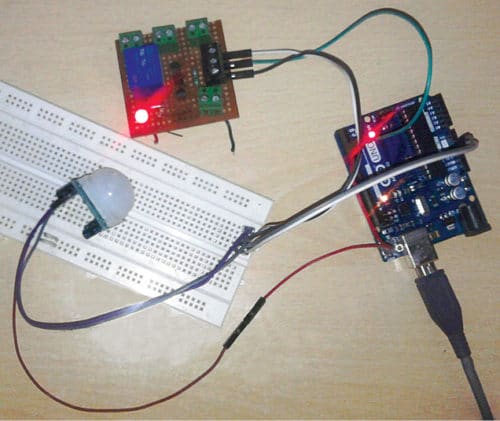
Assemble the components on a breadboard or veroboard as per the circuit diagram. The author’s prototype with relay circuit wired on a veroboard is shown in Fig. 2.
Cayenne setup and testing
- Open https://www.thethingsnetwork.org/docs/applications/cayenne/#set-up-your-mydevices-account and create an account using a valid email address.
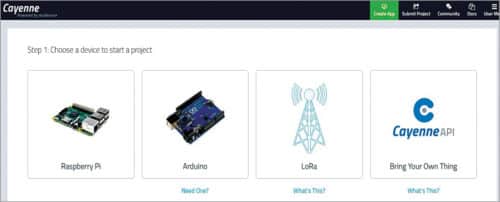
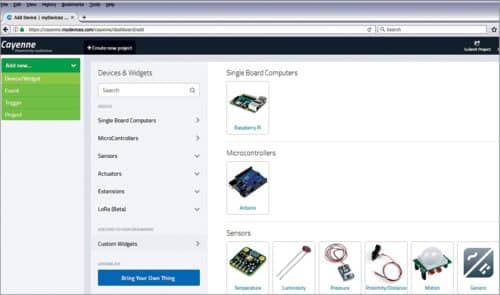
- Choose a device to start. In this case, make sure you select Arduino as the device (Fig. 3).
- Add Cayenne library to Arduino from Arduino setup option.
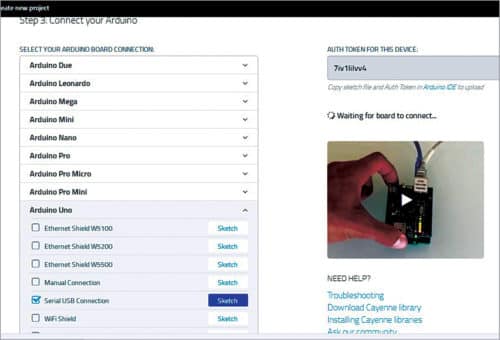
- After selecting Arduino, you will see a list of Arduino boards; select Arduino Uno®Serial USB Connection ®Sketch (Fig. 4). The code will be generated automatically. Name the code; in this case it is Serial_USB_Code.ino. Copy and paste this code to Arduino IDE.
- Connect Arduino Uno board to the PC/laptop using USB cable, and select proper board and COM port under Tools menu in Arduino IDE.
- Upload Serial_USB_Code.ino code to Arduino board.
- For USB serial connection, run a script in command prompt so that the board is connected to Cayenne via USB and PC. This provides an Internet connection to the board, which is already present on the Windows PC.
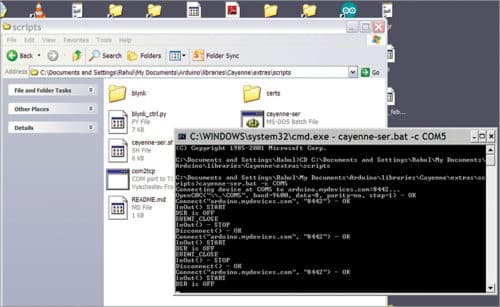
To run scripts, go to Arduino->Libraries->Cayenne->Extras->Scripts folder and note the address from the address bar.
Then, open command prompt and use this address to navigate the same folder using cd command. After accessing Scripts folder, run the following script in command prompt:
cayenne-ser.bat –c COM5
Here, COM5 is the communication port of the PC where Arduino board is connected. Fig. 5 shows navigation of Scripts folder and the script with command prompt in the terminal.
This script is also available in Scripts folder—you can find the address using the address bar. Type the above script (for Windows PC) and hit Enter. In a few seconds, the board will connect to Cayenne through the PC and the Internet in command prompt, as shown in Fig. 5.
We have assumed that the PC’s Internet connection is enabled already. If you have trouble navigating to Scripts folder and the script, follow the instructions given in the sketch generated for serial connection. Once the board gets connected, you will notice the status in the browser shows the board is connected successfully. Fig. 4 shows that Cayenne is waiting for the board to get connected.
Once connected successfully, you can control your circuit from Cayenne platform on the PC or by using Cayenne app on Android device. In our case, the circuit consists of a PIR motion sensor and a relay connected to pins 3 and 4 of Arduino, respectively (Fig. 1).
Fig. 6 shows the homepage of Cayenne dashboard. Go to Add new… Devices & Widgets. From the list of widgets, select Actuator Relay Relay Switch® Enter Settings (Fig. 7).
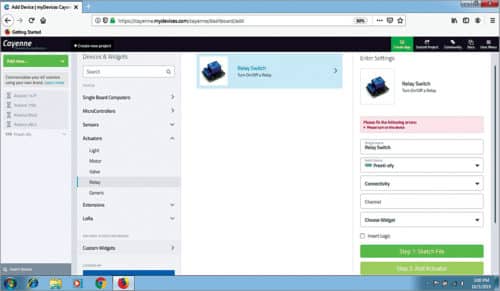
Give your widget a name (Relay Switch, in this case) and select Virtual from Connectivity. Define 1 under Channel—same as that defined in the source code.
Next, select Choose Widget, a bulb icon for your widget and click on Add Actuator.
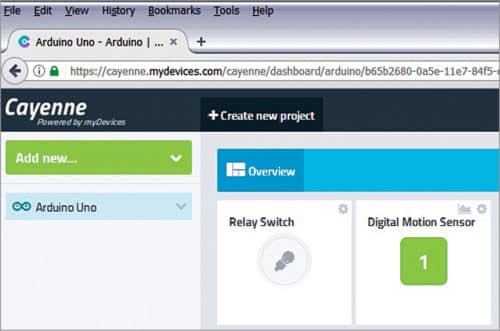
Follow the same steps for the PIR motion sensor. Select Motion under Devices & Widgets Sensors. Give a name to your widget (Digital Motion Sensor, in this case). Define 0 under Channel for the motion sensor and click on Add Actuator.
The two widgets are now added to Cayenne dashboard (Fig. 8).
Next, upload the combined_code.ino sketch to Arduino board for controlling the relay and sensor. However, before doing so, stop the command running on the terminal by typing Q command, followed by Enter key (Fig. 5).
Open combined_code.ino source code from Arduino IDE. This code is generated by combining the code generated for each widget. In this code, define your Message Queuing Telemetry Transport (MQTT) protocol’s username, password and client ID as defined in Serial_USB_Code.ino code. Select proper board and COM port under Tools menu, and compile and upload the combined_code.ino code to Arduino board.
Again run cayenne-ser.bat command to connect Arduino Uno board to Cayenne.
Open Cayenne dashboard to control the relay and sensor via the website. The same can be done using Cayenne app on a smartphone.
There is another feature in Cayenne to activate Trigger function in case of an emergency or to send a security alert. Activating Trigger function will send an SMS alert to the cellphone number or email in case of an emergency. For that, add a cellphone number prefixed with country code, as shown in Fig. 9.
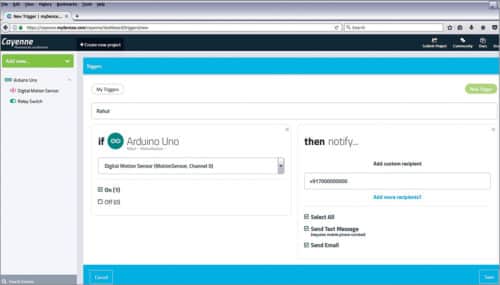
If the PIR sensor detects a human in motion through Arduino Uno, the system will notify you (recipient). You can provide the recipient’s cellphone number or email address.
Download Source Folder
Once you receive an alert via cellphone or email, you can turn on the bulb through the relay switch from Cayenne dashboard.
There are many other features and settings available in Cayenne. It is an interesting and useful platform for alert systems, from surveillance to asset tracking using suitable electronic devices and the Internet.
If you found this IoT project useful then you may also like Top 30+ IoT Projects | IoT Project Ideas for Enthusiasts.
Rahul R. Tribhuwan is partner at Samyakk Technology, Aghur, Aurangabad

Hi Thanks for sharing above project idea. Please help sharing project details report and components circuit board complete project to purchase. Please shar cost on [email protected]