


 The Automatic Battery Charger circuit presented here can automatically charge a 12V, 7Ah battery, or above. Special features of the charger are as follows. It automatically controls the charging current as per the status of the battery. Battery voltage level as well as charging status are indicated on the LCD display. The charger maintains float voltage, if battery is fully charged. Arduino identifies status of the battery connection and voltage, and indicates the same on the LCD.
Circuit and working of 12V automatic battery charger
The circuit diagram of the Arduino-controlled 12V automatic battery charger is shown in Fig. 1. It is built around Arduino Uno (Board1), adjustable voltage regulator LM338 (IC1), 12V voltage regulator 7812 (IC2), 16×2 LCD (LCD1) and a few other components.
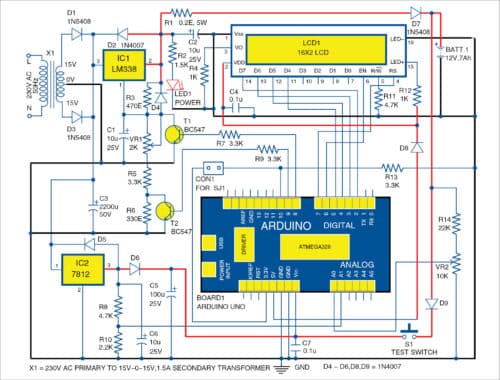
When AC mains power is on, step-down transformer X1 generates about 15V AC and converts it to above 18V DC after rectification and filtering. DC voltage thus available is split into two: one for charging the 12V battery (BATT.1) through IC1 and the other for power supply to Arduino (Board1) through IC2.
While charging the battery, its voltage is displayed on the left-top corner of LCD1. The charger/charging type and status is displayed on the second line on LCD1. LM338 supplies 14.2V to the battery until it is fully charged. Once it is fully charged (above 13V), LM338 supplies about 13.3V to the battery and maintains the charge at this level. This is called float charging. Charging voltage is controlled by two BC547 transistors (T1 and T2), whose bases are connected to Arduino board pins 8 and 9.
To know the status of the battery when 230V AC mains power is off, press and hold test switch S1 for some time. Arduino gets power from the connected battery. It displays voltage and status of the battery (assuming that battery is not dead).
Software
The software program (batterycharger.ino) is written in Arduino programming language. Arduino IDE is used to compile and upload the program. ATmega328P on Arduino Uno board comes with a pre-programmed bootloader that allows you to upload new code to it without using an external hardware programmer.
Connect Arduino to the PC and select the correct COM port in Arduino IDE. Compile the program/sketch. Select the correct board from Tools->Board menu in Arduino IDE. Upload the sketch to the internal memory of the microcontroller.
Download source code
Construction and testing
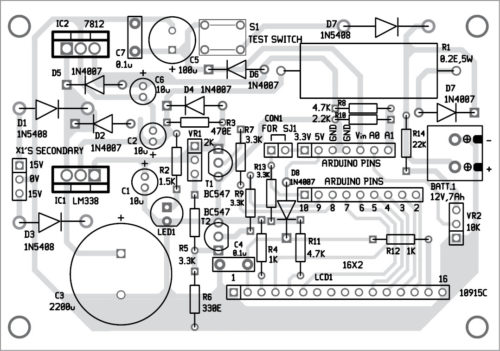
A PCB layout of the Arduino-controlled 12V automatic battery charger is shown in Fig. 2 and its components layout in Fig. 3.
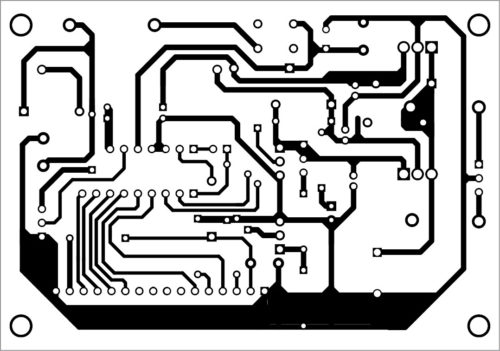
Download PCB and Component Layout PDFs: click here
Assemble the circuit on the designed PCB. Once the circuit is ready and Arduino sketch is written to the board through USB port, connect shorting jumper SJ1 and a multimeter in place of the battery for calibration. Switch on AC mains power and adjust VR1 till the multimeter reads 14.2V DC. Adjust VR2 till LCD1 displays 14.2V. Remove shorting jumper SJ1 and the multimeter. The charger is ready to use. Connect a battery that needs to be charged (12V battery) at BATT.1, as shown in the circuit.
Precaution
Maintain proper polarity of the battery while connecting for charging. Reverse polarity of the battery may damage the circuit.
Charging voltage is set to 14.2V. This value is dependent on the lead-acid battery manufacturer. Hence, refer battery manual before charging.
Use suitable heat-sinks for IC1 and IC2.
Fayaz Hassan is manager at Visakhapatnam Steel Plant, Andhra Pradesh. He is interested in microcontroller projects, mechatronics and robotics.

Do you have a high resolution image of schematic?
Please write to us on [email protected] for circuit or any other help
Can you share the gerber files for the PCB as well
where do you intend to get the pcb made?
Can you please share a copy of the gerber files so that I can have the PCB manufactured? Thank you!
yet another doesn’t say charger. doesnt say nicd doesn’t say nimh doesnt say lithium doesnt say lead. great.
12V/7Ah obviously Lead Acid
Can you please share the gerber files so that I can get the PCB manufactured? Thank you!
My test board: https://ibb.co/6BLf526
For me everything working. But i use Arduino Nano for this project.
That’s really great.
Greetings, do you think this project could be adapted for a bigger battery? for example 45ah?
hello ! can this diy project can be modified to accomodate a larger battery ? i mean like 12v 65Ah automotive battery.
I would like to upgrade my old and simple 1980 style charger.
Thank You !
hi do you have circuit for 48v 20Amps battery charger with or without Arduino,
thank you
Greetings, could the circuit be adapted for lead acid batteries from 45ah to 100 ah? What components should I replace?
This project is meant for small lead-acid batteries upto 7Ah ratings. Many components including transfomer, IC1 and associated components need to be changed for heavy batteries
hi sir can u sell this battrey charger with complete set. or other smart battery charger monitoring system
Can you please share the source code, the link doesn’t work
Hi, we were facing some issues earlier with the Source page. Kindly refresh the page and retry.
Can you please share the source code, the link doesn’t work
It downloads a .rar file but can not be extracted. When changing the file name to .ino Arduino IDE cannot find a sketch and then refuses to open the file.
And what for what wattage is the charger rated?
And what for what wattage level is the charger rated?