


The touch switchboard is fascinating, bringing a sleek and contemporary vibe to our homes and various devices. What sets it apart is its absence of mechanical components that typically wear out with time.
Traditional switches, with their moving parts, tend to deteriorate, especially when used frequently for rapid on-off actions.
Today, we’re going to design an affordable low-cost touch switchboard that you can effortlessly create for your home or even incorporate into your PCB manufacturing process.

The beauty of this design is that it grants you the flexibility to customize your switching preferences. In fact, you can configure up to four different switching modes as you see fit.
Required Components
The components used in the touch switchboard project are listed below.
| ID | Name | Designator | Footprint | Quantity | Price |
| 1 | Connector KF301-3P | C1,C2,C3 | CNT-KF301-3P | 3 | 5 |
| 2 | 1N4007 | D1,D2,D3 | DO-15 | 3 | 5 |
| 3 | TTP223_Module | IC1,IC2,IC3 | TTP223_MODULE | 3 | 80 |
| 4 | PC817 | IC4,IC5,IC6 | DIP4 | 3 | 10 |
| 5 | 1k | R1,R2,R3,R4,R5,R6 | R3 | 6 | 5 |
| 6 | Omron-G5LE-Relay_SPDT | RL1,RL2,RL3 | OMRON_G5LE_SPDT_RELAY | 3 | 60 |
| 7 | BC547 | T1,T2,T3 | TO-92 | 3 | 5 |
Setup and Working
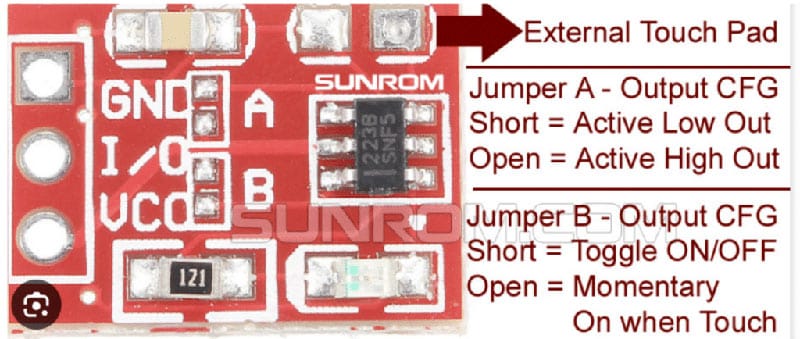
In this setup, we’ve harnessed the TP223 Module as a capacitive sensor, making it remarkably versatile. This touch sensor remains highly responsive even when placed behind thin conductive materials, such as glass.
It offers four distinct modes, each of which can be chosen to match your specific switching needs:
- Turn ON when touched, and OFF when not touched: This mode ensures that the device activates upon touch and deactivates when the touch is removed.
- OFF when touched, ON when not touched: In this mode, the device remains off when touched and switches on when there’s no touch detected.
- Touch to Turn ON and Touch again to Turn OFF: A simple touch turns the device on, and another touch turns it off.
- Touch to Turn ON and automatically resume the last state after a power outage: This mode is particularly useful for maintaining the previous device state (ON or OFF) when the power returns after an outage.
You can effortlessly select these modes according to your requirements by manipulating the solder jumper on the touch module. To specify the desired mode, solder or desolder the jumper as necessary.
Moving forward, we’ve integrated an optocoupler and a relay in conjunction with a transistor to facilitate the switching process.
Touch Switchboard Circuit Connection
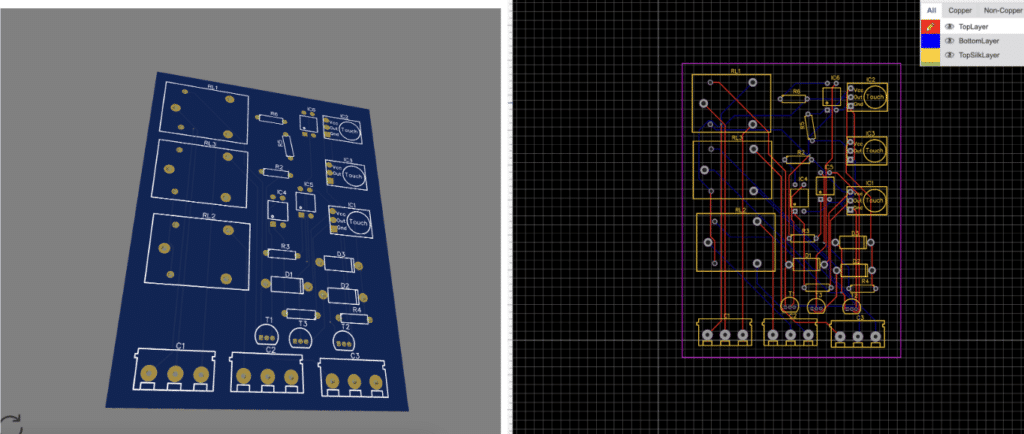
Now connect the sensor and other components according to the circuit diagram. If toy are making a PCB you can download the design file do modifications as per your choice or directly use the Gerber file to manufacture the PCB.
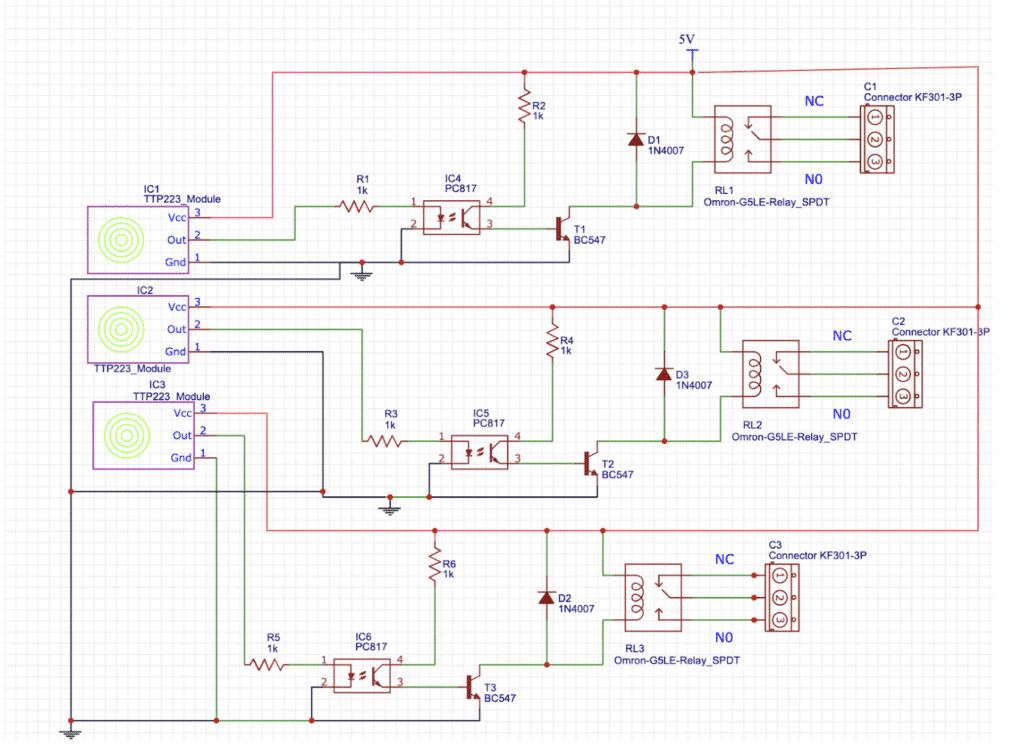
In this circuit diagram, we’ve employed three sensors and three relays to control three separate appliances.
If you wish to extend the control to more appliances, you have the flexibility to modify the design and include additional touch sensors and relays.
The entire circuit operates on a 5V DC power supply. To achieve this, you’ll need to utilize an AC to 5V DC rectifier adapter, which connects to the board.
Once this setup is in place, you’re all set to proceed with implementation and usage.
Testing
Now, after powering the board and connecting an AC appliance to one of the Relay connectors, you’re ready to test its functionality. Depending on the mode you’ve chosen by configuring the solder jumper.
Let’s assume you’ve opted for the toggle mode, which means touching the sensor should turn the appliance on, and touching it again should turn it off.
So, give it a try: Touch the sensor once, and observe as the light or appliance turns on. To turn it off, simply touch the sensor again.
This toggle functionality makes it incredibly convenient to control your appliances with a touch.
We’ve previously undertaken a variety of similar touch switch projects.

can i get pcb designed circuit file
You can convert the circuit into PCB as per your size in easy eda or any other softwere . If still needed the PCB garber file ping me i will try my best to provide as per your need size and shape and layers
can you share the gerber file