To read the previous part of this article: click here
It is frequently observed, and more so with those who design and manufacture electronic control panels, that the overall system often fails to pass electromagnetic compatibility (EMC) tests (particularly emissions), even though the manufacturer has meticulously taken all precautions to ensure product compliance, just because they forgot one crucial aspect of EMC design—cable routing and selection. And as the old saying goes, “All is well that ends well,” proper cable selection and routing is the last major design consideration to make a system complaint to EMC norms.
Cable coupling mechanisms
Three mechanisms exist by which EMI can be coupled on to cables. First, field-to-cable common-mode coupling occurs when wires or traces are routed away from the ground, forming a loop that acts as an antenna, causing common-mode EMI to be coupled into or out of the system.
Second, field-to-cable differential-mode coupling occurs when forward and return wires (or traces) are routed at a large distance from each other, forming a loop that acts as an antenna, causing differential EMI to be coupled into or out of the system.
Third, cable-to-cable coupling (cross-talk) is one where high-frequency signals on one cable can electrically couple (or talk) to adjacent cable through stray capacitance formed between the two cables.
Cable classes
In order to properly segregate cables, these can be split into six classes, depending upon their application, voltage or current levels, frequency of signals these carry, types of signals these carry (like analogue or digital), components these connect to and so on. These classes are as follows:
Class 1. These are cables that carry highly-sensitive signals like low-level analogue signal (in mV) from transducers, instrument lines, radio receiver antenna cables, and cables carrying high-frequency digital signals such as Ethernet. Such cables are highly susceptible to noise and interference.
Class 2. These carry slightly-sensitive signals that are somewhat susceptible such as ordinary analogue signals under 1MHz and of the order of 1-10V and 4-20mA. These also include low-frequency digital signals like RS232 or RS485 and digital inputs/outputs (I/Os) like those from limit switches, encoders and control signals.
Class 3. These are cables carrying the noise source that is slightly interfering such as low-voltage AC distribution less than 1kV or DC power, linear power cables, control cables for inductive loads (such as relay coils, motor brakes and contactors) where proper transient suppression techniques like RC snubbers have been employed to control transients at the load. These also include motor cables from output of inverter drives but fitted with output filters as per manufacturer’s specifications.
Class 4. These are cables carrying signals from strong noise sources that are highly interfering. These include output cables from frequency converters, inputs to and outputs from adjustable speed motor drives, inputs to and outputs from SMPS or DC-DC converters, cables associated with electrical welders or RF equipment (like induction welders, wood gluers, microwave equipment and diathermy apparatus) and cables to DC motors, to RF transmitting antennae and to unsuppressed inductive loads.
Classes 5 and 6. Class 5 cables are those that carry medium voltage, while class 6 are those that carry high voltage.
Cable segregation
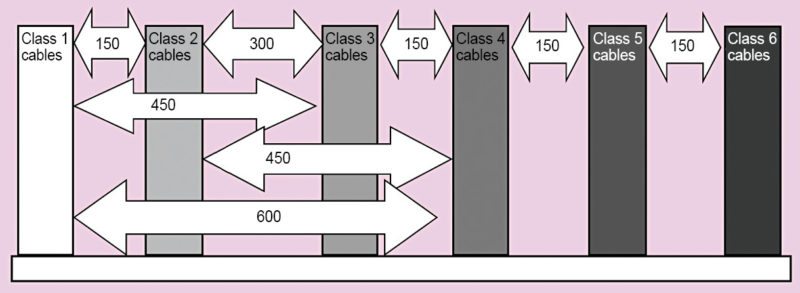
During their run in a system, cables of different classes have to be properly segregated, that is, separated by certain minimum distance. This separation distance not only depends on class but also on cable length. Fig. 27 shows recommended minimum segregation distance for different classes of cables based upon a run of 30 metres, and assuming that the cables run in close proximity to the protective earth conductor that can be a wire, a metal tray or mounting plate that forms a local RF reference.

Accordingly, class 1 and class 2 cables must be separated by a minimum distance of 150mm (ditto for class 3 and class 4). While class 1 and class 3 and class 2 and class 4 should be separated by at least 450mm, and class 1 and class 4 by at least 600mm, separation between class 4 and class 5 and class 5 and class 6 should be 150mm. Now, these distances are for a cable run of less than 30 metres. For longer cables, separation distance is multiplied by the length and divided by 30.
When cables run within a product, these must be physically segregated depending upon their class at all times, and long parallel runs should be avoided. If that is not possible, these should be more than 150mm apart; cable classes—as far as possible—must not cross. If at all these have to cross, these should do so at right angles. And cables should run as close as possible to their local RF reference or to cables carrying return signals. Cables of the same class, when routed through the same tray or duct, should not be twisted around one another.
Reducing common-mode coupling
When cables are routed away from the ground plane or earth, a ground loop is formed as shown in Fig. 28. This loop acts as an antenna for stray fields causing common-mode EMI to be coupled into the system. By the same token, the loop can also cause radiated emission.

Coupling or radiation is directly proportional to the area of the loop. In order to reduce it, area of the loop must be reduced. This is done by routing the cable as close as possible to the ground reference, which, in case of control panels, is the mounting plate.
Reducing differential-mode coupling
This type of coupling occurs when send and return cables are routed away from each other. As shown in Fig. 29(a), a loop is formed between send and return paths, causing differential-mode coupling and radiation proportional to the area of the loop.

This can be reduced by reducing the area of the loop, that is, by routing send and return cables close to each other. Further reduction can be achieved by twisting the cables around one another, whereby the loop area is reduced dramatically.
Cable routing in electronic control panel
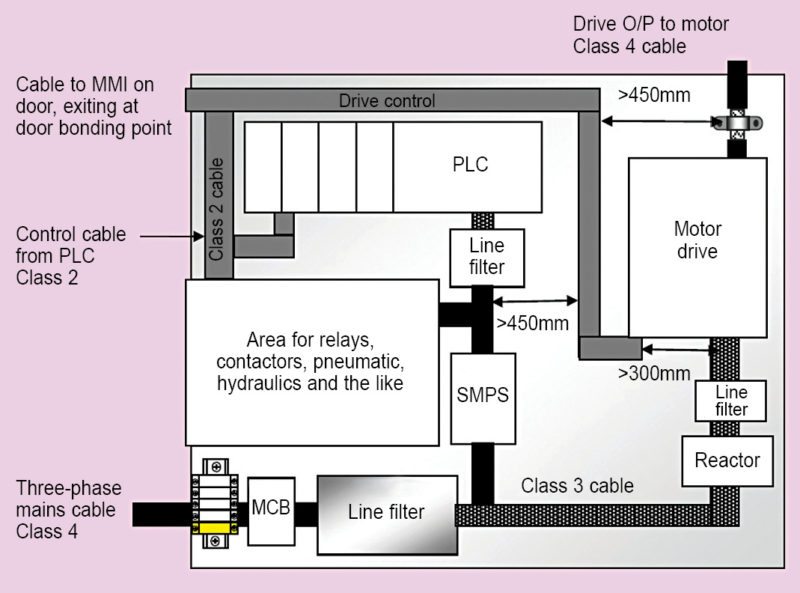
Fig. 30 shows cable trunking for a control panel used for controlling a typical machine. All components should be mounted on an unpainted mounting plate for proper grounding connections for the modules as well as their cables. The three-phase mains comes from a very hostile environment, which is a characteristic of shop floors, and carries signals that can be strongly interfering. Such cables are therefore classified as class 4.

It is essential that these signals are filtered immediately after entering the cabinet, which is normally achieved by a suitable line filter. The filtered cable is classified as class 3, which then goes to the SMPS and the drive. Output of the SMPS is again classified as class 4 since it can carry strong interference. Filter at PLC I/P converts this into a class 3 cable, which then goes to the PLC. I/O lines of PLC carry control signals that can be slightly sensitive and, hence, are classified as class 2. Some class 2 lines from PLC go as control cables to the drive.
As a rule, shielded cables must be used for such lines with the shield exposed and bonded to the mounting plate through 360-degree saddle clamps. Moreover, proper distance has to be maintained between these and nearby class 3 and class 4 cables. In Fig. 30, this distance is shown as 300mm and 450mm, respectively; although it may be less considering small cable lengths (remember the 300mm distance is for lines in excess of 30m).
Some I/O cables of the PLC go to the relay and contactor section, while some can also go to MMI usually mounted on panel doors. These also must be preferably shielded, with the shield bonded to the mounting plate at a point nearest to the PLC. For cables going to MMI, pigtails can be used for grounding, although saddle clamps are better.
Such cables should be very close to RF reference (that is, mounting plate) as these cross over to the front-panel door. This can be achieved only if the crossover happens along the bonding point of the panel to the door, that is, along the bond straps that connect the panel to the door. If possible, bond straps should be mounted along these cables or additional bond straps should be provided along these cables. Many a time, it is observed that these cables crossover along door hinges, which is not a good practice, since hinges cannot be relied upon to provide a good bond.
Motor drives are the most notorious components as far as generation of conducted and radiated emission is concerned, and are the main reasons for non compliances observed in control panels. Most drive manufacturers give fairly-detailed information regarding the type of cables to be used for input mains supply, drive output cable going to the motor, frequency input cable and I/O and control cables. All these cables must be invariably shielded.
Drive manuals also discuss cable routing to be followed, how cables are installed and how saddle clamps and pigtails are to be used to ground the shields. Some even go to the extent of suggesting how much tightening torque has to be applied to the screws for proper bonding. Machine manufacturers who casually ignore these guidelines eventually face a daunting task while complying with EMC tests.
Now, output cables of motor drives can carry strongly-interfering signals and therefore classified as class 4. It is imperative that output and control cables of a drive are shielded with the shield bonded to the mounting plate by a 360-degree connector or saddle clamp at a point nearest to the drive. The shield must also be grounded at the motor end, preferably through a 360-degree bulkhead connector at the motor terminal box.
Drive control cable, which is class 2, must be separated from output cable (class 4) by a distance of more than 450mm and from mains cable (class 3) by more than 300mm. The mains cable to the drive should preferably be a shielded cable with the shield bonded to the mounting plate by a saddle clamp, and the power earth wire of the mains cable should also be fastened under this clamp. Analogue and digital signals must have their own separate cables; there cannot be a bigger blunder than running these as wires through the same cable, even though these are of the same class (class 2).
Conclusion
Cable selection and routing is generally a subject of system-level EMC design, where a large number of components are assembled to make a system. It is generally observed that assembling all EMC-compliant components does not automatically result in a compliant system. This is because although the components that make up the system have been tested individually, their manufacturers do not know in what way their products would be assembled in a system. It is the final system assembler who has to ensure correct assembly of all components to make a compliant system. Cable selection and routing plays a vital part in this endeavor.
Chetan Kathalay is working as scientist in Electronics Test and Development Centre, Pune. He is BE in electronics from Nagpur University


Very interesting article. Does it have background in IEC/IEEE/NEC norms?