


 This project explains the interfacing of PCF8591 converter (slave) with ATmega328 microcontroller (master) using I2C bus to get direct multiple analogue inputs and outputs. ATmega328 microcontroller (MCU) on the Arduino Uno board consists of only six analogue inputs, which are not enough for some projects that need more analogue inputs. This circuit provides twenty analogue inputs, five analogue outputs and an LCD for display.
Circuit and working
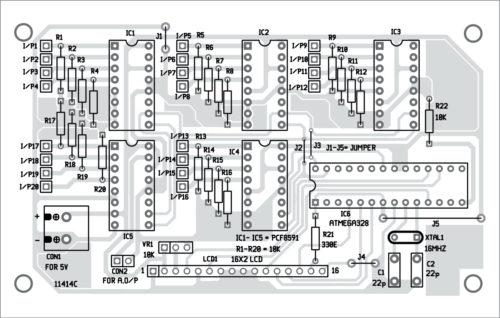
The circuit diagram of ATmega328 analogue I/O port expander using I2C bus is shown in Fig. 1. It is built around five PCF8591 (IC1 through IC5), ATmega328 (IC6), and a few other components.
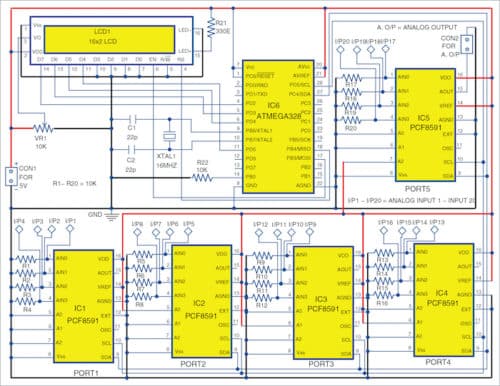
PCF8591 is basically an 8-bit analogue-to-digital conversion (ADC) and an 8-bit digital-to-analogue conversion (DAC) chip. As shown in the circuit diagram, you may also replace ATmega328 with the Arduino Uno board directly by connecting SCL and SDA pins of Arduino to PCF8591.

In this circuit, the I2C bus connections include pins 9 and 10 of PCF8591 and pins 27 and 28 of ATmega328, which are SDA and SCL pins, respectively. In this I2C bus, we can connect eight slave ICs (PCF8591) with each slave having a unique address for data transmission and reception. However, only five slave ICs are used in this project.
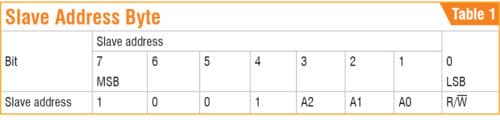
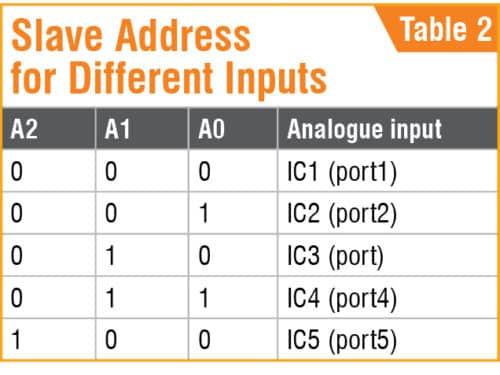
Table 1 shows the slave PCF8591 addressing in detail. A2, A1, and A0 are slave address bits to configure I2C slave address selection for different inputs (refer Table 2). To enable each slave IC, the corresponding address bits must be either GND (logic 0) or connected with 5V supply (logic 1) as shown in Fig. 1.
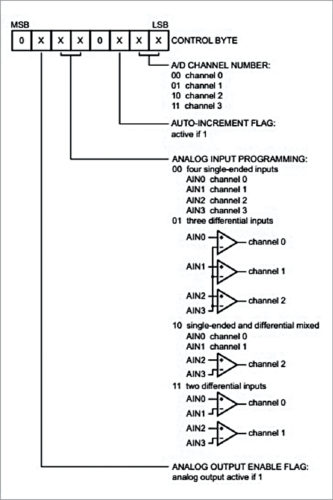
To know more about the slave address bits selection, refer to the control byte of PCF8591 as shown in Fig. 2. By enabling the control bits we can configure the analogue inputs and outputs. Each slave IC has four analogue inputs (AIN0 through AIN3). In this project, there are five slave ICs, which means twenty analogue inputs (I/P1 through I/P20) of PCF8591 will be automatically scanned and the corresponding outputs can be displayed on 16×2 LCD display.
To get the outputs on the LCD, control byte and analogue output values are to be programmed in the coding. The system scans the addresses (A2, A1 and A0) of each slave port one by one, processes the inputs (AIN0 through AIN3) and displays them on the LCD. For better accuracy in the display, each analogue input pin is pulled down to ground using 10-kilo-ohm resistor.
Software
Arduino IDE is used for programming the code (Atmega328_expander.ino). LCD library is used for display and Wire library is used for I2C communication. Before uploading the code to ATmega328, do not forget to include the related files (Atmega328_expander_library_files.zip) in the Arduino Library.
For uploading the code to ATmega328, use an Arduino Uno board with bootloader. After uploading the code, remove ATmega328 chip from Arduino Uno board and insert it into the circuit or PCB.
Download Source Code
Construction and testing
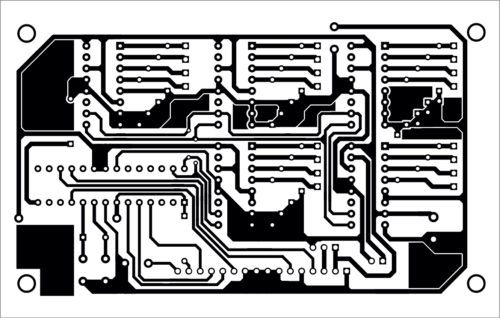
A PCB layout for the ATmega328 analogue I/O port expander is shown in Fig. 3 and its components layout in Fig. 4. After assembling the circuit on PCB, connect 5V across CON1.
Download PCB and Component Layout PDFs: click here
To test the working of the circuit, just connect a variable resistor or preset between ground and 5V power source with its wiper (middle pin) connected to any of the analogue pins of IC5. Vary the preset and check the output voltage on LCD. You can also check the output voltage at connector CON2 on a digital voltmeter.
S. Basilea Ruban is an electronics and communication engineer, circuit designer, and embedded programmer

I was working on some project and i did not get the all Proteus library i want can you help me???
Dear Cofnan,
We do not have Proteus library as we are working on KiCAD softeware.
Regards