


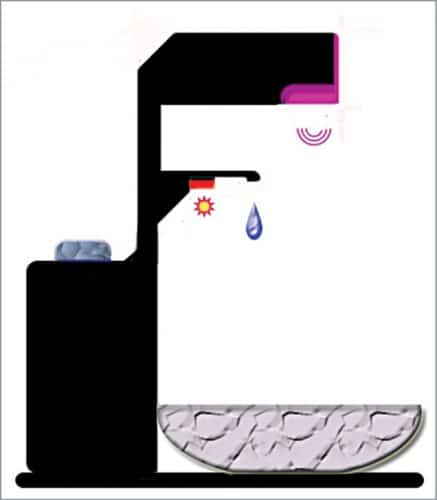
 A branded automatic water dispenser is usually expensive. So, a relatively low-cost do-it-yourself solution is presented here. It is a portable general-purpose automatic water dispenser perfectly suitable for homes to wash hands or feed water to pets. The presented system also offers many possibilities for extensions.

The system consists of three key segments: infrared (IR) proximity sensor, water pump driver, and mini submersible water pump. Also, there is a power supply block that holds a couple of standard dry cells.
IR proximity sensor design
The use of an IR proximity sensor is a practical way to build an automatic water dispenser. While industrial-grade sensors are extremely efficient, most readymade pre-wired sensor modules are prone to iterated false triggering, which badly affects the intended performance. You also have to properly mount the sensors so that these are not exposed to strong sunlight/ambient light. These sensors should be covered partially to prevent erroneous operation.

To keep the complexity and cost within limits, a reliable IR proximity sensor has been developed with the help of a PLL tone decoder IC NE567.
This tone and frequency decoder is a highly stable phase-locked loop (PLL) with synchronous AM lock detection and power output circuitry. Its primary function is to drive a load whenever a sustained frequency within its detection band is present at the self-biased input. The bandwidth centre frequency and output delay are independently set using just four external components.
The next key component is the compact TCRT5000L reflective sensor, which includes a 950nm IR emitter and phototransistor in a leaded package that blocks visible light.
Water pump driver
Any 3-6V water pump motor should work with this little driver built around transistor T2. (It is recommended to use a prime version water pump for a permanent fixture.) Just attach a small rubber/silicone hose to the motor outlet, and submerge it in water to run it. Make sure that the water level is always higher than the motor as dry run will damage the water pump motor in a flash. Fortunately, we can prevent such a mishap by adding a mini float switch to the wiring of the water pump.
Here, S8550 pnp transistor (T2) is used as a high-side switch to drive the water pump motor (M1). Since the transistor switches the high voltage on and off (instead of ground), the setup provides a good return path when the water pump motor is turned off, and hence there’s not much undesired electromagnetic interference (EMI).
Further, when the output of IC1 goes high (idle state), the base resistor (R7) of T2 is floating. So, the VBE of T2 becomes 0V (5.3–5.3=0) and keeps T2 and M1 dead off.
Nevertheless, the driver circuitry can be replaced with a low-current 5V relay because IC1 can merrily source current up to 100mA.
Circuit and working of automatic water dispenser
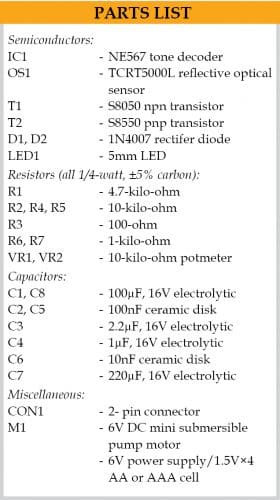
The circuit diagram of the automatic water dispenser is shown in Fig. 2. It is built around tone decoder NE567 (IC1), optical reflective sensor TCRT5000L (OS1), two 1N4007 rectifier diodes (D1 and D2), two transistors S8050 and S8550 (T1 and T2), and a few other components.
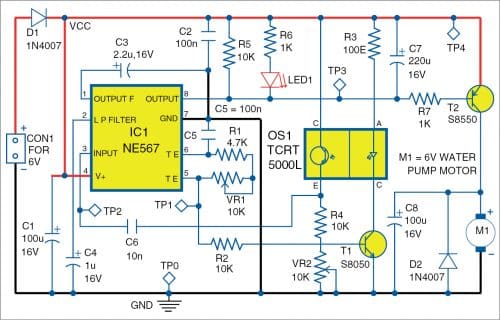
The working of the circuit is simple. Initially, when there is no object such as a hand or pet in front of TCRT5000, LED1 remains off and no water flows out as the water pump also remains off. But when there is an object/obstacle in front of TCRT5000, LED1 glows and, at the same time, the water pump is switched on and water flows out from the tap.
Construction and testing
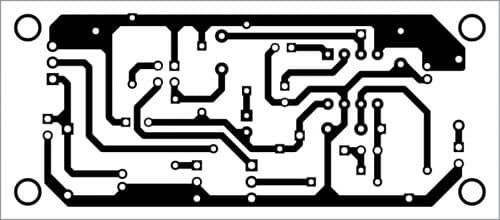
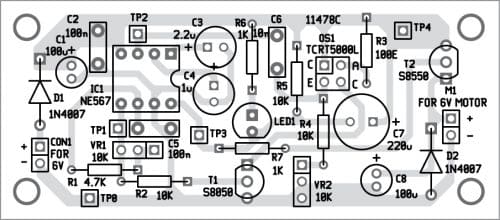
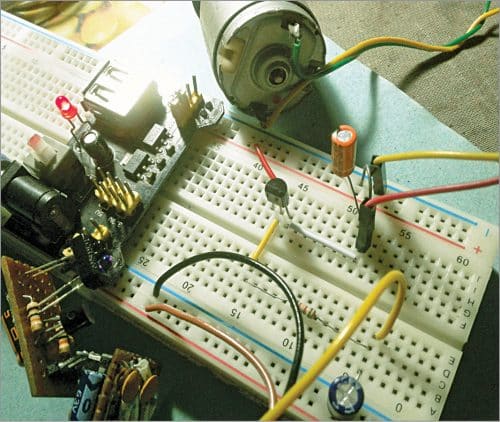
Wiring up the circuit is simple. You can either use a veroboard, or the designed PCB layout given here. A PCB layout for the automatic water dispenser is shown in Fig. 3 and its components layout in Fig. 4.
Download PCB and Component Layout PDFs: click here
After assembling the circuit on the PCB, enclose it in a water-resistant (transparent/translucent) prototype enclosure. A status indicator (LED1) has been added in the circuit, which glows when the proximity sensor detects an object/obstacle. Fix the TCRT5000L sensor and LED1 on the front panel of the cabinet.
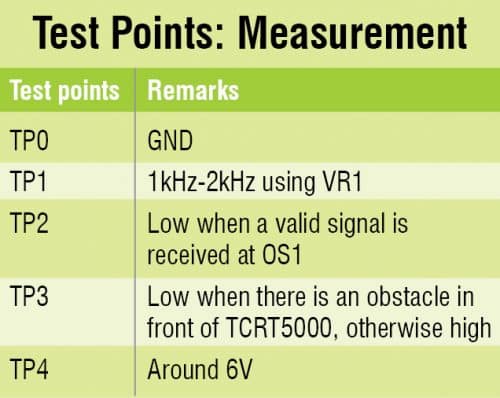
A trimpot (VR1) is used to set the operating frequency of the oscillator. The power supply used here is 6V (four AA/AAA cells) DC supply. It also powers the mini submersible water pump (M1). The final proposed arrangement is shown in Fig. 5. For troubleshooting, check voltages at various test points as per the table.
Note. The system hardly needs any crucial electrical adjustments. The operating frequency of NE567 (IC1) can be tuned in 1kHz to 2kHz range using a 10-kilo-ohm potmeter (VR1). You can check frequency at test point TP1.
In case of valid proximity detection, test point TP2 gives a value greater than 150mV. The operating distance lies in 7cm to 15cm range depending upon the setting of the second 10-kilo-ohm trimpot (VR2).
The primary output pin 8 of NE567 is actually a free-floating output transistor collector. It gives a logic-low level output (TP3) with 100mA current-sinking capability on proximity detection.
T.K. Hareendran is an electronics designer, hardware beta tester, technical author, and product reviewer

I am in second year of Entc Engg.,so can i make this project for project based learning(PBL) subject? what is the total cost needed to make this project?
I am in second year of Entc Engg.,so can i make this project for project based learning(PBL) subject? what is the total cost needed to make this project?
You can assemble the project within Rs 1000. All components are easily available in the market.
Do you have any more instructions on how this project can be built? I want to try and use it for a project in my electronics class.
Hello, I am commenting again because I am having trouble finding some parts for this kit. Is there any way I can get in contact with anyone so that I can order this for my project? I really need to get all the parts. Please I really need help.
The project is simple and so it does not require any specific instructions. You can go through the Construction and Testing section carefully to build the project. After that check the test points given in the Table above. For any specific problem you may contact us at [email protected]