


 “Now control any PC or play any digital game using brain waves”
Characters in sci-fi movies are often seen operating a computer with their minds. While this may not be possible in reality, technology such as Brain-Computer Interface (BCI) can allow this.


Despite being completely paralysed, the late physicist Stephen Hawking was able to communicate using a speech synthesiser on his computer, which he controlled with the help of certain facial movements. Wouldn’t it be amazing if, in the future, differently-abled people can effectively communicate with the help of brain waves that are relayed using different sensors? Imagine not requiring a mouse or keyboard to type/navigate or play games. Your brain waves would be enough to make a decision. The positive changes seem to be endless.
It all sounds interesting. So why wait for the future when it can be developed in the present? Let’s begin our journey to bring about a positive change in several lives.
Bill Of Material
The following components are required to build this project.

Prerequisite
First, install the BlueZ module in the Raspberry Pi IDE that will enable the EEG sensor to capture the Alpha, Beta, Gamma and Theta waves and stream that data over a Bluetooth connection via a Bluetooth serial port. You also need to install the PySerial Python module to obtain the streamed EEG sensor data from the Bluetooth serial port.
To process the captured EEG data, you can use the NeuroPy module. For controlling the GUI of the PC or the mouse movements and clicks, use Pynput or any other similar Python module. To map one range of values to another, use the nmap module. Installing these modules is easy. Simply open the Linux terminal and execute the following commands:
sudo pip3 install pyserial

sudo pip3 install nmap

sudo pip3 install neuropy
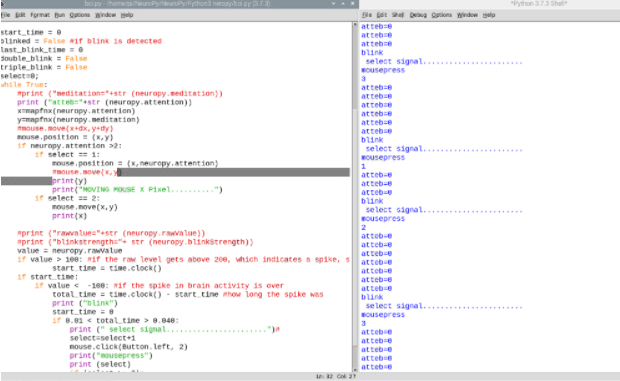
Coding
After importing all the necessary libraries in the code, set the range of values to be mapped for the screen resolution from the sensor readings. This will enable the code to map the EEG values from 01 pixel to 100 pixels of GUI. In my case, it was from 720p to 1080p.
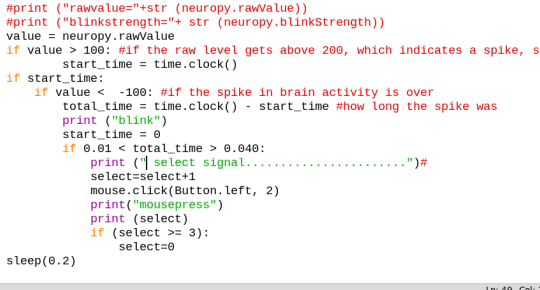
Next, make use of the signal which the brain sends to the eye for blinking. So by blinking once, the functions of the left mouse button click will be performed. Similarly, blinking twice will perform the functions of the right mouse button click. For these to happen perfectly, you will need to set values for variables such as time count, blink count and start time.
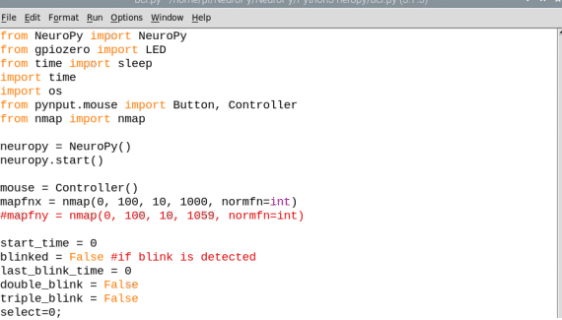
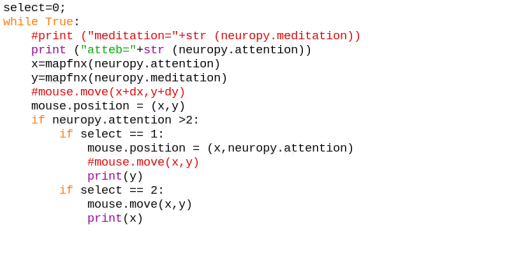
Now you need to create a while loop so that the EEG brain wave data can be converted into HID inputs for controlling the mouse actions in the GUI of RPi. Therefore it is important to update the attention span of the mind responsible for the generation of mind waves. The mind waves will map with the GUI pixel value and then move the mouse over the GUI.
Then, with the help of the previously set condition in the code, the duration of the signal spike in brain waves will be checked. If it meets a certain duration, then the respective mouse click will occur. It will also check the number of blink signals that are generated from the brain.
Testing
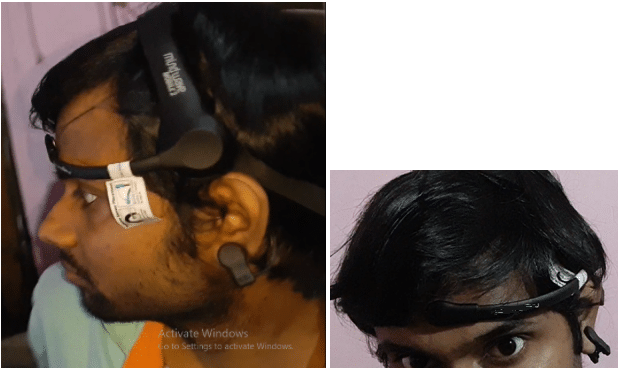
Now save the final code and connect the EEG sensor with the Raspberry Pi. Then wear the EEG sensor and run the code while concentrating to move the mouse in x and y axes for clicking with the help of blink signals from the brain.
Congrats!!! You have just made a mind-controlled computer.
It might be a bit tricky to move the mouse to the exact position that you want. But since this is the first version, I promise more cool and easy to control features will be added in the future.