


 Certain shortcuts on your keyboard such as copy, paste or print can definitely simplify your work. And what if you can create these different keyboard operations on your own? Have you ever thought about this?
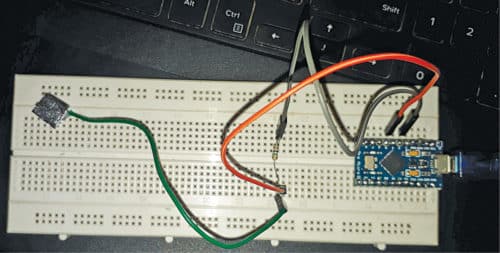
This simple DIY project explains how you can make a portable device that performs different keyboard operations like copy and space bar. It is a small single keypad device that works on Arduino and capacitive touch sensor. The sensor can be made using any metallic object like aluminium foil, coin, etc. The author’s prototype wired on a breadboard is shown in Fig. 1.
Hardware components include Arduino Micro, 1-mega-ohm resistor, jumper wires, and aluminium foil.
Arduino Micro is the smallest board of the family of ATmega32U4 Arduino. It is easy to integrate with everyday objects to make them interactive. It is based on the ATmega32U4 microcontroller (MCU) featuring a built-in USB, which makes the Micro recognisable as a mouse or keyboard. Note that you can use only the Arduino boards that use ATmega32U4 such as Micro, Leonardo, Leonardo ETH, etc.
Circuit and working
The circuit diagram of the capacitive touch keyboard using Arduino is shown in Fig. 2. Digital pins 2 and 4 of Arduino are used to interface with the sensor.
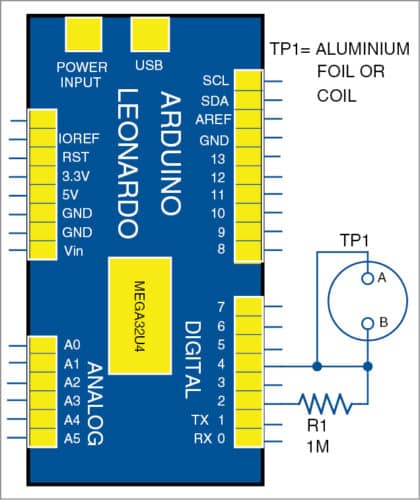
The sensor setup includes a medium to high-value resistor, some jumper wires, a small piece of aluminum foil. You can use any resistor value between 100-kilo-ohm and 50-mega-ohm. Note that at higher resistor value, it behaves like a proximity sensor.
The circuit requires a capacitive sensor library in Arduino IDE. The library turns two or more Arduino pins into a capacitive sensor, which can sense the electrical capacitance of the human body. Capacitive sensor can detect anything that is conductive or that has a significantly different permittivity than air, such as the human body or hand.
The project was tested using a 1-mega-ohm resistor. If you are using a different resistor value, use the program (capturing_sensor_value.ino) to find the sensor value before uploading the main Arduino sketch to Arduino board.
Software program
Software is written in Arduino programming language. The capturing_sensor_value.ino code is used to decode the sensor value. The copy_operation.ino code is used for copy operation and the space_bar.ino code is used for space bar operation on the capacitive touch keyboard.
After installing Arduino IDE in your PC, launch Arduino IDE Software, connect Arduino Micro to your PC, select the board (Arduino/Genuino Micro) and COM port. Then install capacitive sensor library, which can be downloaded from the link https://github.com/arduino-libraries/CapacitiveSensor/zipball/master
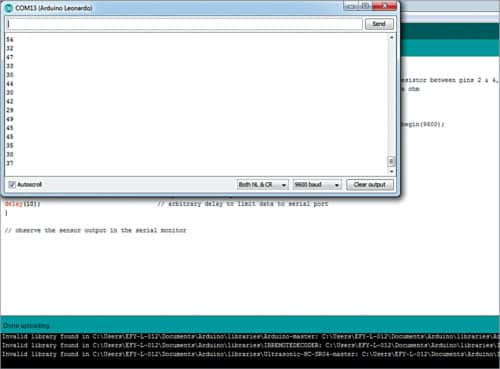
For obtaining the sensor values, open capturing_sensor_value.ino from Arduino IDE, compile and upload to Arduino board with the sensor connected to the board. Next, open serial monitor of Arduino IDE and observe the values. The default sensor values obtained on the serial monitor without touching the sensor are shown in Fig. 3.
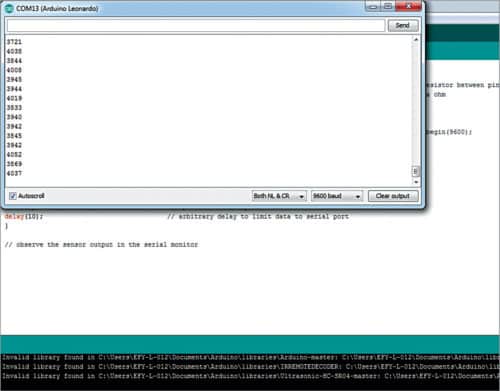
Whenever you touch the sensor, the value increases. With 1-mega-ohm resistor, at every touch, the sensor value goes up by 1000. So, a condition statement in Arduino sketch is used such that whenever sensor value goes over 1000, a keyboard operation is performed.
Sensor values after touching the sensor are shown in Fig. 4. You can change the sensor values by changing the resistor value and use suitable sensor values in the main codes (copy_operation.ino and space_bar.ino)
Download Source Code
Testing steps
- Upload capturing_sensor_value.ino code to Arduino board
- Open the serial monitor and observe the values with and without touching the sensor. When you touch the sensor, the value comes in between 3700 and 4052 as shown in Fig. 4. For example, let us take a value of 3800.
- Next, open copy_operation.ino code, insert the value 3800 in this code as sensor1 3800. Compile and upload it to Arduino board
- Now open any document file. Select a line of text from this document file. When you touch the sensor it will perform the copy operation, equivalent to ctrl+c operation on the normal keyboard.
- Similarly, open space_bar.ino code and use 1000 in the code as sensor1 1000 and Keyboard.write(32) for space bar operation. After compiling and uploading the code into the Arduino board, touch the sensor. It performs space bar operation by simply moving the cursor towards right on each touch.
Amal Mathew is an electronics hobbyist

Hi
Is it possible to check water presence in a tube/pipe with this circuit?
Thanks in advance.
You need to modify the project for that application