


Every once in a while, you come across an idea where keeping time is a prime concern. For example, imagine a relay that has to be activated at a certain time, or a data logger that has to store values at precise intervals.
The first thing that comes to our mind is to use a real-time clock (RTC) chip. But since these chips are not accurate, we need to keep doing manual adjustments to keep them synchronised.
The solution here is to use network time protocol (NTP). The ESP8266 NodeMCU has access to the internet, so you can get day of the week and precise time within a few milliseconds of Coordinated Universal Time (UTC) for free! And you don’t need any additional hardware circuitry.

NTP is a standard internet protocol (IP) for synchronising computer clocks to some reference over a network. The protocol can be used to synchronise all networked devices to UTC within a few milliseconds—50 milliseconds over the public internet and under 5 milliseconds in a LAN environment. UTC is a world-wide time standard, closely related to Greenwich Mean Time (GMT). UTC is the same worldwide.
NTP sets the clocks of computers to UTC and any local time zone offset, or daylight saving time offset, is applied by the client. In this manner clients can synchronise to servers regardless of location and time zone differences.

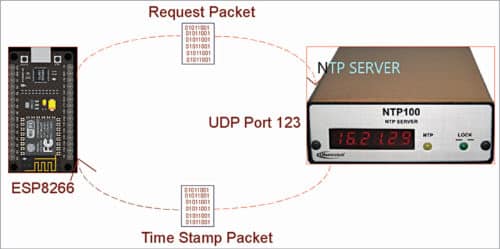
NTP can operate in a number of ways. The most common configuration is to operate in client-server mode. The client device, such as an ESP8266, connects to the server using the User Datagram Protocol (UDP) on port 123. A client then transmits a request packet to an NTP server.
In response to this request the NTP server sends a time stamp packet. A time stamp packet contains multiple information like UNIX time stamp, accuracy, delay, or time zone. A client can then parse out current day of the week and time values.
The circuit and working
The structure of NTP protocol is shown in Fig. 1. The NTP communication format structure comprises a regulated power supply and the main circuit.
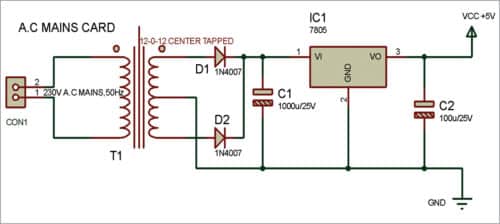
The regulated power supply, shown in Fig. 2, is built around a 12V-0-12V, 500mA step-down centre-tapped transformer (X1), full-wave rectifier with 1N4007 diodes (D1 and D2), 5V regulator 7805 (IC1), 1000µF, 25V electrolytic capacitors (C1) and 100µF, 25V electrolytic capacitor (C2). Alternatively, a 5V phone charger adaptor can be used to power the circuit.
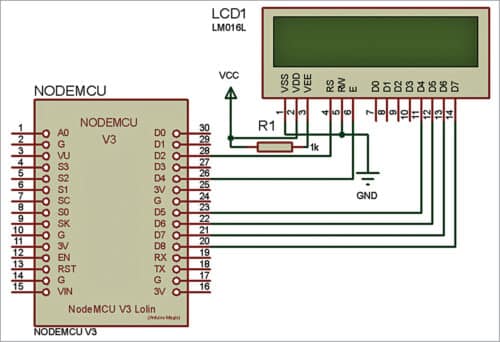
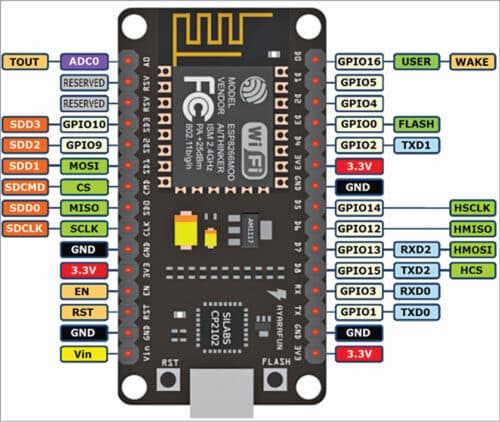
The mains circuit, shown in Fig. 3, is built around NodeMCU V3 and LCD LM016L (LCD1). Pin details of the NodeMCU are shown in Fig. 4.
The working principle of the project is as shown Fig. 1. The ESP8266 NodeMCU sends request packet to NTP server and then the NTP server sends a time stamp packet to ESP8266. The NodeMCU decodes the time stamp with the help of NTPClient.h header file along with User Datagram Protocol (UDP). After decoding the time stamp and day of the week in serial port it is displayed on the 16×2 character LCD.
Installing NTP Client library
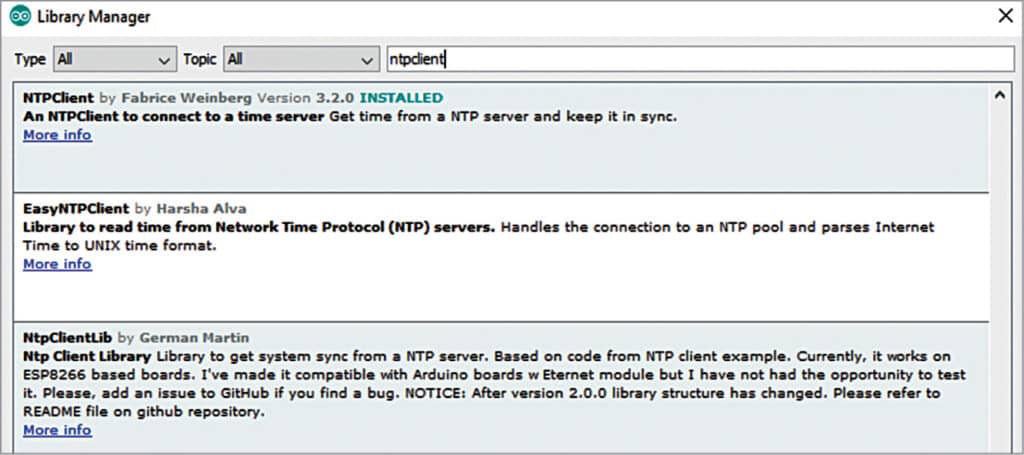
The easiest way to get time from an NTP server is by using an NTP Client from Arduino libraries. To install this library in your Arduino IDE, Navigate to the SketchInclude LibraryManage Libraries… Wait for Library Manager to download libraries index and update the list of installed libraries.
Filter your search by typing ntpclient. There should be a couple of entries. Look for NTPClient by Fabrice Weinberg. Click on that entry, and then select Install, as shown in Fig. 5.
Software
The circuit requires the software program loaded into the internal memory of NodeMCU to operate. Arduino IDE 1.6.8 is used to compile and upload the program. The program makes the device communicate with NTP Application Platform when connected to the internet through an access point or Wi-Fi router.
To add board for ESP8266 NodeMCU in Arduino IDE, go to File→Preferences and paste the link
Open Board Manager from Tools→Board Menu and install ESP8266 platform. (Do not forget to select your ESP8266 board from Tools→Board menu after installation.)
The sketch is at the heart of the system and carries out all major functions. For external header files needed for programming, use the above link.
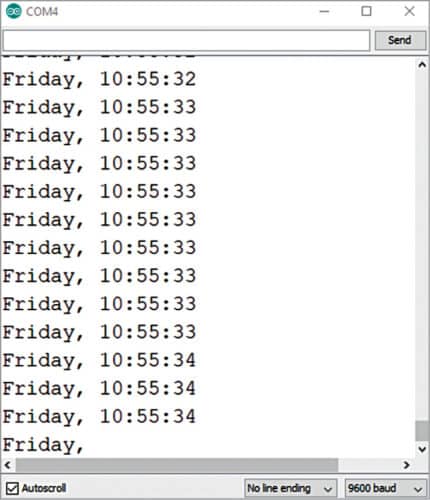
After uploading the sketch, press RST button on your NodeMCU. You would get the current day and time every second, as shown in Fig. 6.
Let’s take a quick look at the code to see how it works. First, we include the libraries needed for this project.
- NTPClient.h is time library which does graceful NTP server synchronisation.
- ESP8266WiFi.h library provides ESP8266-specific Wi-Fi methods we are calling to connect to network.
- WiFiUdp.h library handles UDP protocol, like opening a UDP port, sending and receiving UDP packets, etc.
Next, we set up a few constants like SSID, Wi-Fi password, and UTC offset that you are already aware of. We also define daysOfTheWeek2D array.
Before initialising NTP Client object, we need to specify the address of the NTP server we wish to use:
WiFiUDP ntpUDP;
NTPClient timeClient(ntpUDP, “pool.ntp.
org”, utcOffsetInSeconds);
The command pool.ntp.org automatically picks time servers that are geographically close to you. But if you want to choose explicitly, use one of the sub-zones of the command mentioned below.
| Area | HostName |
| Worldwide | pool.ntp.org |
| Asia | asia.pool.ntp.org |
| Europe | europe.pool.ntp.org |
| North America | north-america.pool.ntp.org |
| Oceania | oceania.pool.ntp.org |
| South America | south-america.pool.ntp.org |
Once ESP8266 is connected to the network, initialise the NTP client using begin()function, like:
timeClient.begin();
Now we can simply call the update()function whenever we want current day and time. This function transmits a request packet to an NTP server using UDP protocol and parses the received time stamp packet into a readable format, like:
timeClient.update();
You can access the day and time information by accessing the NTP Client library functions, as shown in Fig. 6.
After installing all above-mentioned libraries properly, upload the source code NODE_EFY_ARTICLE.ino. Now connect the components according to circuit diagram. Power the circuit using 5V power supply described earlier, or you can use your phone charger adaptor that gives an output of 5V.
| Part List | |
| Semiconductors: | |
| IC1 | – 7805, 5V voltage regulator |
| D1, D2 | – 1N4007 rectifier diode |
| Resistor (1/4-watt, ±5% carbon): | |
| R1 | – 1-kilo-ohm |
| Capacitors: | |
| C1 | – 1000µF, 25V electrolytic |
| C2 | – 100µF, 16V electrolytic |
| Miscellaneous: | |
| CON1 | – 2-pin connector |
| X1 | – 230V AC primary to 12V-0-12V, 750mA secondary transformer |
| LCD1 | – LCD LM016L |
| – NodeMCU V3 | |
| – Flexible wire | |
Wait for a few seconds and you can see the time on display. The best part of this project is that you need not set the time as it automatically takes the right time from NTP.
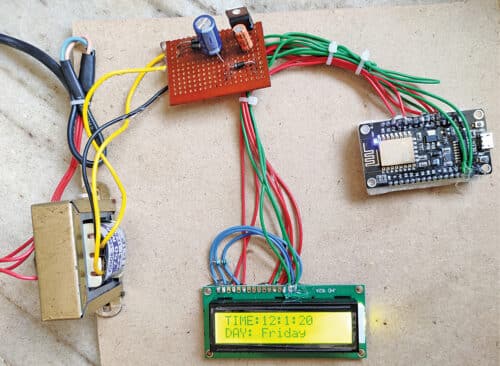
Assemble the circuit based on circuit diagrams shown in Fig. 3 and Fig. 4. Connect the primary of transformer to 230V AC and its secondary to diodes D1 and D2. The final product (prototype) is shown in Fig. 7.
Download source code
Pamarthi Kanakaraja is an electronics hobbyist
