


Well, we have seen that using ESP32 one can send data to cloud server like thingspeak.com but this transmission is rather very slow. Your machine may be powerful enough to send data every second but the ultimate throughput is decided by slow data path allowed by thingspeak.com server.
A better process
A better process is cash out a few grand & buy an Internet server space of your own which will always be connected to Internet and then dump your data into it as you like. However, still a better, secure yet cheap process is, use Telegram! Send data once in every couple of seconds using a cheap ESP32 to a telegram Bot channel and then receive it on the other end of the world using a simple Python code! We have a remote telemetry station which sends data once in 4 seconds. The data comes to the base station made of ESP32 ,connected vide a LoRa telemetry. The same ESP32 is connected to Internet WiFi connection on the other end like a router & re-sends data to a Telegram Bot channel.
Receiver end
A normal computer connected on Internet and capable of running Python3 to receive data continuously and put it in use. The block diagram could be like this…

Field Sensors –> To ESP32 –> To Telegram Channel –> To Cyberspace –> To far end Receiver → WiFi Internet + Python → Reproduce data.
Telegram Bot principle
To start with first you have to create a channel in telegram which will then communicate with your ESPs. For this step, the first thing you need to do is to install the Telegram app into your mobile phone, tablet, or any of the other devices of your choice. You can get the free app easily from Google Play Store, App Store, etc.
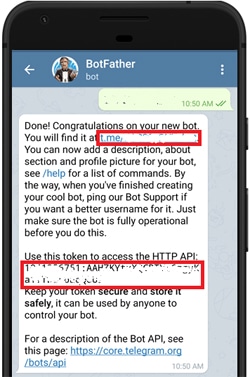
After installing the app and setting up your account. Search Botfather in your app as soon as you open Botfather you will see a Start or a Restart button this will open up a list of commands and their applications you need to click on the /newbot command. After this command, you need to give your bot a name. I have given the name “bera_arduino”. As the name of the bot is set, you need to set the username. While setting the username you should keep in mind that the username must be unique and it should end with the word “bot” – bera1bot. As soon as you set the username your bot will be created and you will see an API token available. save this somewhere as it will be needed in the next step.
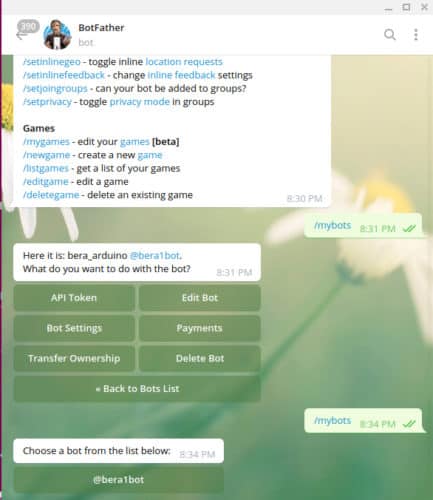
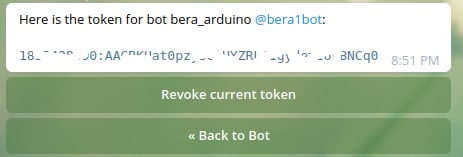
 Now two more parameters to be found out for this bera_arduino channel – chat_id and bot_token to prepare our sketch. After having created the chat name and user id, give a /mybots command ,it will open your bots. Select your chosen bot and you will be presented with a graphical window like this. Press the API_token and you will receive the write bot_token for your bot.
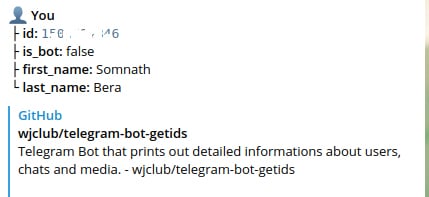
 The only other data required is your chatid. To get it find the bot named @GetIDsBot and you will be presented with an window like this describing your chat ID.
 Well, now you are all set with all the credentials to run your chatbot in Telegram. Write down these two ghostly looking numbers clearly for using them in the sketch.
Telegram with Python
So far the above setup is OK for getting messages on Telegram app on Mobile. But to get telegram interfaced with Python, you have to do the following – In a browser open https://my.telegram.org and enter the same mobile number that you have set up on the Mobile app. Like +919423456666 .This will send you an SMS into the Telegram bot in the phone app of Telegram [Telegram channel inside Telegram]. Enter that secret like code into the next window. You will be ushered into the next window where you have to give some name to the app title and short name [bera2 bera2]. Press next and you will be presented with two important identity – api_id, api_hash. The username is already there that you have setup while creating the bot – @bera1bot. Now only these three parameters are essential for accessing the incoming messages in a Telegram channel by a python script. Lets see how it works…
with TelegramClient(name, api_id, api_hash) as client:
@client.on(events.NewMessage() )
async def handler(event):
async for message in client.iter_messages(”):
print(message.text() )
client.run_until_disconnected()
Well, that is the main loop for continuously getting messages as it arrives in the channel.
On First Run
On your first run of the python code on computer, it will ask for the session parameters. To make it, it will ask for entering your same phone number that you have used in your mobile phone. On entering that it will send an SMS into the Telegram bot in the phone app of Telegram [Telegram channel inside Telegram]. Enter that secret like code into the next window and the session file will be created and your python code will start working! To make your code truly portable you have to give away both the files – the python code and the @bera1bot.session file together.
The sample Project
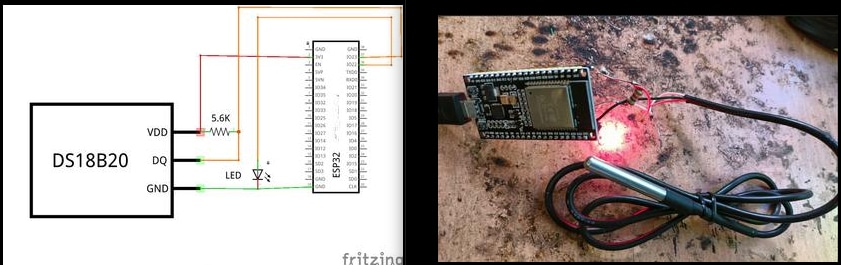
The sample project is divided into two parts – One is the sender unit and the other is the receiver unit. The sender unit is based on ESP32 with a DS18B20 connected to it. It creates a simple CSV data stream comprises of Date & time taken live from the NTP server. Add up a few arbitrary data stream with the temperature added at the last. 08/09/2021, 06:35:42, 0746, 0876, 3278, 3563, 2795, 3012
 The last data [3012] is the temperature – 30.12 Degree centigrade. Hold the DS18B20 by your palm and you would notice that the value is changing. The whole string is uploaded to the Telegram channel by using the simple GET statement of ESP32.
This same feat can be achieved by a computer as well but I still prefer the ESP32 as the sender unit as it’s real, continuous, small, automatic and a real hardware computing way of delivering data to Telegram without a bulky computer and using just a fraction of power of a 3.3 volt source !!!
[The actual project is much more complicated. It has a remote sender unit which sends field sensor data over a LoRa network to another ESP32 which in turn pumps data to the Telegram channel using LoRa one side and WiFi the other side – just like router]
Receiver unit
This is the crux of our project. You can receive data on a mobile which is highly secured, encrypted and you have set it up already in your mobile. The first test data reaches to your mobile only! But you can hardly process that data further to do some meaningful work like putting it on a web database for trending, run a relay or to run a system to perform differently depending on the value of data. Therefore, we replace the mobile phone by simply a internet connected computer having python3 installed. The python script will gather data and then re-display it on the same terminal at the same speed as it is sent at the sending end. Since all data is available as variables inside python, one can process them in anyway.
While other mediums like thingspeak.com can give you maximum 4 data string per minute, In telegram you can pump as many as 30 data strings per minute and yet all are highly secured and encrypted. Below is a data string that arrives over LoRa connection once in every 2 seconds and it is received in the python telegram terminal at the other end of the Globe with not a single stream lost.
08/09/2021 08:22:15 0746 3563 0876 2795 3278 2962
08/09/2021 08:22:16 0746 3563 0876 2795 3278 2962
08/09/2021 08:22:18 0746 3563 0876 2795 3278 2962
08/09/2021 08:22:20 0746 3563 0876 2795 3278 2962
08/09/2021 08:22:21 0746 3563 0876 2795 3278 2968
08/09/2021 08:22:23 0746 3563 0876 2795 3278 2968
08/09/2021 08:22:25 0746 3563 0876 2795 3278 2968
08/09/2021 08:22:26 0746 3563 0876 2795 3278 2968
08/09/2021 08:22:28 0746 3563 0876 2795 3278 2962
08/09/2021 08:22:30 0746 3563 0876 2795 3278 2962
Python prerequisite
Two python pip modules need to be installed to have the python ready for telegram works – python-telegram-bot and telethon.
$ pip3 install python-telegram-bot
$ pip3 install telethon
In Linux you may sudo it for installation while on Windows you need not to sudo it instead just clicking would do. The script is used in Python3 version. Once you run the script file in the same directory where your @bera1bot.session file is residing, the data will start appearing endlessly.
somnath@somnath-Satellite-L855:~$ python3 get.py
Arduino Sender unit
The arduino sketch is very simple and straight forward. ESP32 is provided with a series of WiFi user name and passwords. It connects with the suitable WiFi connection first. If unsuccessful, it restarts on its own and selects the next id/passwords. After establishing connection, it gets the data string and then using the CHAT_ID and BOTtoken it creates a https datastring which is then pumped out to telegram using a http.GET(). An LED connected to PIN-23 will blink continuously as long as the data uploading takes place successfully.
Aftermath
Once you successfully learn to run the sample project, you will be able to deploy Telegram to your real use. A data or data stream you can carry using your telegram bot channel to anywhere on the planet at a very high speed [one 49 characters CSV data string every two seconds] and with security. On the other end after receiving it on python3 you can further process it to run your devices or dump it in a database. With my Fiber to Home internet connection I get 30 readings per minute – one 49 character long data reading in every 2 seconds which is extremely good and that is the beauty of this round about data transfer. If the network slows down, the number of uploads will be reduced.
BOM:
- ESP32 – $4 to $5 a piece
- DS18B20 – $1 a piece.
- LED, 5.6K Resistor & Power supply
Software used: arduino_sketch.ino and python_script.py
Somnath Bera is an avid user of open source software. Professionally, he is a thermal power expert and works as additional general manager at NTPC Ltd
