


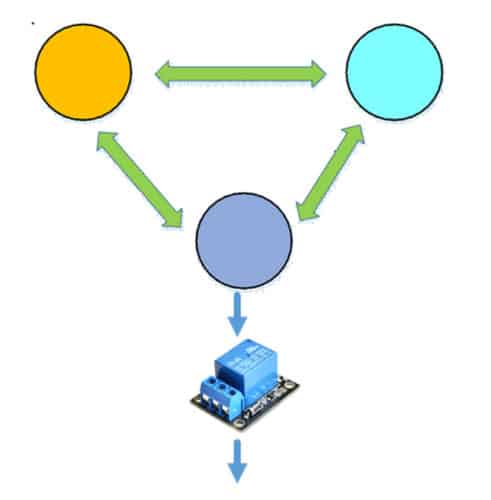
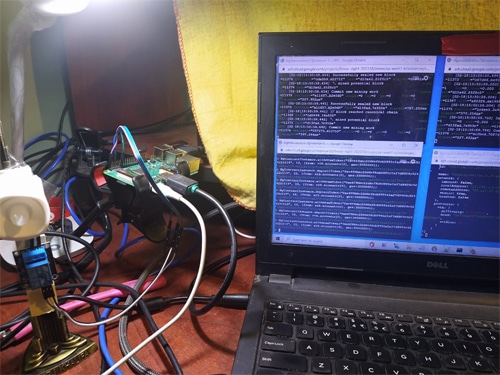
Smart home solutions enable controlling electrical devices such as lights, fans, water heaters, water pumping motors, kitchen accessories, etc. Smart contracts work on Blockchain and control these devices. In this mini-project, a peer-to-peer (P2P) network is built with two GCP (Google Cloud Platform) based VM(Virtual Machine)s and one RPI(Raspberry) based system. These two VMs are employed as miners and approve the transactions from the miner1 to RPI. RPI is connected with a relay which in turn turns on and off a light. A smart contract is deployed on Blockchain through Web3.0 and controls the light by transactions such as depositing the tokens and withdrawing the tokens. This mini-project involves technologies such as Blockchain, IoT, Cloud computing, and Web3.0.
The following development environments are required:
- Google cloud VMs (2nos) for running miners (Java script)
- Raspberry PI as a Blockchain node (Java script)
- Truflle Environment to build Smart Contract (Solidity)
- Control the light from Miner1 through RPI (Java Script)
Pre-requisites

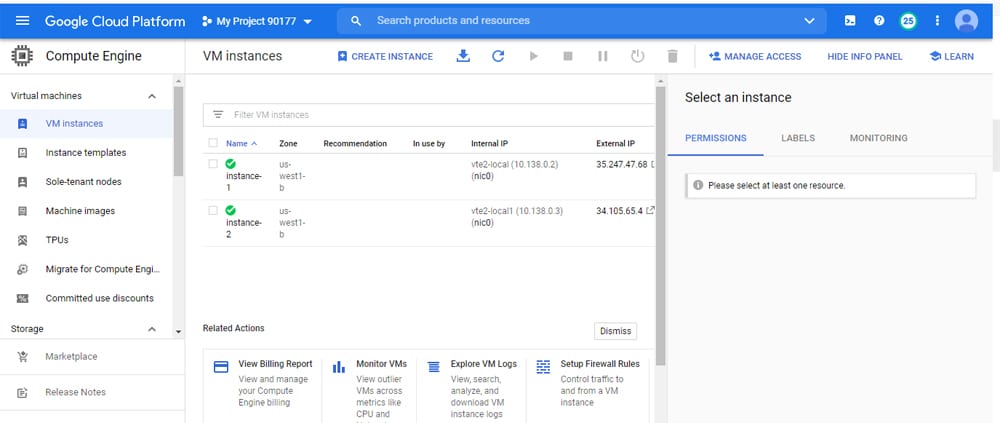
//Launch atleast 2 VMs (35.247.47.68, 34.105.65.4)
//Install the following in these 2 VMs
sudo apt-get install software-properties-common
sudo add-apt-repository -y ppa:ethereum/ethereum
sudo apt-get update
sudo apt-get install ethereum
geth version
//configure winscp to transfer files
Configure Google cloud VMs for running miners
1.1. Create folders
cd ~/
in vm1,
mkdir -p ~/RPI/miner1
in vm2
mkdir -p ~/RPI/miner2

1.2. Create Genesis block – genesis.json under ~/RPI
{
“nonce”: “0x0000000000000042”,
“mixhash”: “0x0000000000000000000000000000000000000000000000000000000000000000”,
“difficulty”: “0x400”,
“alloc”: {},
“coinbase”: “0x0000000000000000000000000000000000000000”,
“timestamp”: “0x00”,
“parentHash”: “0x0000000000000000000000000000000000000000000000000000000000000000”,
“extraData”: “0x436861696e536b696c6c732047656e6573697320426c6f636b”,
“gasLimit”: “0xffffffff”,
“config”: {
“chainId”: 42,
“homesteadBlock”: 0,
“eip155Block”: 0,
“eip158Block”: 0
}
}
1.3. Initialize miner #1
open cmd with admin
cd ~/RPI
geth –datadir miner1 init genesis.json
1.4. Initialize miner #2
open cmd with admin
cd ~/RPI
geth –datadir miner2 init genesis.json
1.5. Accounts for miner #1
default account for the miner #1
geth –datadir miner1 account new
Address: {0xFAeC65D82c950b9f21e46c506c359a74ecA5C9C9}
pw: blockchain
Add an additional account for testing purpose:
geth –datadir miner1 account new
Address: {0x10dbd79D08bA50bc0Cc1D5D00F2b68D97cf72870}
pw: blockchain
list the accounts
geth –datadir miner1 account list
1.6. Accounts for miner #2
default account for the miner #2
geth –datadir miner2 account new
Address: {0x646634c4A86af893a57D4c8796b8747c3845000a}
pw: blockchain
Add an additional account for testing purpose:
geth –datadir miner2 account new
Address: {0xAFa0Fd7b8f2B6220Ec618b7B517728EF5E21123D}
pw: blockchain
list the accounts
geth –datadir miner2 account list
1.7. Miner #1: setup
Prepare password.sec file under ~/RPI
with content = blockchain
Add the following to startminer1.sh
geth –identity “miner1” –networkid 42 –datadir “~/RPI/miner1” –nodiscover –mine –rpc –rpcport “8042” –port “30303” –allow-insecure-unlock –unlock 0 –password “~/RPI/password.sec” –ipcpath “~/.ethereum/geth.ipc” –rpcapi “db,eth,net,web3,personal,miner,admin,txpool,debug”
sudo chmod +x startminer1.sh
sh startminer1.sh
check error with > ps -ef | grep -i geth
To attach
open separate cmd window
sudo geth attach “http://localhost:8042”
miner.start()
after some time,
miner.stop()
eth.blockNumber
//Observe few blocks are mined
stop miner by ctrl+c
To identify running miner:
ps aux | grep geth
kill -INT procid
1.8. Miner #2: setup
Prepare password.sec file under ~/RPI
with content = blockchain
Add the following to startminer2.sh
geth –identity “miner2” –networkid 42 –datadir “~/RPI/miner2” –nodiscover –mine –rpc –rpcport “8043” –port “30304” –allow-insecure-unlock –unlock 0 –password “~/RPI/password.sec” –rpcapi “db,eth,net,web3,personal,miner,admin,txpool,debug”
sudo chmod +x startminer2.sh
sh startminer2.sh
check error with > ps -ef | grep -i geth
To attach
open separate cmd window
sudo geth attach “http://localhost:8043”
miner.start()
after some time,
miner.stop()
eth.blockNumber
//Observe few blocks are mined
stop miner by ctrl+c
To identify running miner:
ps aux | grep geth
kill -INT procid
1.9. Send ethers within miner #1
//Start miner1
sh startminer1.sh
geth attach “http://localhost:8042”
//default account
eth.coinbase
//all accounts
eth.accounts
eth.getBalance(eth.coinbase)
eth.getBalance(eth.accounts[1])
//get balance in ether
web3.fromWei(eth.getBalance(eth.coinbase))
//stop mining
miner.stop()
//send ethers
eth.sendTransaction({from: eth.accounts[0], to: eth.accounts[1], value: web3.toWei(10, “ether”)})
eth.pendingTransactions
//Observe one transaction is pending
//start miner
miner.start()
eth.pendingTransactions
//Observe null array
web3.fromWei( eth.getBalance(eth.accounts[1]))
//It has to display 10
//stop miner
miner.stop()
1.10. Send ethers within miner #2
//Start miner2
sh startminer2.sh
geth attach “http://localhost:8043”
//default account
eth.coinbase
“0x646634c4a86af893a57d4c8796b8747c3845000a”
//all accounts
eth.accounts
[“0x646634c4a86af893a57d4c8796b8747c3845000a”, “0xafa0fd7b8f2b6220ec618b7b517728ef5e21123d”]
eth.getBalance(eth.coinbase)
eth.getBalance(eth.accounts[1])
//get balance in ether
web3.fromWei(eth.getBalance(eth.coinbase))
//stop mining
miner.stop()
//send ethers
eth.sendTransaction({from: eth.accounts[0], to: eth.accounts[1], value: web3.toWei(10, “ether”)})
eth.pendingTransactions
//Observe one transaction is pending
//start miner
miner.start()
eth.pendingTransactions
//Observe null array
web3.fromWei( eth.getBalance(eth.accounts[1]))
//It has to display 10
//stop miner
miner.stop()
1.11. Pair the miners
cd ~/RPI
First, start both miners (miner #1 and miner #2).
//Start miner1
sh startminer1.sh
//from another cmd window with admin
geth attach “http://localhost:8042”
admin.nodeInfo.enode
//note down enode address
“enode://f9d48547c373fd61124d110791168572382298979d18ab5d6314cd399538ef77b8ff826b870a3474ad351f175b6d4d6f03c09ab4382b4d075e6a3c7fdeee58aa@35.247.47.68:30303?discport=0”
//Start miner2
sh startminer2.sh
//from another cmd window with admin
geth attach “http://localhost:8043”
admin.nodeInfo.enode
//note down enode address
“enode://991f8279ae27e665151621a9940b42e208bb7cda0108c3cda219059bed28fbb7ec869b04db84d173fbb1cecdce5fef222d010f02a90238e7d8a53b163f6b0a2a@34.105.65.4:30304?discport=0”
1.12. GCP Firewall settings
In GCP, top navigation->VPC Network->Firewall
Name=ethereum
Ingress
Tag name=miner
IP range=0.0.0.0/0
TCP = 30303,30304
UDP = 30303,30304
Create
In VMs, Edit VM
Network tag name = miner
Save VMs
Re-start VMs
1.13. Create static-nodes.json by adding these enodes
[
“enode://f9d48547c373fd61124d110791168572382298979d18ab5d6314cd399538ef77b8ff826b870a3474ad351f175b6d4d6f03c09ab4382b4d075e6a3c7fdeee58aa@35.247.47.68:30303?discport=0”,
“enode://991f8279ae27e665151621a9940b42e208bb7cda0108c3cda219059bed28fbb7ec869b04db84d173fbb1cecdce5fef222d010f02a90238e7d8a53b163f6b0a2a@34.105.65.4:30304?discport=0”
]
//copy static-nodes.json into the folders
in vm1,
/home/digitransolutions7/RPI/miner1
in vm2
/home/digitransolutions7/RPI/miner2
//exit both miners and again re-start miners
//from attached windows, check peer status
admin.peers
//Observe both miners are paired.
1.14. Send ethers between nodes of the private blockchain
//from both cmd window attachments,
miner.start()
//Send ethers from Miner #1 to Miner #2
//From miner2 attached cmd window,
//check miner2 account
eth.accounts[1]
“0xafa0fd7b8f2b6220ec618b7b517728ef5e21123d”
//check miner2 balance
web3.fromWei(eth.getBalance(eth.accounts[1]))
//observe balance=10
//From the Geth console attached to the miner #1
eth.sendTransaction({from: eth.coinbase, to: “0xafa0fd7b8f2b6220ec618b7b517728ef5e21123d”, value: web3.toWei(10, “ether”)})
//from miner1 attachment, check the balance of miner2 account
web3.fromWei( eth.getBalance(“0xafa0fd7b8f2b6220ec618b7b517728ef5e21123d”))
//from miner2 attachment, check the balance of miner2 account
web3.fromWei( eth.getBalance(eth.accounts[1]))
//now balance = 20
1.15. send 2 ethers between the following accounts:
miner #2(eth.accounts[1]) -> miner #1(eth.accounts[1])
//from both cmd window attachments,
miner.start()
//From the Geth console linked to the miner #1
eth.accounts[1]
//”0x10dbd79d08ba50bc0cc1d5d00f2b68d97cf72870″
//check balance
web3.fromWei(eth.getBalance(eth.accounts[1]))
//0
//From the Geth console linked to the miner #2
eth.sendTransaction({from: eth.accounts[1], to: “0x10dbd79d08ba50bc0cc1d5d00f2b68d97cf72870”, value: web3.toWei(2, “ether”)})
//Error: authentication needed: password or unlock
//From the miner #2, unlock the account #1 with its password:
personal.unlockAccount(eth.accounts[1], ‘blockchain’)
//From the miner #2
eth.sendTransaction({from: eth.accounts[1], to: “0x10dbd79d08ba50bc0cc1d5d00f2b68d97cf72870”, value: web3.toWei(2, “ether”)})
//From the miner #2,
web3.fromWei( eth.getBalance(eth.accounts[1]))
//17.9999
//From the miner #1,
web3.fromWei( eth.getBalance(eth.accounts[1]))
//2
1.16. Synchronize RPI
Finish RPI configuration based on Secton 2.
Update the file “static-nodes.json” with RPI enode
[
“enode://f9d48547c373fd61124d110791168572382298979d18ab5d6314cd399538ef77b8ff826b870a3474ad351f175b6d4d6f03c09ab4382b4d075e6a3c7fdeee58aa@35.247.47.68:30303?discport=0”,
“enode://991f8279ae27e665151621a9940b42e208bb7cda0108c3cda219059bed28fbb7ec869b04db84d173fbb1cecdce5fef222d010f02a90238e7d8a53b163f6b0a2a@34.105.65.4:30304?discport=0”,
“enode://2bb141277704d6ca1e7920c744090e01f53c3842f238a09c9b14c425eb0eb75ef5bbf3b294d9d3dd37f9d321ffcac1314c46e49473f1f66a3f7ad828d116a364@192.168.0.106:30303?discport=0”
]
/copy static-nodes.json into the folders
in vm1,
/home/digitransolutions7/RPI/miner1
in vm2
/home/digitransolutions7/RPI/miner2
/home/ubuntu/rpi-gcp/node
//exit all 3 miners and again re-start miners
//from attached windows, check peer status
admin.peers
//Observe all 3 miners are paired.
1.17. Send ethers from Miner #1 to RPI
//start mining in two computer miner attachments:
miner.start()
//send 10 ethers between the following accounts:
//miner #1(eth.coinbase) -> RPI(eth.accounts[1])
//From the Geth console linked to the RPi
eth.accounts[1]
“0x442f086b987d703887710af9ab59dce364c5f922”
//get balance
web3.fromWei(eth.getBalance(eth.accounts[1]))
//7.9999
//From the Geth console linked to the miner #1
eth.sendTransaction({from: eth.coinbase, to: “0x442f086b987d703887710af9ab59dce364c5f922”, value: web3.toWei(10, “ether”)})
//From the miner #1
web3.fromWei( eth.getBalance(“0x442f086b987d703887710af9ab59dce364c5f922”))
//From the RPI
web3.fromWei( eth.getBalance(eth.accounts[1]))
//17.9999
1.18. Send ethers from RPI to Miner #2
//send 2 ethers between the following accounts:
//RPI(eth.accounts[1]) -> miner #2(eth.accounts[1])
//From the Geth console linked to the miner #2
eth.accounts[1]
//”0xafa0fd7b8f2b6220ec618b7b517728ef5e21123d”
//get balance
web3.fromWei(eth.getBalance(eth.accounts[1]))
//0
//From the Geth console linked to the RPI
eth.sendTransaction({from: eth.accounts[1], to: “0xafa0fd7b8f2b6220ec618b7b517728ef5e21123d”, value: web3.toWei(2, “ether”)})
//From the RPi, unlock the account #1 with its password:
personal.unlockAccount(eth.accounts[1], ‘blockchain’)
//again try
eth.sendTransaction({from: eth.accounts[1], to: “0xafa0fd7b8f2b6220ec618b7b517728ef5e21123d”, value: web3.toWei(2, “ether”)})
//From the RPi
web3.fromWei( eth.getBalance(eth.accounts[1]))
//15.99958
//From the miner #2
web3.fromWei( eth.getBalance(eth.accounts[1]))
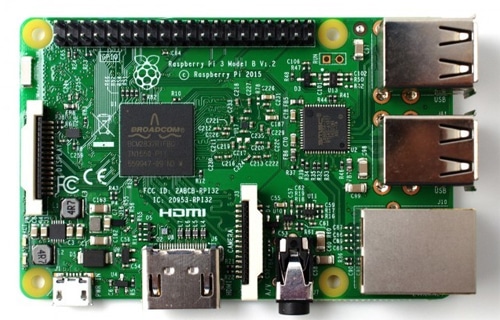
2. RPI Configuration
Pre-requisites:
The setup of the RPi will require the following hardware:
A Raspberry Pi
An SD Card with at least 16Gb
A LAN cable
A keyboard
A display
2.1. Prepare Ubuntu SDcard and login
Type: other
user: ubuntu
pw: ubuntu
2.2. Setup wifi
2.3. install Geth
cat /proc/cpuinfo
//processor -> ARMV7
https://geth.ethereum.org/downloads/
download https://gethstore.blob.core.windows.net/builds/geth-linux-arm7-1.8.23-
c9427004.tar.gz
tar zxvf geth-linux-arm7-1.8.23-c9427004.tar.gz
cd geth-linux-arm7-1.8.23-c9427004
sudo cp geth /usr/local/bin
geth version
2.4. Synchronize the Raspberry PI with the Private Blockchain
cd ~/
mkdir rpi-gcp
sudo chown ubuntu:ubuntu -R rpi-gcp
sudo chmod -R 777 rpi-gcp
Use winscp to copy CustomGenesis.json from windows PC to rpi-gcp
cd rpi-gcp
pwd
/home/ubuntu/rpi-gcp
2.5. Set up the rpi node (RPI)
cd /home/ubuntu/rpi-gcp
geth –datadir node init genesis.json
//default account for the miner #1
geth –datadir node account new
//Address: {e6f8bbc22d6ef8cb0991e1a27d9909c92422c119}
//pw: blockchain
//Add an additional account for testing purpose:
geth –datadir node account new
//Address: {ed163d61901483eb7611b1c4a60abe56a8af5765}
//pw: blockchain
//list the accounts
geth –datadir node account list
2.6. Node: setup
Prepare password.sec file under /home/ubuntu/rpi-gcp
with content = blockchain
geth –identity “node1” –networkid 42 –datadir “node” –nodiscover –mine –rpc –rpcport “8042” –port “30303” –unlock 0 –password “password.sec” –ipcpath “/home/ubuntu/.ethereum/geth.ipc” –rpcapi “db,eth,net,web3,personal,miner,admin,txpool,debug”
To attach
open separate cmd window
geth attach “http://localhost:8042”
//get enode address
admin.nodeInfo.enode
//”enode://2bb141277704d6ca1e7920c744090e01f53c3842f238a09c9b14c425eb0eb75ef5bbf3b294d9d3dd37f9d321ffcac1314c46e49473f1f66a3f7ad828d116a364@172.16.115.162:30303?discport=0″
2.7. Permission to node
cd rpi-gcp
sudo chmod -R 777 node
3. Create and deploy a smart contract
3.1. Install truffle
open a new cmd window with admin
mkdir SmartToken
chmod -R 777 SmartToken
cd /home/digitransolutions7/SmartToken/
//https://registry.npmjs.org/truffle/-/truffle-5.1.66.tgz
sudo npm install -g [email protected]
npm install [email protected]
truffle init
truffle compile
3.2. Create smart contract
cd /home/digitransolutions7/SmartToken/contracts
In the “contracts” directory, create a file named “SmartToken.sol” and paste the following code:
pragma solidity ^0.4.15;
contract SmartToken {
mapping(address => uint) tokens;
event OnValueChanged(address indexed _from, uint _value);
function depositToken(address recipient, uint value) public returns (bool success) {
tokens[recipient] += value;
emit OnValueChanged(recipient, tokens[recipient]);
return true;
}
function withdrawToken(address recipient, uint value) public returns (bool success) {
if (int(tokens[recipient] – value) < 0) {
tokens[recipient] = 0;
} else {
tokens[recipient] -= value;
}
emit OnValueChanged(recipient, tokens[recipient]);
return true;
}
function getTokens(address recipient) constant public returns (uint value) {
return tokens[recipient];
}
}
3.3. Create deployment file
Replace the content of “migrations/2_deploy_contracts.js” with the following content in order to deploy our “SmartToken” Smart Contract:
var SmartToken = artifacts.require(“./SmartToken.sol”);
module.exports = function(deployer) {
deployer.deploy(SmartToken);
};
3.4. Update truffle.js
The file named “truffle.js” contains network settings used to identify your deployment platform.
module.exports = { networks: { development: { host: “localhost”, port: 8042, network_id: “*”} } };
3.5. Start miners in 2 cmd windows in computer
cd /home/digitransolutions7/RPI/
//Start miner1 in cmd window with admin
sh startminer1.sh
//in miner1 attachment window
geth attach “http://localhost:8042”
miner.start()
//Start miner2 in cmd window with admin
cd /home/digitransolutions7/RPI/
sh startminer2.sh
//in miner2 attachment window
geth attach “http://localhost:8043”
miner.start()
3.6. Compile and deploy your contract
Run the command “truffle migrate” to compile and deploy your contract to your blockchain:
cd /home/digitransolutions7/SmartToken
truffle compile
//should compile successfully
truffle migrate –reset
3.7. Identify the contract
//open a cmd window with admin
cd /home/digitransolutions7/SmartToken
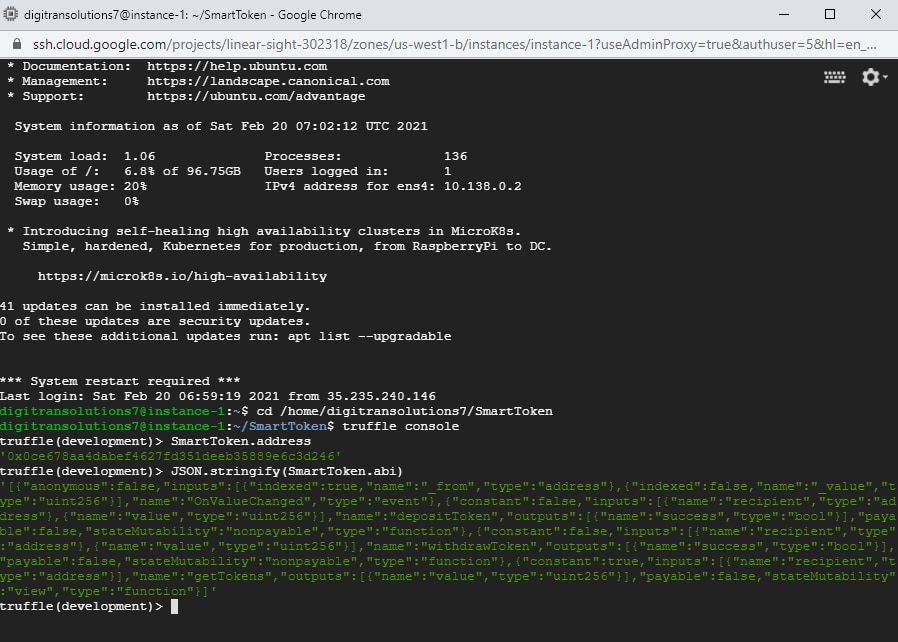
truffle console
//Observe truffle(development)>
SmartToken.address
‘0x0ce678aa4dabef4627fd351deeb35889e6c3d246’
JSON.stringify(SmartToken.abi)
//ABI (Application Binary Interface)
[{“anonymous”:false,”inputs”:[{“indexed”:true,”name”:”_from”,”type”:”address”},{“indexed”:false,”name”:”_value”,”type”:”uint256″}],”name”:”OnValueChanged”,”type”:”event”},{“constant”:false,”inputs”:[{“name”:”recipient”,”type”:”address”},{“name”:”value”,”type”:”uint256″}],”name”:”depositToken”,”outputs”:[{“name”:”success”,”type”:”bool”}],”payable”:false,”stateMutability”:”nonpayable”,”type”:”function”},{“constant”:false,”inputs”:[{“name”:”recipient”,”type”:”address”},{“name”:”value”,”type”:”uint256″}],”name”:”withdrawToken”,”outputs”:[{“name”:”success”,”type”:”bool”}],”payable”:false,”stateMutability”:”nonpayable”,”type”:”function”},{“constant”:true,”inputs”:[{“name”:”recipient”,”type”:”address”}],”name”:”getTokens”,”outputs”:[{“name”:”value”,”type”:”uint256″}],”payable”:false,”stateMutability”:”view”,”type”:”function”}]
3.8. Test the contract
//get default address created by RPI
//in RPI attachment cmd window,
eth.coinbase
“0xe6f8bbc22d6ef8cb0991e1a27d9909c92422c119”
//In geth console attached to miner1:
//Create instance of Smart Contract
var abi=[{“anonymous”:false,”inputs”:[{“indexed”:true,”name”:”_from”,”type”:”address”},{“indexed”:false,”name”:”_value”,”type”:”uint256″}],”name”:”OnValueChanged”,”type”:”event”},{“constant”:false,”inputs”:[{“name”:”recipient”,”type”:”address”},{“name”:”value”,”type”:”uint256″}],”name”:”depositToken”,”outputs”:[{“name”:”success”,”type”:”bool”}],”payable”:false,”stateMutability”:”nonpayable”,”type”:”function”},{“constant”:false,”inputs”:[{“name”:”recipient”,”type”:”address”},{“name”:”value”,”type”:”uint256″}],”name”:”withdrawToken”,”outputs”:[{“name”:”success”,”type”:”bool”}],”payable”:false,”stateMutability”:”nonpayable”,”type”:”function”},{“constant”:true,”inputs”:[{“name”:”recipient”,”type”:”address”}],”name”:”getTokens”,”outputs”:[{“name”:”value”,”type”:”uint256″}],”payable”:false,”stateMutability”:”view”,”type”:”function”}]
var MyContract = web3.eth.contract(abi);
var MyContractInstance = MyContract.at(‘0x0ce678aa4dabef4627fd351deeb35889e6c3d246’);
//transfer 10 tokens to RPI
MyContractInstance.depositToken(“0xe6f8bbc22d6ef8cb0991e1a27d9909c92422c119”, 10, {from: eth.accounts[0], gas:3000000});
//check the transaction after 10 seconds
MyContractInstance.getTokens(“0xe6f8bbc22d6ef8cb0991e1a27d9909c92422c119”, {from: eth.accounts[0], gas:3000000});
//it should display 10
//withdraw 10 tokens from RPI account
MyContractInstance.withdrawToken(“0xe6f8bbc22d6ef8cb0991e1a27d9909c92422c119”, 10, {from: eth.accounts[0], gas:3000000});
4. Control RPI ports
4.1. Start miners in 2 cmd windows in computer
cd /home/digitransolutions7/RPI/
//Start miner1 in cmd window with admin
sh startminer1.sh
//in miner1 attachment window
geth attach “http://localhost:8042”
miner.start()
//Start miner2 in cmd window with admin
cd /home/digitransolutions7/RPI/
sh startminer2.sh
//in miner2 attachment window
geth attach “http://localhost:8043”
miner.start()
4.2. Prepare RPI
//Install Node.js
curl -sL https://deb.nodesource.com/setup_7.x | sudo -E bash –
sudo apt-get install nodejs
node -v
npm -v
//Install Git
sudo apt-get install git
//Install web3 module
mkdir -p ~/RPI/SmartToken
cd ~/RPI/SmartToken
npm install [email protected]
//Install OnOff module
ln -s /usr/bin/python /usr/local/bin
——————~/.bashrc—–
export PYTHONPATH=$PYTHONPATH:/usr/local/bin
export PATH=$PATH:/usr/local/bin
————————–
source ~/.bashrc
npm rebuild node-sass
cd ~/RPI/SmartToken
npm install onoff
4.3. Create the Client application
//create – “smart_token.js”
cd ~/RPI/SmartToken
sudo nano smart_token.js
//Add SmartToken.address and ABI
// Interaction with GPIO
var Gpio = require(‘onoff’).Gpio
// Interaction with Ethereum
var Web3 = require(‘web3’)
var web3 = new Web3()
// connect to the local node
web3.setProvider(new web3.providers.HttpProvider(‘http://localhost:8042’))
// The contract that we are going to interact with
var contractAddress = ‘0x0ce678aa4dabef4627fd351deeb35889e6c3d246’
// Define the ABI (Application Binary Interface)
var ABI = JSON.parse(‘[{“anonymous”:false,”inputs”:[{“indexed”:true,”name”:”_from”,”type”:”address”},{“indexed”:false,”name”:”_value”,”type”:”uint256″}],”name”:”OnValueChanged”,”type”:”event”},{“constant”:false,”inputs”:[{“name”:”recipient”,”type”:”address”},{“name”:”value”,”type”:”uint256″}],”name”:”depositToken”,”outputs”:[{“name”:”success”,”type”:”bool”}],”payable”:false,”stateMutability”:”nonpayable”,”type”:”function”},{“constant”:false,”inputs”:[{“name”:”recipient”,”type”:”address”},{“name”:”value”,”type”:”uint256″}],”name”:”withdrawToken”,”outputs”:[{“name”:”success”,”type”:”bool”}],”payable”:false,”stateMutability”:”nonpayable”,”type”:”function”},{“constant”:true,”inputs”:[{“name”:”recipient”,”type”:”address”}],”name”:”getTokens”,”outputs”:[{“name”:”value”,”type”:”uint256″}],”payable”:false,”stateMutability”:”view”,”type”:”function”}]’)
// contract object
var contract = web3.eth.contract(ABI).at(contractAddress)
// components connected to the RPi
var greenLed = new Gpio(14, ‘out’)
var redLed = new Gpio(15, ‘out’)
var button = new Gpio(18, ‘in’, ‘rising’)
// display initial state
showStatus()
// watch event on the button
button.watch(function (err, value) {
if (err) {
throw err
}
showStatus()
})
// wait for an event triggered on the Smart Contract
var onValueChanged = contract.OnValueChanged({_from: web3.eth.coinbase});
onValueChanged.watch(function(error, result) {
if (!error) {
showStatus()
}
})
// power the LED according the value of the token
function showStatus() {
web3.eth.defaultAccount = web3.eth.coinbase
//web3.personal.unlockAccount(web3.eth.accounts[1], ‘blockchain’)
//web3.eth.defaultAccount = web3.eth.accounts[0]
// retrieve the value of the token
var token = contract.getTokens(web3.eth.defaultAccount)
// display the LED according the value of the token
const led = new Gpio(17, ‘out’); // Export GPIO17 as an output
if (token > 1) {
// Green: you have enough token
redLed.writeSync(0)
greenLed.writeSync(1)
led.writeSync(1)
} else {
// Red: not enough token
greenLed.writeSync(0)
redLed.writeSync(1)
led.writeSync(0)
// Toggle the state of the LED connected to GPIO17 every 200ms
//const iv = setInterval(_ => led.writeSync(led.readSync() ^ 1), 200);
}
}
// release process
process.on(‘SIGINT’, function () {
greenLed.unexport()
redLed.unexport()
button.unexport()
})
4.4. Run the client application
cd ~/RPI/SmartToken
node smart_token.js
4.5. Test the application
//Test your application using Mist by depositing tokens to the coinbase address of the Pi node.
//get default address created by RPI
//in RPI attachment cmd window,
eth.coinbase
“0xe6f8bbc22d6ef8cb0991e1a27d9909c92422c119”
//In geth console attached to miner1:
//Create instance of Smart Contract
var abi=[{“anonymous”:false,”inputs”:[{“indexed”:true,”name”:”_from”,”type”:”address”},{“indexed”:false,”name”:”_value”,”type”:”uint256″}],”name”:”OnValueChanged”,”type”:”event”},{“constant”:false,”inputs”:[{“name”:”recipient”,”type”:”address”},{“name”:”value”,”type”:”uint256″}],”name”:”depositToken”,”outputs”:[{“name”:”success”,”type”:”bool”}],”payable”:false,”stateMutability”:”nonpayable”,”type”:”function”},{“constant”:false,”inputs”:[{“name”:”recipient”,”type”:”address”},{“name”:”value”,”type”:”uint256″}],”name”:”withdrawToken”,”outputs”:[{“name”:”success”,”type”:”bool”}],”payable”:false,”stateMutability”:”nonpayable”,”type”:”function”},{“constant”:true,”inputs”:[{“name”:”recipient”,”type”:”address”}],”name”:”getTokens”,”outputs”:[{“name”:”value”,”type”:”uint256″}],”payable”:false,”stateMutability”:”view”,”type”:”function”}]
var MyContract = web3.eth.contract(abi);
var MyContractInstance = MyContract.at(‘0x0ce678aa4dabef4627fd351deeb35889e6c3d246’);
//transfer 10 tokens to RPI
MyContractInstance.depositToken(“0xe6f8bbc22d6ef8cb0991e1a27d9909c92422c119”, 10, {from: eth.accounts[0], gas:3000000});
//check the transaction after 10 seconds
MyContractInstance.getTokens(“0xe6f8bbc22d6ef8cb0991e1a27d9909c92422c119”, {from: eth.accounts[0], gas:3000000});
//it should display 10
//Observe RPI port = high
//withdraw 10 tokens from RPI account
MyContractInstance.withdrawToken(“0xe6f8bbc22d6ef8cb0991e1a27d9909c92422c119”, 10, {from: eth.accounts[0], gas:3000000});
//Observe RPI port = low
5. Demo
The demo of this project is given in this link
Source code:
References
1. Create a private Ethereum blockchain with IoT devices (1/6) – All 6 parts
https://chainskills.com/2017/02/24/create-a-private-ethereum-blockchain-with-iot-devices-16/
2. Node.js Raspberry Pi – GPIO Introduction
https://www.w3schools.com/nodejs/nodejs_raspberrypi_gpio_intro.asp
https://chainskills.com/2017/04/10/raspberry-pi-and-ethereum-the-epilogue/
3. IOT Sample code
https://www.npmjs.com/package/onoff