


 Touching of a doorbell switch by different people can spread coronavirus and many other communicable diseases from one person to the others. So, protection from such diseases at the entrance doorbell switch is as much necessary as the use of a hand sanitiser. This project is meant to help in combating the spread of viruses and diseases that might transfer during the touching of doorbells.
This touchless doorbell can be made easily with the help of an Arduino development board. The bell rings only when the visitor’s hands are found to be sanitised. To ring the bell, the visitor needs to bring her/his hands just 3cm to 5cm away from the MQ3 gas sensor. Author’s prototype is shown in Fig. 1.

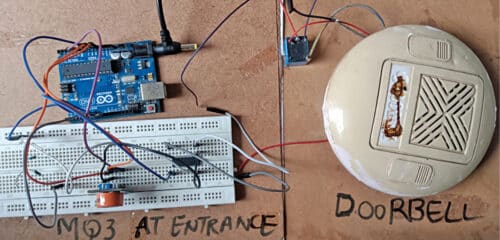
Circuit diagram of the touchless doorbell is shown in Fig. 2. The circuit comprises an Arduino board, gas sensor MQ3 (which can also sense alcohol fumes in an alcohol based sanitiser), relay driver ULN20003 IC, 5V single changeover relay RL1, and a few other components.
| Parts List | |
| Semiconductors: | |
| Board1 | – Arduino Board R3 |
| IC1 | – ULN2003 relay driver |
| LED1 | – 5mm LED |
| D1 | – 1N4007 rectifier diode |
| Resistor (all 1/4-watt, ±5% carbon): | |
| R1 | – 220-ohm |
| Miscellaneous: | |
| CON1, CON2 | – 2-pin connector |
| CON3 | – 4-pin connector |
| BZ2 | – Piezo-buzzer |
| RL1 | – 5V, 1C/O relay |
| – MQ3 alcohol sensor | |
| – 5V regulated power supply | |
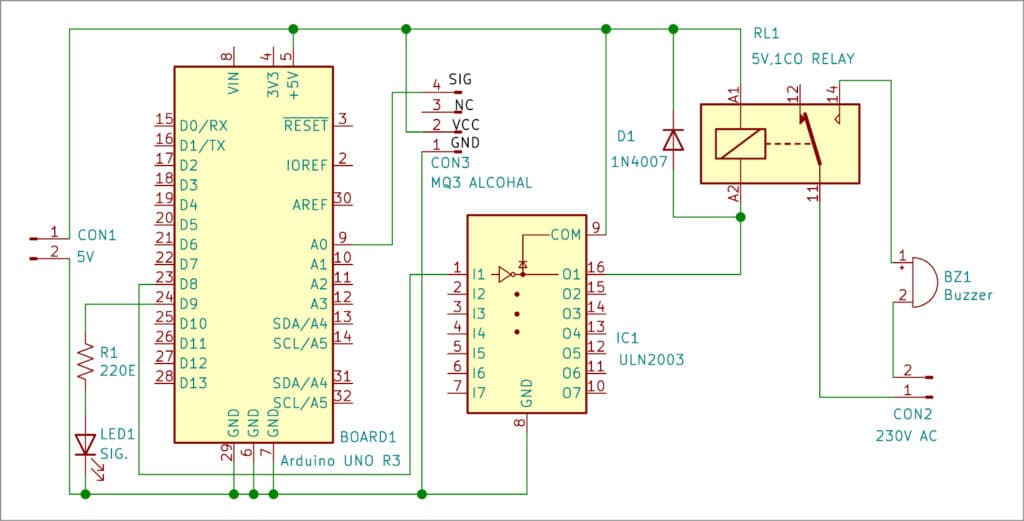
When someone brings a hand near the MQ3 sensor to ring doorbell, if it senses alcohol vapours arising from the sanitised hand, it generates an analogue signal. This signal drives the interfaced Arduino-Uno to generate signals at pin 8 and pin 9. The LED connected to pin 8 glows and pin 9 connected to uln2003 IC drives the relay. The relay, in turn, rings the doorbell. The doorbell will, of course, not ring if the hand has not been sanitised.

For the doorbell to work, first the Arduino IDE needs to be installed and then the code shown in Fig. 4 needs to be uploaded to the Arduino by selecting the right board and port number in Arduino IDE.

Construction and testing
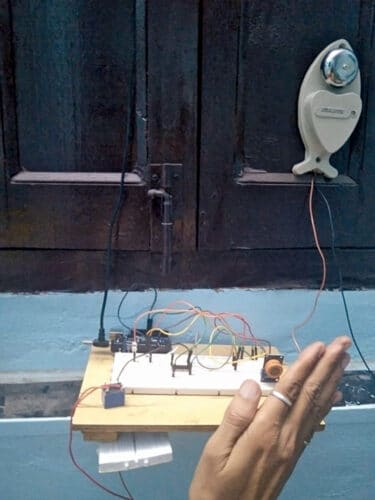
The doorbell can be assembled by connecting all the components as per circuit diagram shown in Fig. 2. To test, first bring your unsanitised hand near the MQ3 sensor and see that the doorbell does not ring. Next sanitise your hand and again bring it near the sensor. The doorbell should now ring (see Fig. 5).
Download source code
Rakesh Jain received his master’s degree in VLSI, B.E. degree in Electronics and Communication, and diploma in Electronics. He is Assistant Professor in ECE Department of Geetanjali Institute of Technical Studies, Udaipur. His research areas include Sensors and Microcontrollers. He has 17 copyrights and 3 Indian patents
Rahul Moud also received his master’s degree in VLSI and B.E. degree in Electronics and Communication. He is Assistant Professor in ECE Department and Dean-Student Affairs at Geetanjali Institute of Technical Studies, Udaipur. His research area includes Network Theory and Analysis
