


 Sanitizing hospital rooms with human effort is not an easy task. It increases the chances of contracting infection, leading to further spread of harmful microorganisms
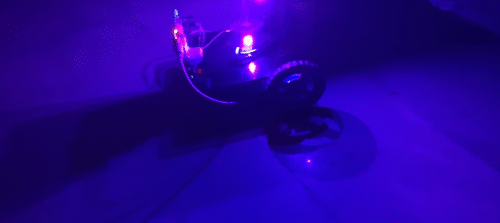
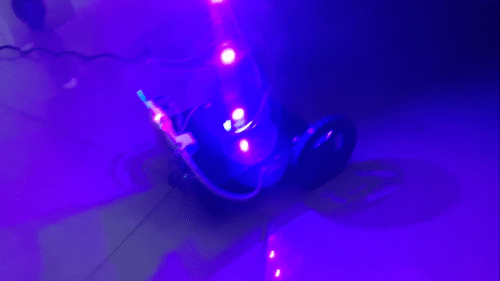
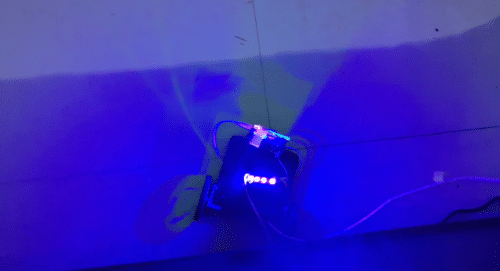
The UV sanitization robot uses the power of UV rays to kill germs and bacteria. The robot can also give a live video stream of its surroundings. With the help of WiFi, we can control the robot and its GUI allows us to drive the robot inside a hospital room without physically being there. All this enables us to sanitize the hospital room as per our requirements. By killing the germs, the UV light restricts their multiplication by destroying their reproductive system.

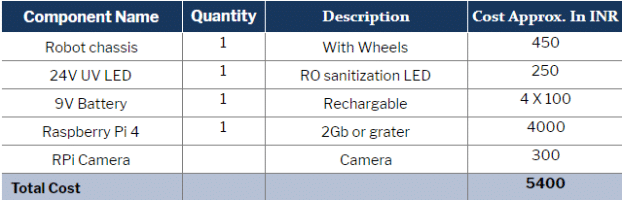
Bill of Materials
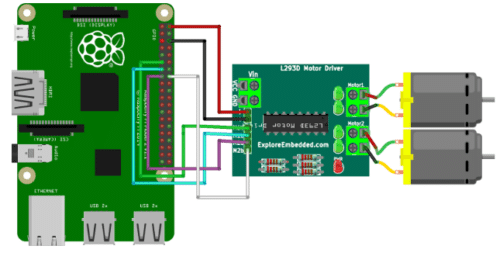
Connection
| Raspberry Pi | Motor Driver |
| VCC | ENABLE 1 and 2 |
| GND | GND |
| GPIO 17 | IN PIN 1 |
| GPIO 27 | IN PIN 2 |
| GPIO 22 | IN PIN 3 |
| GPIO 23 | IN PIN 5 |
Coding
Hope you have upgraded your Raspberry Pi with the latest Raspbian OS and VNC viewer, and have access to the desktop window. Now open the Linux terminal and install the required library for Python that we will use in our project. Here we need to create a GUI, for which we need to install a GUI library for Python. Install the guizero library using the following syntax:
sudo pip3 install guizero
Next we need to control the GPIO to run the robot. For that, we need to install the gpiozero library. You can do so using:
sudo pip3 install gpiozero
After installing the libraries, let’s create the GUI to control our robot.
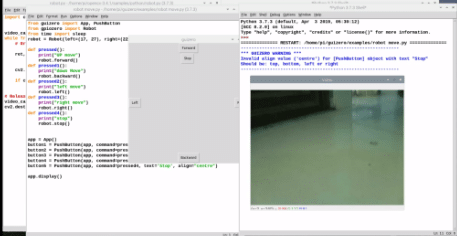
Making the GUI
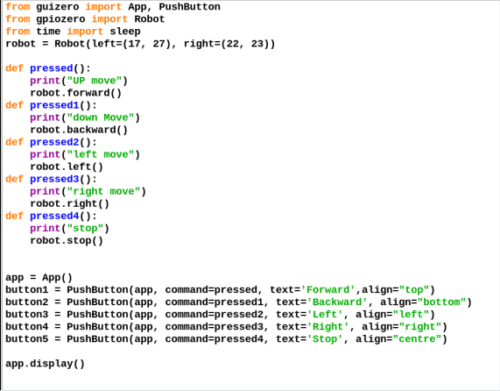
First of all, import the guizero library module and the gpiozero robot control module into the code. After that, set the GPIO pin numbers to control the robot. Here we are using 17.27.22.23.
Next, create the buttons for GUI and set their functions. Here we have created 5 buttons to operate the robot.
Setting Cam Stream
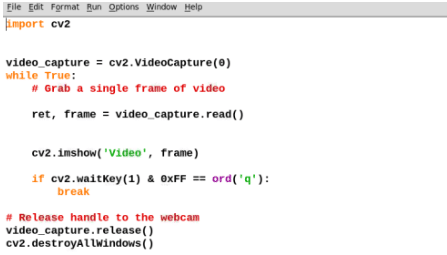
Next, we need to create the code for capturing live video from a Raspberry Pi camera and display it on the Raspberry Pi window. For that, we will use OpenCV for taking the video from the Pi camera and displaying it frame-by-frame on the Raspberry Pi desktop.
Then install the VNC server in the Raspberry Pi and VNC viewer in PC or smartphone. Go to the Raspberry Pi desktop, open the VNC and check the IP address to view the Raspberry Pi screen from remote PC or smartphone.
Construction
Assemble all the components on the robot chassis and then fix the UV light on top of the robot (as shown in pic)
Place the Raspberry Pi in front of the robot in such a way that the camera can clearly view what is in front it.

Testing
Now after getting everything ready, power the Raspberry Pi and wait for its bootup. After that, open its screen on a remote desktop or smartphone using the VNC and then run the GUI and video camera Python code. Now wait for a few seconds. An app with live video camera footage will then become visible on your screen. At the same time, an app with control buttons will also appear on the screen. Switch on the UV light and put the robot in a closed room of the hospital. You will be able to control the robot from outside and thus stay away from being exposed to the UV light.
Now you will be able to control the robot’s movement and see its current position for properly sanitizing the room.

can i get the code for this
Hi Akshay, the source code is present at the end of the page.
Can I get the block diagram and a photo of how are LEDs connect ?
this project is nice but why it has only two wheels why not four ?
please reply
thank you
this project is nice but why it has only two wheels why not four ?
please reply
YES. you can use 4 but I have used 2 wheel because I already have the 2 wheel chassis while I can’t order 4 wheel chassis during lockdown
You can explain about RO sanituzation LED?
Can u plz add images for connections of the components..so that we have to understand.plz
Can u share the blockdiagram please
Pls share the block diagram pls pls
Can i get the details about the UV led which has been used in the project???
I have used 12V UVC LED used in RO purifiers for killing germs in water
how to get the code? it says we need to pay
Hi, the source code is present at the end of the project.
where you connect led
which motors used for this project
Please share the complete block diagram with all components connected
how to add AI in this project which enables it to intelligently do its job by its own ?
Can I do this with RPi 3B?
Yes, you can use any version of raspberry pi but keep in mind you need wifi to get video and drive robots. Raspberry pi 4, Zero w have builtin Wifi
Hello, I tried using your code for cam stream but got error: Unrecognized or unsupported array type in function cvGetMat in python opencv, any thoughts?
Might be a version error. Try o check the right OpenCV 2 or 3 version and also check the camera interface is on in raspberry pi and the camera works fine. If error still comes then try to find it on the net you get the cause and soln.
how can i contact for these can you share me the details?
Can you elaborate asking for which connection , WiFi and video or Circuits
please share me the report of this project
Download source code is not working please enable it
Hi, we were facing some issues earlier with the Source page. Kindly refresh the page and retry.
Please share me the report of this project component.
All information is present within the article
Can you please elaborate on the power source given to raspberry PI and the connection in it
Power ti raspberry pi and motor is given using the USB Powerbank. For UV led lights you can use the 9V battery saperately