


 With the advancement of technology, the driving system is also getting advanced and providing more safety. The auto-braking feature, obstacle detection system, anti-collision system, and alert system are essential parts of the Autonomous vehicle and ADAS systems.
So we have decided to make an advanced ADAS system with all those safety features required for an autonomous vehicle safety system. Here we design the system in parts to make it simple. This is the first part where we interface the LIDAR and make the simple anti collisions system.
Bonus: You can watch the complete step-by-step video tutorial of this DIY project at the end of the article.

Next part we will talk about the connection of the system to the breaks and electronics of your EV, Automotive vehicle, and Robotics. Then we will proceed further with the design of the ADAS system with more radar and dashboard features.

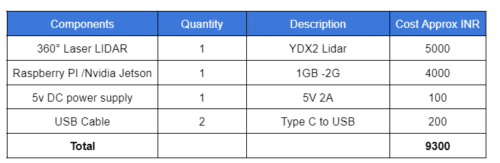
First, we need the following components

Bill of Materials
Choosing LIDAR and Understanding Datasheet
List of lidar datasheet of some common LIDAR you can use
- RPI LIDAR
- YD LIDAR
- INTEL REALSENSE LIDAR
- VELODYNE LIDAR
NOTE:- You can choose any of the above LIDAR for this project all are compatible with RPI and have Python SDK for development
There are lots of radar and lidar available in the market from various price ranges and detection ranges and most of them use USB serial communication. You can use any of them as your choice but here in our design, we use the YDlidar X2. You can use RPi Lidar, INTEL Realsense, or any other lidar.
All you have to do is to find the datasheet of the LIDAR you are using and then the PYTHON Module you are using and then create the code around them. So let’s jump into the data sheet and learn to extract the information we need.
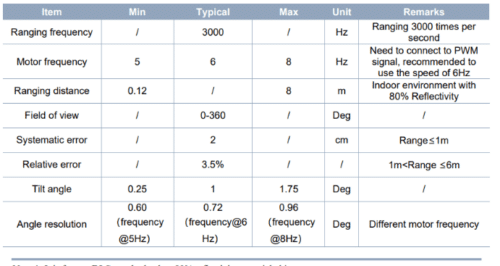
For any LIDAR you choose to use the datasheet is the key so let’s extract the datasheet. So go to Google and search the datasheet of the respective LIDAR you are using. In the datasheet we can see the table that tells us its field of view ie 360 degrees so here our lidar can sense the distance to 360 degrees it uses a motor to rotate the LASE and get the distance at a very fast speed around its surrounding.
Some LIDARs provide 250 or 180 degrees so you need to choose the LIDAR according to your need so First parameter while choosing the LIDAR for your design is to look into the viewing angle you need in the design.
The second thing comes in a range of lidar and working conditions. Different Lidar uses different technology. Some use red LASER, some use Doppler waves, and many other technologies depending on technology the sensing conditions and range change so if you are designing a solution that needs to detect objects even in a foggy rainy environment then you can select according to that and range according to your need.
The third thing you need to look into the LIDAR while selecting is the Government Policy and Health Risk. As informed previously the different LIDAR and RADAR uses different technology some use IR LAser, some red LASER some waves some use mm waves to detect and these might cause a health risk and affect the animals and plants kids so you need to check those risks and the Government policy wisely.

Also Read: How Lidar Is Enabling Autonomous Drones
Connection
Depending on the model of lidar you are using the connection might varies but most 360-degree laser-based LIDAR uses Serial communication and provide a USB port to connect to your system. As you can see the Fig 4 our LIDAR has 4 pins 2 for power one for transmitting the data and one to control the motor using the signal. This pin further connects to another port that provides you the USB to connect to your system.
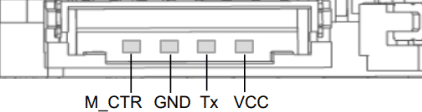
So you need to simply connect it with the RPI board. using USB plug
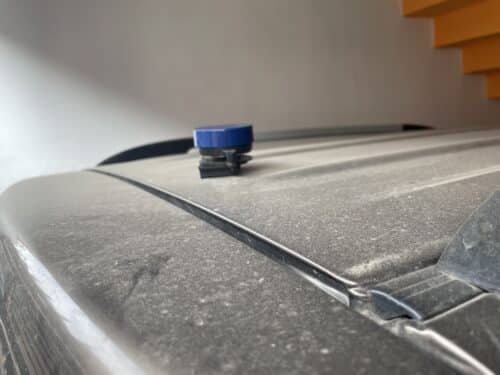
Mounting
Mounting LIDAR is an important and crucial part.
Important things to keep in mind while mounting a LIDAR in Vehicles:
- Vibration and Stabilisation: The data points of the liger get wrong if the lidar vibrates too much so you need to mount the lidar with a rubber pad or some kind of shock-absorbing thing
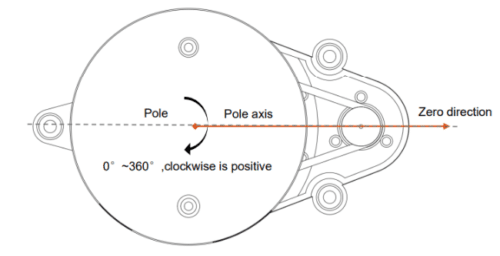
- Sansing angle: Mostly we put the lidar to see what is in front of the vehicle and what’s behind the vehicle. You need to mount the LIDAR if its range is around 245 or 180 degree accordingly. But if you are using 360-degree rotation-based radar then you need to mount the LIDAR according to its Zero point.
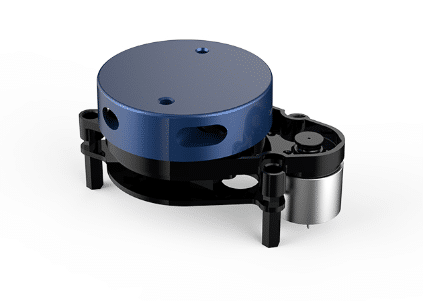
Here our LIDAR Zero angle point is shown in the below image.
Anti-Collision System – Coding
Now for coding and getting the data and making ADAS and anti-collision system, we need an SBC you can either use NVIDIA Jetson RPI. Now install the Python module, LIDAR SDK, and libraries according to your LIDAR version and model here I am using YDX2 so install the library for the same.
Next, we need to install the metaplot and numpy library to do mathematical calculations to find the distance and angle data using lidar data
To install the Python modules, open terminals and run following
sudo pip3 install numpy
sudo pip3 install matplot
Now we need to clone the library of YDLIDARx2.
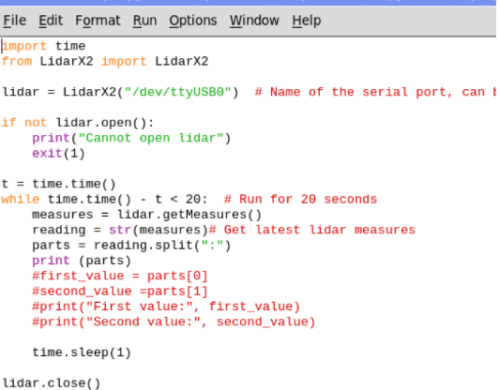
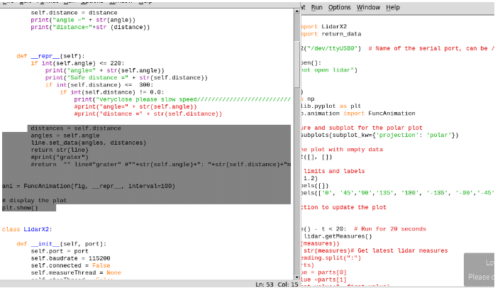
We need to create the code to get the data from lidar here the lidar library has a YDLIDAR.py file. Open it and make the code to send and view the angle and distance data to you, then make an if condition where you can check the angle and distance of the obstacle; if you want to keep the front of the vehicle at a safe distance, then use the angle range around 245 degrees but if you want to keep vehicle away from the obstacle from all side, then simply set the safe distance in if condition according to that.
You can change and tweak the safe distance in fi conditions as per your car, vehicle, and your choice. Under if condition you set the GPIO as output to alert or auto breaking or simply print the alert to the python cell saying to drive slowly to avoid an accident.

Now in the main code, you need to set the port name and baud rate here you need to set the port according to the USB port name you connect the LIDAR to and the baud rate according to your LIDAR baud rate here my LIDAR baud rate is 115200.
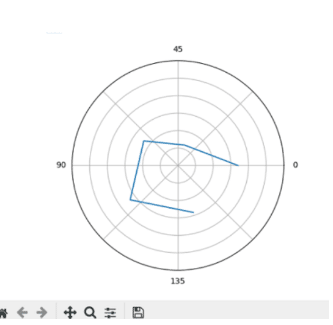
Now if you want to visualize the surroundings captured by lidar then you can add the following code in the same code and visualize the surroundings of the car or vehicle
Testing

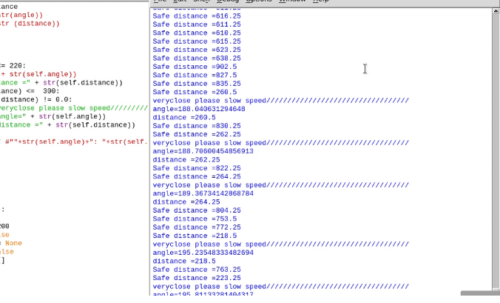
Now power the LIDAR and Raspberry Pi and run the code. Now it will start showing if the car or person comes close to it and asks you to slow down the car. if your want to get a map of the surrounding, then you can see that as well.
Congrats !! our first part is ready, next, we integrate it with car/EV/Robot electronics wiring and braking system.
DIY Video Tutorial
NOTE:- This is a series project of developing the ADAS system for autonomous cars and EVs and this is the first part; we will continue with adding and deploying it to car and EV braking systems; then we add more radar for finding distance and speed of coming car and people as well with real-time Image processing we also add person and car traffic density monitoring system in same ADAS system

“Now if you want to visualise the surroundings captured by lidar then you can dd the following code in the same code and visualize the surroundings of car or vehicle”
You forgot to add “a” in the word “dd”.
Thank you for your comment, we have edited the article