


Location tracking is crucial to many applications, from navigation to asset management. Traditional GPS-based systems have limitations, especially indoors or in urban environments with signal obstructions.
In this project, we propose a novel approach to location tracker using SSID signals, magnetic compass data, and the Indusboard COIN, a compact IoT device with Wi-Fi capabilities and a magnetic compass sensor. By leveraging Wi-Fi signals and compass data, we can achieve real-time location tracking even in challenging environments.
The SSID-based location tracking system can be applied in various scenarios, including:
- Indoor navigation in buildings where GPS signals are weak or unavailable.
- Asset tracking in warehouses or manufacturing facilities.
- Monitoring and tracking personnel movement in large venues or events.
- Location-based advertising and marketing campaigns.
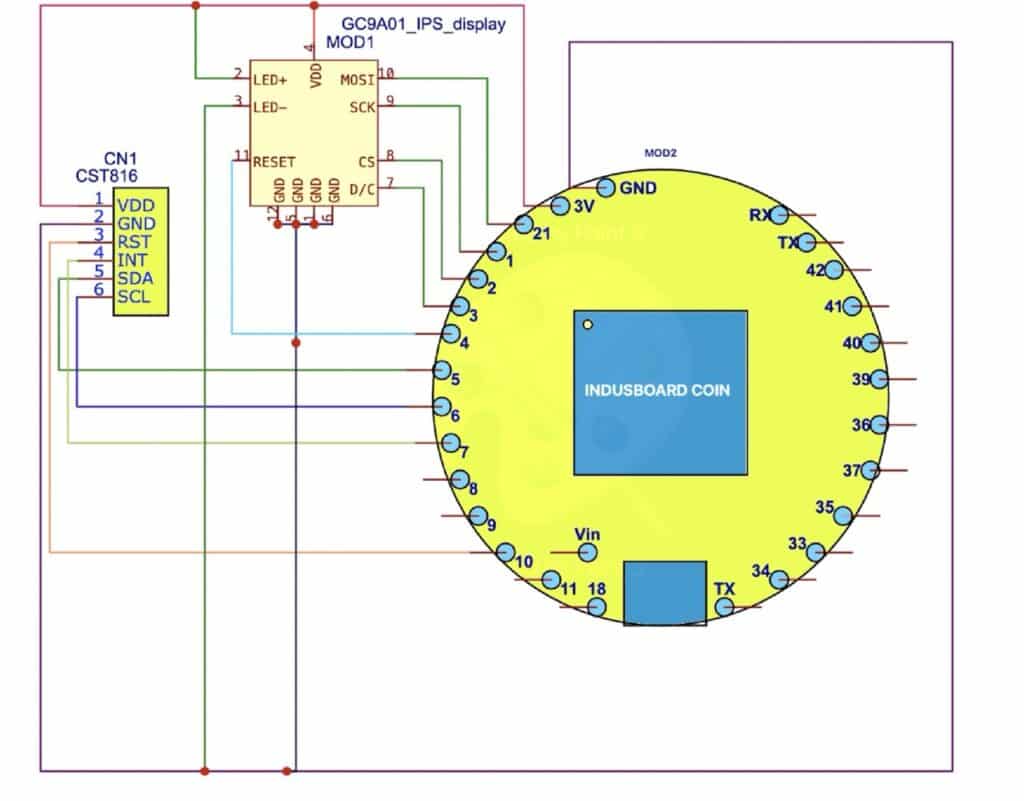
Here the Indusbaord/ESP32 is used that has the Wi-fi to scan networks and then connect to them and extract the location based on the network. Then using the Magnetic compass, it finds the direction of facing. Using the GC9A01 Round display, it shows the location data and connection states to the user who is wearing that.
Bill of Materials (BOM)
The Indusbaord has a built-in 3D magnetic compass sensor that can tell the direction as well if you are using the ESP32 you need to add an external compass sensor.
Location Tracker using SSID Wi-Fi Signals – Code
For coding, you need to install the Arduino_GFX named library that helps us drive the display we are using. This can be installed using the library manager found in the left bar of the new Arduino IDE.
Next, you need to set the pin for the SPI display. Here the board and any free pins can be configured so you can use Indusbaord have flexible software SPI as well. Here we have used pins 21, 1, 2, and 3 for SPI and we set the MOSI, CS, DC, and SCL pins accordingly.

Next, we configure the wifi network to connect with and extract the location time zone, and all other data.
Now upload the code by selecting the board as ESP32S2 and COM Port.
DIY Location Tracker – Connection
Now connect the SPI pins of Dsiplay as configured in the code and according to the connection diagram. You can also solder the display.
Testing Location Tracking with Wi-Fi SSID Signals
Testing the SSID-based location tracking system involves the following procedures:
First power the device; you can power it using the USB-C or 3.3V battery using the 3V and GND PIN on the board. Then wait for a few seconds, it shows the connecting message on display.
After a successful connection, it shows all the data like country, population, time zone, country code, Latitude of location, longitude, City, State, Pincode, network name, IP address, and many other data.
The challenge for you:-
The display shows all the data which is a very long list change the code to scroll the display to show the data by scrolling text. If you succeed, then inform us in the comment box, and we will update the project with your improved version