 In this project, we will be making a prototype of a smart eyeglass that can help a visually challenged person to recognize the person in front of him and learn about obstacles ahead. This will be enabled by face recognition and distance detection features.
Bill of Material
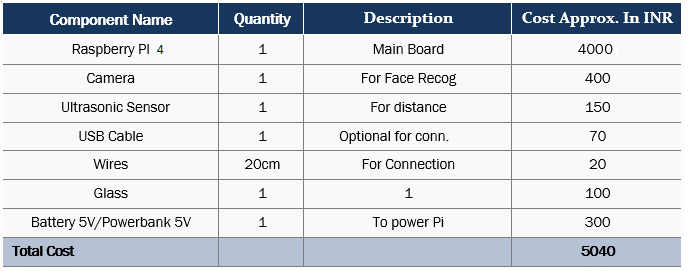
You will also need an earphone but since most of us have it, I haven’t mentioned it in the
above list.
Prerequisite setup
First, open RPi SSH or Terminal and install the required libraries and modules.
Then install the espeak module, followed by the espeak library for Python.
Follow the snippet below for installation (Refer Fig 1,2).

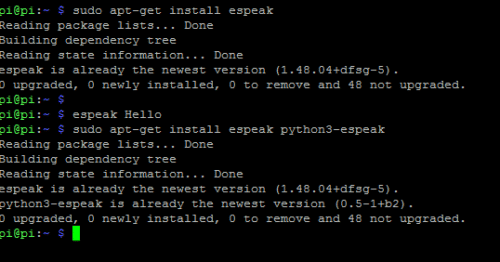
Now install the ‘opencv’, ‘numpy’, ‘dlib’ library. You might need to swap the
memory for installation. Follow the instruction for installation of opencv and dlib
available on the internet.
After that install the face recognition library for python 3 using the following
command in the terminal.
‘pip3 install face recognition’
As we have installed our required library, let’s start coding.
Code
For this project we will make two different codes in Python3, one to tell the distance of
obstacles ahead and other for face recognition. The first code measures the distance of
obstacles and alert the user using voice output. We can also add a vibration motor for haptic
feedback.
Code 1: Open the Python3 IDE to start coding. Here we need two modules – time and
espeak. We will import both the modules in code. After that we created a distance function
where we import the GPIO and set the pins for distance sensor. Next we created a while
loop that continuously checks the distance. In this while loop we also added an if condition
to check the distance between the user and the obstacle. If it detects an object close to the
user, it will automatically inform the person by giving audio and haptic feedback. (Refer fig
3, 4).
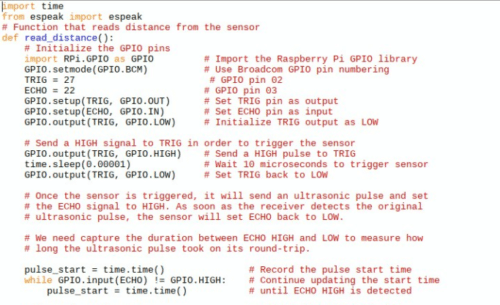
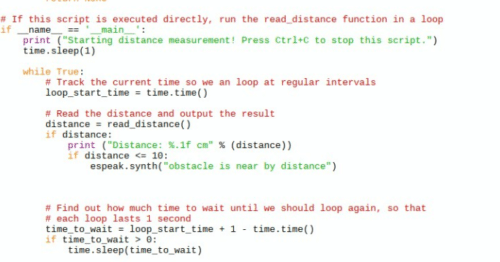
Code 2: This is to recognise the person in front of the user (known or unknown). Here in this code we will import 3 modules: face recognition, cv2 and numpy. We have to create different arrays for known faces and their names. We must write the image file name for the face recognition of that member (Refer Fig 5,6).
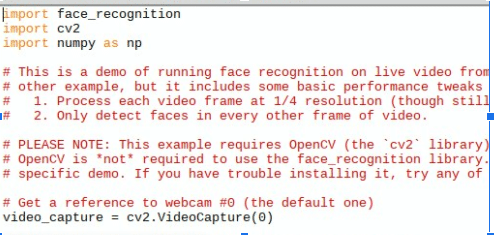

In the next part of code, we will try to match the face in camera video with the array of known faces. If the face matched, then the code will run the espeak synthesizer to call the name of that person using the syntax ‘espeak.synth ()’ as in the pic below.(Refer fig 7).

Note :- You can Change the output language to hindi and voice to different modes for example wisher mode, Male voice , and female voice by uncommenting lines in code.(Refer fig 8).

After all is done, save the code in the face recognition folder.
Connection
Since we have created the code, now it’s time to connect all the components.
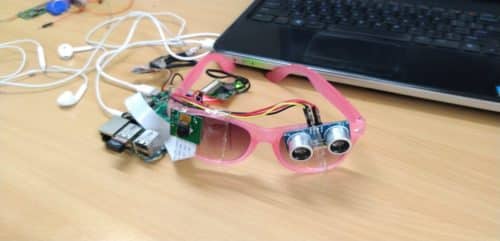
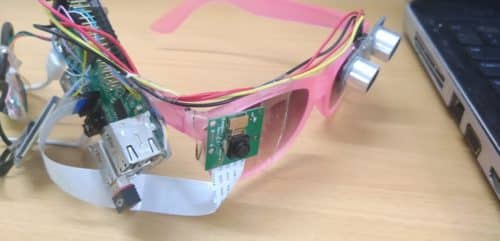
Insert the camera ribbon in camera module and solder the wires of ultrasonic sensor as illustrated below.
| Raspberry Pi | Ultrasonic Sensor |
| 5V pin | VCC |
| GND | GND |
| BCM Pin 27 | TRIG |
| BCM PIN 22 | ECHO |
After the connection, set all sensors and components as in pic below.
Testing
Now power the Raspberry Pi using battery or power bank. Then open the Pi desktop window in remote desktop or VNC (If you do not know how to enable VNC and remote desktop on Pi follow the instructions online.) Next run the distance.py and facerecogination.py code and you are ready to go. When any known or unknown person come in front of the user (visually challenged person), it will detect the face and tell about them. If the user comes closer to any obstacles like wall or any other object, the device will alert about it to avoid accident.
Note: – This is the first version of the project, we will update it soon with more features to
enable detection of colour and ambient light. The update may come with optical character
and sign board recognition feature as well.
Note: –During the installation of cv2 , dlib, and face recognition library you might need to swap the memory of Raspberry Pi do it carefully.If you face any error or problem during the installation of library refer to online guide of that python library.


Awesome!! Really awesome. Can you please send me any projects on robotics? Please!
You can check out this link: https://www.electronicsforu.com/electronics-projects/hardware-diy/25-robotics-project-ideas
Wow, it looks cool! Thanks for your sharing.
Thanks for your sharing!
Hi Ashwini Kumar Sinha
Thanks for the project approach. I would like to discuss further on this and appreciate your contact.
Thanks.
Most welcome, You can discuss farther for this project. Ask any question in my comments or in chat head
Please I need some help on this raspberry pi smart eyeglass. I don’t really see a circuit diagram, or how to connect it. And what kind of camera is needed. I’m planning on working on the project
Dear Ashwini Sinha, I need some help on this raspberry pi smart eyeglass I don’t really see a circuit diagram or how it’s connected. I also need to know the specifications or the type of camera.
can you get me the components and the full write up of this project, so i can read and understand?
i want to do it as my project work in my Bsc final year.
i want to know the cost involved as well
The full code and project details is in this article. Can you elaborate what problem are you facing.
Good day Ashwini, I really need your help on this raspberry pi smart eyeglass. I don’t really see a circuit diagram or how it’s connected. I also would appreciate the specifications of the camera to be used. Thank you in advance.
Ashwini Sir , I am trying to do this project however i am not able to understand where do i store my files in the image files you have depicted above as”ash.jpg” where do I store it in the directory and how does it come up in the first place . Do i need to click my picture and upload it there or by some other means.
I am very new to Raspberry Pi and programming and with your project I am trying to learn and implement it .It would be really helpful if you show the step by step procedure to do this from scratch
Hello Ashwini, I’ve several doubts, would you please contact me on my mail id ASAP.
Mail id- [email protected]
What doubt. can you elaborate
In the “FaceRecoginitionv1.py” you have imported a function name facial_recognition but there is no such file available in the zip folder. So how do I run it ? I am also having problems while integrating the python files all together and running it with the raspberry pi so could you please mail me at [email protected]
I am making this for my mini project and need it urgently.
install the face_recognition lib and then git clone that library.
So there’s a file named ‘ Facial_recognition1’ in the zip file that you provided in which there’s a function named ‘ import facial_recognition’ but there’s no separate file from where it could be imported so how do I do I use it? Also is it a library that I’ve to install using ‘pip install facial_recognition’ command?
Also, do I have to integrate all the codes into one long code to run it ? Or do I run it one by one?
Git clone the liberary and then in face_recoginition folder->example paste your own code image for face in that folder.
use sudo git clone and the link of library
sir i have doubt how u have imported image as i am getting error i am new to raspberry pi
pls help with the face recognition code and also cant understand the circuit diagram
can we raspberry pi 3 b + rather than 4
yes
face recognition is working properly but there is a problem with voice output. espeak is not working properly
Can I use the same code for implementing the same system on my windows PC?
Yes but you have to delete the code for distance measurement.
I tried Gitcloning the Face Recognition repository but even after everything it says “ImportError: No module named face_recognition” What do I do?
After git cloning, you have to install the library module. sudo pip3 install (library name).
Traceback (most recent call last):
File “/home/pi/Desktop/Programs/Face Recognisation/face_compare_test.py”, line 16, in
gaurav_face_encoding = face_recognition.face_encodings(gaurav_image)[0]
IndexError: list index out of range
Replace the image name with your image file name and then also replace the name in an array of names
Ashwini Sir , I am trying to do this project. I am very new to Raspberry Pi and programming and with your project I am trying to learn and implement it .It would be really helpful if you show the step by step procedure to do this from scratch
ok, let me know when you stuck at any steps.
Anybody tried in pi 3??
I’m planning to make one
wonderful, if you face any problem please let me know
Sir can i use pi 3B
yes
Ashwini, I really need your help on this raspberry pi smart eyeglass. I don’t really see a circuit diagram or how it’s connected. so please share it.
No need for a circuit diagram, just connect RPI camera to the raspberry pi camera port, then connect the ultrasonic sensor to raspberry pi as described in the connection, section then insert the earphone plug into the audio jack port of the raspberry pi. Pin number 13 and 14 is raspberry pin 27,22
Is there anyway to place order?
can it recognise unknown people with names as well
can we use any pi board
NO, it needs a Pi board having at least 1GB ram
the code shows ash.jpg is not found. how can i solve this issue.
You need to change the file name of the image with your image and its filename
Sir, the program rums fine when executed from python shell, but once I run it through terminal it cannot find the images stored within the face_recognition folder
http://s000.tinyupload.com/index.php?file_id=58221204686187845345 sir I’m getting this problem, when I’m executing the python script from terminal, whereas it runs nicely in python shell
It to open a terminal in the same folder.
What arethe software’s used ??
What are the software’s used ??
We have created code in python
Hello Ashwiniji,
My father is a patient of night blindness and now he cannot see in day time also.. His age is 72 yrs. Can you tell me if he want to take help of this smart specs what major things he need to do as no one in my family is computer literate to understand programming upto this extent. Please suggest.
Regards,
Shilpi Srivastava
“full dictionary is not installed for ‘zh'”
Error during RUN
broken or imporper espeak might cause this error , uninstall espeak re install espeak.
sudo apt-get install espeak -y
sudo apt-get install python3-espeak
same error again
Either uninstall speak and espeak for python and fresh install from start i still got same then copy erro code snad search you get the cause and soln of that error on esepak master branch.
??
Hello Ashwiniji can I know at which line you have set for file location, because even I changed name it says Traceback (most recent call last):
File “/home/pi/Desktop/Programs/Face Recognisation/face_compare_test.py”, line 16, in
Myname_face_encoding = face_recognition.face_encodings(myname_image)[0]
IndexError: list index out of range
Can you please send the step by step video of programming to my mail please. Because I am doing it for my final year project it’s near too.
Hello mam, can you send the code again not able to download
Hi Abhilash Tikare, If you are unable to download the source code, please try to open the page in incognito mode and retry or temporarily turn off the antivirus before downloading.
I’m trying to make this project. Could you share which directory to store our images in? I tried to store them in the face_recognition folder but it throwed the error.
Can you elaborate more on what error it throws? You can reach me on whats app 7061350809 and share screenshot in which path you keep image and and what path you set in code
Thank you for the reply. I figured out the directory it needed to be stored in. Thank you for your help. The project is running flawlessly. Is there a way to use a nicer voice for the distance measurement and person names?
could you please guide me for this project as I am very new to raspberry pi and programming
hello bro i am getting errors while performing could you please help me
Kindly elaborate on your query.
yes,sir
can i have your number so that i can share the screenshot of the errors
how to change the path,i mean where to upload new images sir
Can we use raspberry pi 3 instead of raspberry pi 4
Yes , You can but processiong beome slow as low RAM and processing speed . For best performance and processing image I used RPI4 but you can use others as well