


 Please Keep Silence! You must have seen this message written in places like library and office. But some people intentionally or unintentionally tend to make noise in such silence zone areas, disturbing the others. How about having a device that can help us maintain silence in such silence zone areasHere, in this project we are going to make a very sensitive smart noise detector that will identify loud talker and alert us by displaying red light and trigging buzzer. We can also connect this device to our phone to set its sensitivity level according to our choice.

Let’s start the project.
First, we need to have these components –
Components
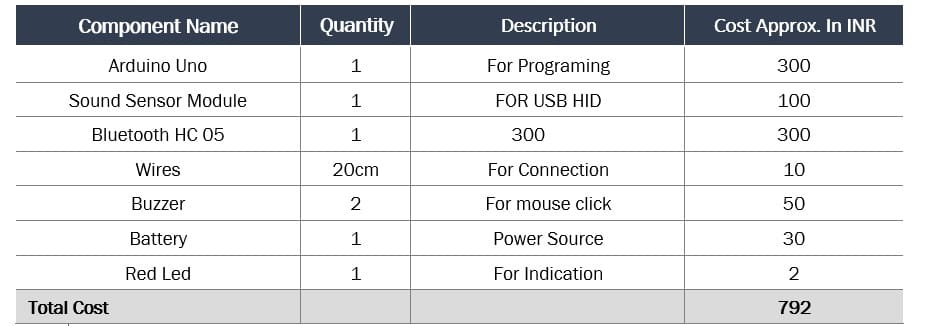
- Arduino Uno
- Red LED bulb
- Buzzer
- Sound Sensor.
- Some Jumper wires
- Battery/ 5v Power bank
- Bluetooth HC 05
Bill of materials
Coding
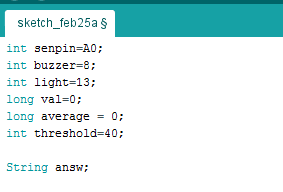
After collecting the components, we will set up the variables for storing values. Refer (Fig .1).
Then we will set up Bluetooth and I/O pin for input and output in setup function. Here, I have set up the Bluetooth baud rate with 9600 but if didn’t work you can try default baud rate 38400.

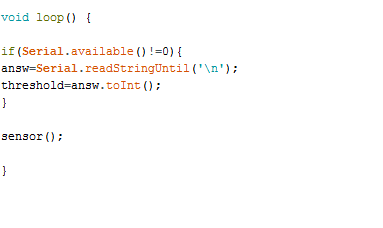
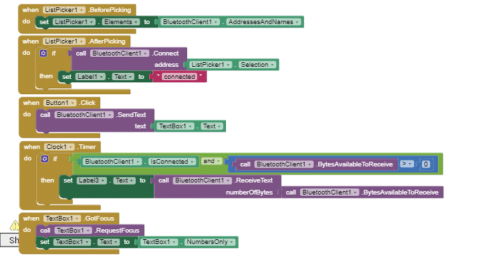
After this, we have to set loop functions for running code repeatedly (Refer to Fig .3) In this loop function, we create a if() condition that listens to Bluetooth incoming string, then we convert that string to integer value and then set that integer value to threshold value.
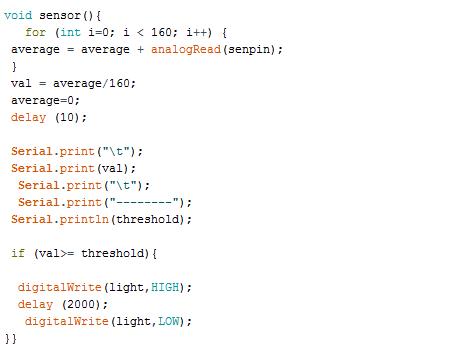
In the next part of coding, we create a sensor () function to get sensor value (refer Fig 4). For sensor value, we take an average of several readings for detecting noise. Formula for obtaining value of sensor is
Sum of all readings/ Total number of readings taken
Here we are going to take average of 160 readings. So, the formula is
Sum of all readings / 160.
Building App
Create a layout as in Fig below and add the following components to it
- 2 Text level
- 1 Text input
- 1 List picker
- 1 Button
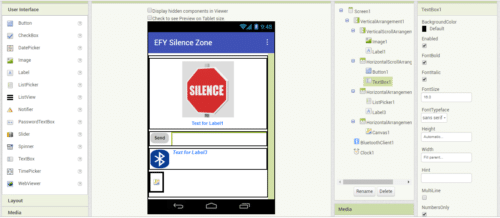
Now, go to MIT App inventor coding blocks and set coding blocks according to Fig 6.You can download the whole source code and app from the link below.
Connection
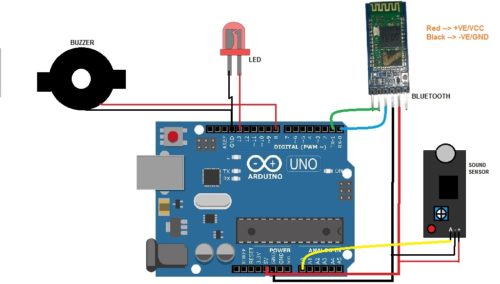
Connect the components as shown in the following illustration (refer Fig 8)
| Arduino | Components |
| GND | BUZZER -VE |
| PIN 8 | BUZZER +VE |
| TX | BLUETOOTH RX |
| RX | BLUETOOTH TX |
| 5V | BLUETOOOTH VCC |
| GND | BLURTOOTH GND |
| PIN 13 | LED +VE |
| GND | LED -VE |
| 5V | SOUND SENSOR VCC |
| GND | SOUND SENSOR GND |
| ANALOG A0 | SOUND SENSOR OUTPUT |
Now our project is complete.
Testing
Power the Arduino and open the app tap at the Bluetooth Icon and select HC 05 from the list to connect your phone to Bluetooth. Now you can see the noise level value in the text bar. When noise level reaches the threshold value, the LED light and Buzzer will automatically get triggered by Arduino. You can also set threshold value using the app. To do so, tap on the text box next to ‘send’ button and enter the value you want to add and click on the ‘send’ button to set the threshold value.

great content thanks for the tutorial
Thanks, Looking forward how you can improve it ? what you can make from it? We love to see your project also, you can share with us.
hello, thanks for sharing the information. where can we use this?