


This project is a sequel of my earlier project ESP32 Cam project which was used to project a video from an ESP32 Cam to a network. By connecting a computer to that network and calling the IP address of the Cam, we got a live feed. The DHCP IP address of the camera can either be known from the Serial print or from the attached I2C OLED connected to the ESP32 Cam.
The project can be extended further by having fixed IP address as well. For that you have to enter the fixed IP address in the set up portion like this.

WiFi.begin(ssid, password);
IPAddress Ip(192, 168, 10, 10); //IP address of your choice.
IPAddress NMask(255, 255, 255, 0); //Netmask of your choice.
WiFi.Config(Ip, Ip, NMask);
WiFi Access Point mode
Now you have a cam which is connected to your wifi and it has a fixed IP address as 192.168.10.10. In the network, if you call 192.168.10.10 ,you will be able to see the cam view. That’s it. But the entire set up is again dependent on the WiFi network of your home. If it is down, the whole thing will be down as well! To get rid of this profound problem, here’s the Camera on Access Point mode.
WiFi Camera on AP mode
The WiFi camera is set up as an independent hot spot itself. One can connect the camera and get the cam view on the fixed IP address or the DHCP IP address call back. For that the set up comes here. The few other parameters with their uses and explanation is described below.
Remove the password parameter, if you want the AP (Access Point) to be open
ssid_hidden: (0 = broadcast SSID, 1 = hide SSID)
channel: Wi-Fi channel number (1-13)
max_connection: maximum simultaneous connected clients (1-4)
softAP(const char* ssid, const char* password, int channel, int ssid_hidden, int max_connection)
WiFi.softAP(ssid, password, 1, 10, 2);
//Set a fixed IP address by this
Serial.println(“Set softAPConfig”);
IPAddress Ip(192, 168, 10, 10); // Select your IP address now.
IPAddress NMask(255, 255, 255, 0); //Select the netmask now.
WiFi.softAPConfig(Ip, Ip, NMask);
Well, we are a step ahead now. Our ESP32 CAM is now a self-created WiFi hot spot. One can simply connect a laptop to our ESP32 CAM and by calling that fixed IP address [192.168.10.10], one can get the live cam feed.
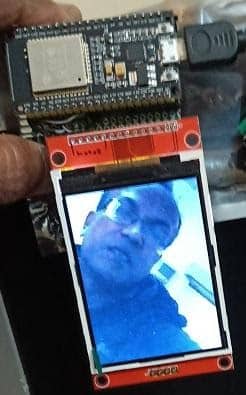
ESP32 CAM view on ESP32 TFT
Now let’s move on a step further. We are using a tiny ESP32 Camera to get the live feed. Whereas, for output we are using a cumbersome laptop or computer. This is a huge disparity. 50 gram ESP32 camera versus 2.5kg laptop screen output view. Can’t we have a matching ESP32 TFT output? Yes, that’s our next project.
ESP32 Websocket Camera
Few ideas need to be changed before embarking on a matching ESP32 camera viewer. So far we were projecting ESP32 camera output on a http web server protocol. That overburdens the viewer. Therefore, we will use websocket protocol. In websocket instead of refreshing the entire webpage, it helps to update the additional data only. Therefore, it creates substantially less load on the output device – ESP32 Camera Viewer. The camera project on websocket is not necessarily a different one from our earlier camera. Only the program software is slightly changed.
The client ESP32 [TFT viewer] connects the Camera ESP32 on the same IP address and gets the websocket image data as and when changes. The digital image data is then processed and then after sizing, it is projected on the TFT screen.
Schematic of ESP32 Cam Viewer
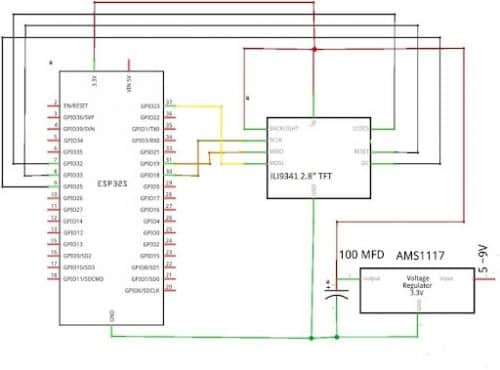
ILI9341 TFT preferably 2.8” to 3.5” display works best. A small 0.8” TFT also works but the output becomes unrecognizable on a small TFT. On websocket the update is selective – once in 250 millisecond. When the picture changes, it updates automatically.
Bill Of Materials
ESP32 CAM x 1: ₹ 700
ESP32 [38 pin] x 1 : ₹ 550
AMS1117 or HT7333 3.3 volt regulator x 2: ₹ 20
TFT 2.8” to 3.5” ILI9341 x 1: ₹ 1200
Total expenditure without power supply: ₹ 2500 only
Working principle of ESP32 webcam with OLED
For image handling by ESP32, there are many Arduino libraries but for this project we find the TFT_eSPI.h is the fastest one and easy to manage. You can very easily change the TFT type by simply changing the TFT specific file in the User_Setup_Select file. To use the smaller display like ILI9163 type you have just to uncomment the respective line. It’s very easy and you also can define which pin you would like to connect to the TFTs. TFT_eSPI also have facility to connect ILI9488 parallel type 3.5” TFT display as well! The parallel TFT will be little faster than the Serial display.
#include <User_Setups/Setup1_ILI9341.h> // Setup file configured for my ILI9341
//#include <User_Setups/Setup2_ST7735.h> // Setup file configured for my ST7735
//#include <User_Setups/Setup3_ILI9163.h> // Setup file configured for my ILI9163
Software for ESP32 websocket cam & ESP32 TFT viewer is attached. Most of the libraries I have attached. However, if you find some libraries are missing, just get them installed from Arduino IDE vide Sketch –> Include library –> manage libraries
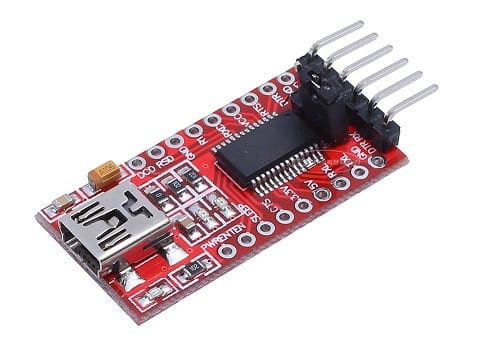
ESP32 Camera Programmer: The ESP32 camera does not come with built in USB to serial interface. Therefore, to upload the sketch one needs to have a USB to Serial programmer which looks like this and comes for INR 250 to INR 300.
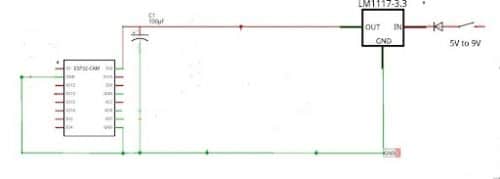
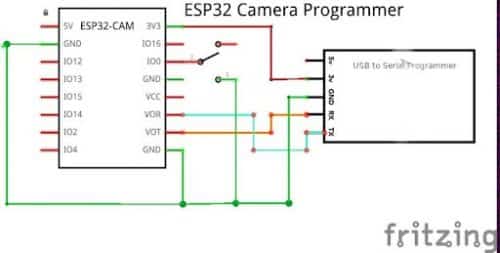
In the schematics shown below, the GPIO 0 to be pulled to ground during uploading mode and the reset button of the ESP32 to be pressed during first few seconds of uploading after that it is to be released.
Schematics of ESP32-Camera programming
Set up: Everything is set for an ILI9341 3.5” SPI TFT display to work. For changing to a smaller display like ILI9163 one has to comment out the ILI9341 line and uncomment the ILI9163 line in User_Setup_Select file. The connections are to be made as per the schematics shown.
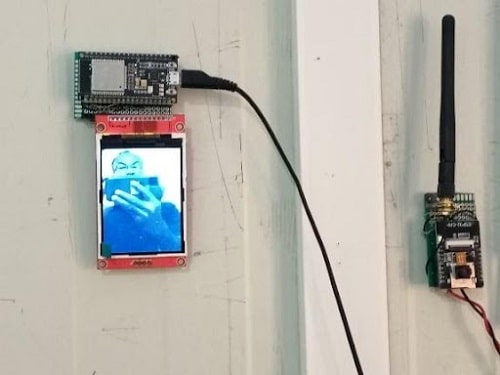
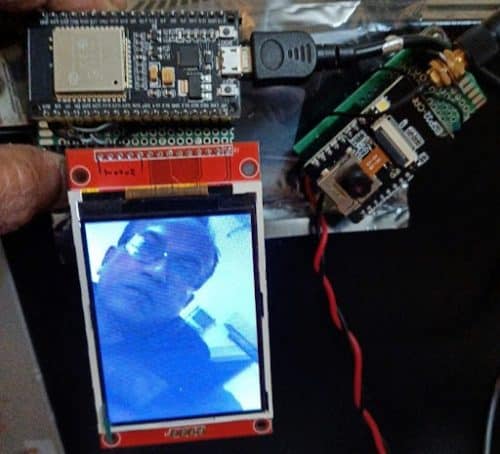
Prototype
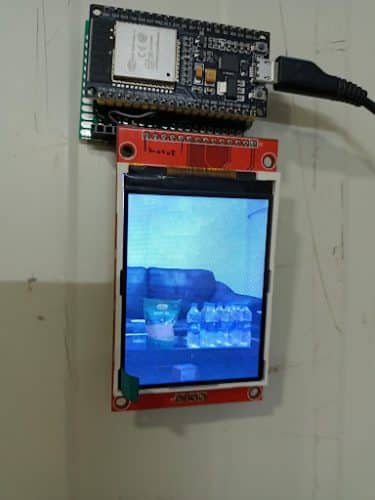
Aftermath
ESP32 camera is very cheap so is the ESP32 TFT display. Together they cost without power supply around INR 2500 only. Although it is not very fast to have a video like feed, it’s rather jarring and the images are clearly distinguishable. With a small external antenna, the distance between the camera and viewer can be increased as high as 200 metres.
Possible uses
(1) Door-eye hole camera in which the camera looks outside through a small hole while the viewer inside gets a wider view
(2) Car rear view mirror, which runs on 3.3 volts, thus consuming very less power.
(3) Intruder surveillance camera for a passage or locker room, birdwatching etc.
Download These
ESP32 TFT: esp32_websocket_server_with_tft_jpeg_v1-27-01-2022-2
ESP32 websocket cam: esp32_esp32cam_websocket_server_4
Arduino websockets: ArduinoWebsockets
TJpg decoder: TJpg_Decoder
TFT eSPI: TFT_eSPI
Edit: The Server program can now work for all these formats:
VGA 640×480, SVGA 800×600, XGA 1024×768, SXGA 1280X1024, UXGA 1600X1200, CIF 400X296, QVGA 320X240, HQVGA 240X176, QQVGA 160X120
Make sure to include these lines
config.frame_size = FRAMESIZE_CIF; //VGA;
config.jpeg_quality = 10;

I try to conect my ESP32-CAM but when the client in python conect with the server in arduino a window open but transmiting nothing.
This is my client code:
from ctypes import sizeof
import numpy as np
import websocket
import cv2
import mediapipe as mp
import time
import os
import socket,pickle,struct,imutils
import socket,pickle,struct
import asyncio
ws = websocket.WebSocket()
ws.connect(“ws://192.168.0.19/”)
print(ws.send(“Hello, Server “))
print(“Hola Server “)
Raw = ws.recv_frame() #Recibimos los datos desde el servidor en formato ABNF
print(websocket.ABNF.OPCODE_MAP[Raw.opcode])
nparr = np.frombuffer(bytearray(Raw.data), np.uint8)
img_np = cv2.imdecode(nparr, cv2.IMREAD_COLOR)
while True:
cv2.imshow(“RECEIVING VIDEO”,img_np)
ws.close()
Thanks you