


 When you were outside of your home, no one was there to protect your home. There are lots of burglary, theft occurs. There are cameras are available but that was not going to give you any alert. Due to that reason you only know about this after theft occurs. To protect your home, we design a low-cost home security system that not only alert you by SMS but also send mail to 5 different people about this alert. You can also add call features so that you can a get a call.
In this IOT project we will make a home security system. If someone enters your home, you will get SMS alert as well as a mail. So that you can be alert and call to police and neighbors for secure your home. Total cost of the project will be under 700 if you have all other components available.
Circuit and working
In this project we are going to use ESP8266 ESP-07 Wi-Fi module to connect with Internet. PIR sensor was used for detection human motion.

Components required
1. ESP8266 ESP07
2. PIR Sensor
3. BC 547 Transistor
4. ARDUINO Board (For Programming)
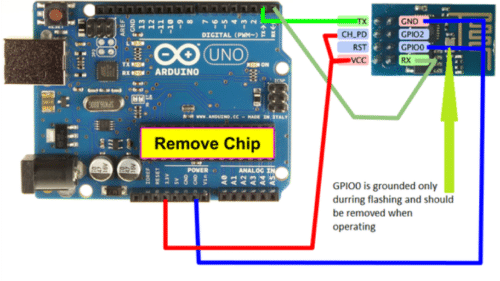
Pin Connections of ESP8266 with Arduino
| ESP8266 pin | Arduino pin |
| Rx | Rx |
| Tx | Tx |
| GND | GND |
| GPIO15 | GND |
| GPIO 0 | GND (This pin connected to ground only at the time of Programming) |
| GPIO 2 | 3.3V |
| VCC | 3.3V |
| EN (CH_PD) | 3.3V |
Connections
All the pins described above will be connected as specified. Remember to give 3.3v voltage to ESP8266 it can’t withstand at 5v. Then program the ESP8266 with ESPbasic software that was available online for free. After successful flashing the code inside ESP8266 connect PIR sensor and BC547 transistor with reset pin of ESP8266. When sensor detects human movement, it will reset the ESP8266 and we will get our desired alert.
Software
For programming ESP8266 we use ESP8266 basic that available online for free at “esp8266basic.com”. There are lots of instructions and examples available on their website how to use this for flashing.
Steps to Program ESP8266
1. Connect ESP8266 with Arduino as per pin connection mentioned above. Connect Arduino with PC using USB cable.
2. Check the COM port in device manager and remember which port Arduino was connected.
3. follow instructions for how to program ESP8266.
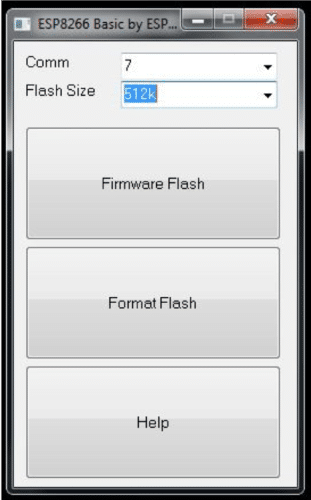
4. Give memory and Flash the Firmware. (GPIO0 should connect to Gnd)
5. After that ESP8266 will create a AP name ESP. So, wait for some time and check available wi-fi network.
6. Connect with ESP network.
7. If you don’t find AP, then reprogram it with different memory size. In my case it worked in 512k.
8. Then go to http://192.168.4.1/ in your browser.
9. You will find GUI designed by ESP8266 basic.
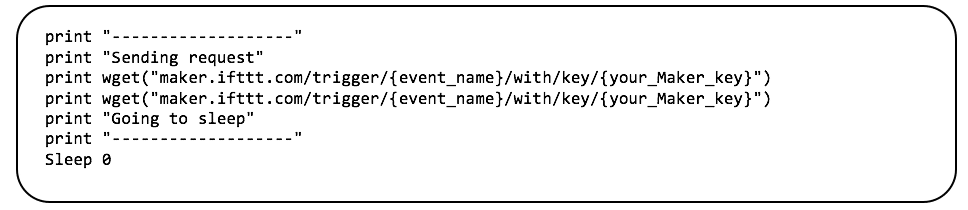
10. Click on EDIT. write the below code and save.
11. Go to setting, give you active internet SSID and password.
12. Enable run Default.bas at startup and click save, then restart.
13. After that when PIR sensor detects something you will get SMS as well as Email alert.
Backend process
When the ESP8266 boots, it connects to the wi-fi network and runs by default.bas (this is the program we just wrote). Then, the URL corresponding to our recipe’s trigger is browsed and the response is returned by get to the console via the print function. After that, IFTTT do its magic by sending an email and SMS. Right after receiving the response, the ESP8266 goes to deep sleep “forever” until it gets next response.
IFTTT guide
1. Go to My Recipes and click Create a Recipe.
2. Click on This and enter Maker in the search box. Click on the Maker channel icon.
3. You might be asked to connect to that channel: click Connect. then click Continue to the next step.
4. Click on Receive a web request trigger.
5. Enter an event name, motion sensor for instance and click Create Trigger.
6. Click on That and enter Gmail.
7. You might be asked to connect to that channel: click Connect and follow thesteps in the popup window.
8. Click Continue to the next step.
9. Click on Send an email action.
10. Fill the fields:
To address: the email addresses of the people you want to be notified
Subject: Someone Enters Your Home
Body: Please check First & inform your neighbors otherwise call to police: 100
11. click Create action.
12. Enter a meaningful name for your recipe and Create recipe.
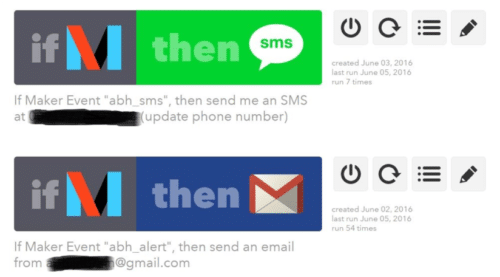
Like this setup at SMS alert maker channel.
Note down the event name and maker private key and use these in flashing ESP8266.
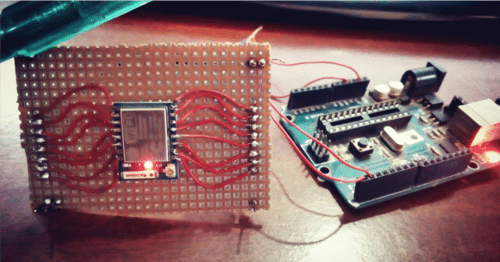
Construction and testing
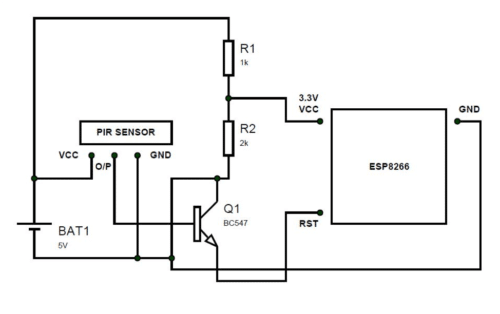
This is the final circuit connection. Connect Everything as per the circuit and someone enters your home you will get alert.
When PIR sensor detects human motion, it will give high pulse in o/p pin.
BC547 is a NPN transistor that connects collector and emitter when it gets some positive voltage at its base. So, RST pin will be connected to GROUND whenever PIR sensor detects something. This will activate the ESP8266 and it will trigger the EFTTT event by connecting to Internet & got alert.
hii I want to interface four p6 led module to node MCU to send data using wifi and i have tried to Connect but the data was not displaying properly, and i used serial data and also used dmd library but i don’t receive any data to p6led module ( indore )