


 I have decided to make a Smart Crowd Detection Camera that will keep a watchful eye on all illegal activities and detect any crowd/person/vehicle on the road. The device can also alert the authorities regarding unnecessary gatherings.

However, this camera is not just limited to this. It can be used to:
- Detect high traffic on roads.
- Identify any unauthorised human entry in a restricted area.
- Observe the number of people in a hall/auditorium.
- Maintain and monitor the flow of the crowd in a protest demonstration.
How it works?
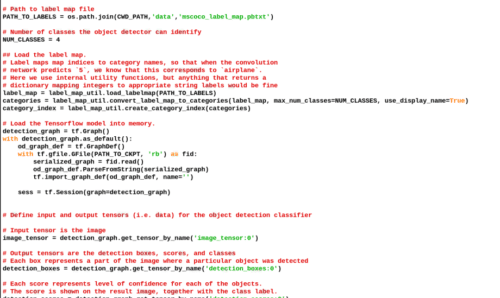
We are going to use an RPi with a camera for capturing live video. The video is then processed frame-by-frame.
By using image processing with the help of TensorFlow, people and vehicles in the video are identified. When that happens, the device gives an alert by speaking and/or by triggering the lights/bulb.
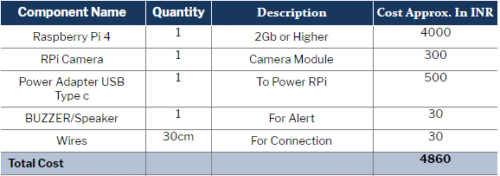
Bill Of Materials
Let’s start our project by collecting the following components.
Prerequisites
Assuming that you already have the RPi ready with Raspbian Image and Python environment setup, we can install the required libraries and modules.
Firstly, install the following libraries in Python.
- Espeak
- Numpy
- Scipy
- Opencv
- Dlib
- Keras
- TensorFlow/TensorFlow Lite
To install the above libraries, open the LX terminal and then type the following commands:
sudo apt-get update
sudo apt-get upgrade
sudo nano /etc/dphys-swapfile
Then change the line CONF_SWAPSIZE=100 to CONF_SWAPSIZE=1024
sudo /etc/init.d/dphys-swapfile stop
sudo /etc/init.d/dphys-swapfile start
sudo pip3 install opencv
sudo pip3 install numpy
wget https://bootstrap.pypa.io/get-pip.py
pip3 install dlib
pip3 install tensorflow
After the installation you can now proceed with the cloning of TF modules and examples and files using the following command:
git clone https://github.com/tensorflow/tensorflow.git
After successfully cloning, go to the directory → research folder → create a new Python file and paste the code attached with the article.
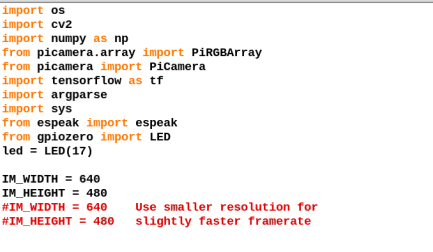
Coding
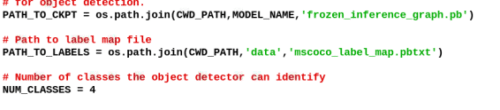
In the first part of the code, we have to initialize the required library. Then we will have the code that uses the camera module to take live video and then process it frame-by-frame to detect the desired objects such as:
- Bike
- Bicycle
- People
- Bus
- Car
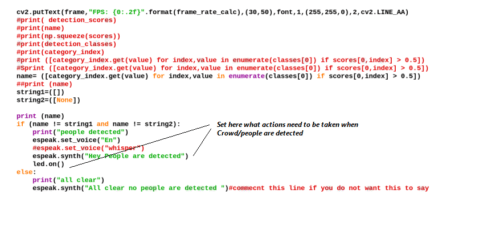
Now using the if() condition, we will check whether any desired objects have been detected. If nothing is detected, then no action will be taken. But if detected, the code will trigger the speaker to give an alert. You can also attach a bulb/buzzer to pin 17 to get the alert notification.
Connection
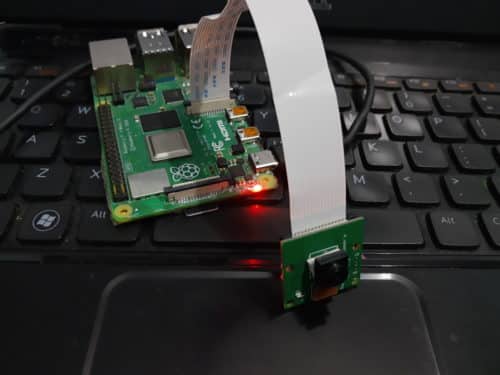
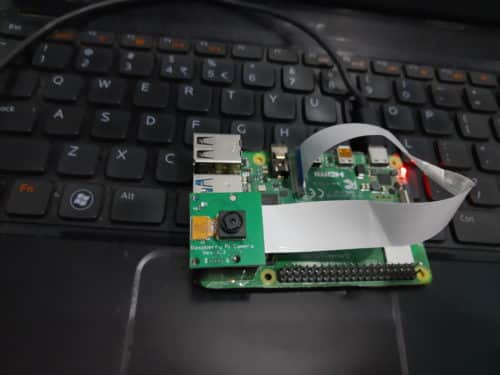
Now connect the camera to the RPi4 board using a ribbon cable and power the Raspberry Pi using an adaptor. To get a live video output from the camera, you can either use an RCA Cable with RCA Input of TV or use HDMI cable with TV.
You can also use a VNC. Just connect RPi and PC/Laptop with your network/hotspot and then mirror its screen using VNC. Now, connect a speaker to the audio port of RPI and power it. If you want any alert using bulb/buzzer, then connect the buzzer to GPIO pin 17 of Raspberry Pi.
Testing
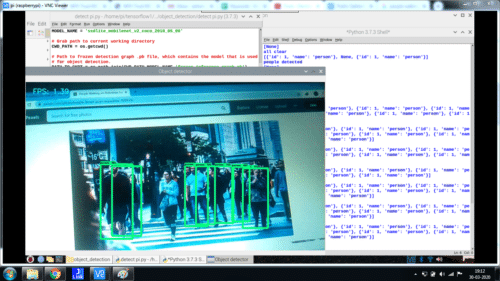
After making all the connections and setup, now let’s test our project. Open the folder and then run the code. Wait for a few seconds to let the Python initialize all the modules. Then run the code. After a few seconds, a new window opens up and shows the results of the cam. The detected people are shown in the window and an alert is given about their presence on the road.
Not a bad idea, I’m working on prototypes for jamming signals and surveillance systems. Not everyone likes their privacy exposed.
Good
After successfully cloning, go to the directory → research folder → create a new Python file and paste the code attached with the article.
I can’t find where is research folder? please helps.
I want to order this project can you please send me a purchasing link of how to buy this project am from Nagpur
You can buy the components fo project from lits n spares
You can buy the components fo project from kits n spares
You can buy the components fo project from kits n spares https://www.kitsnspares.com/
bhai block diagram daal yaar iski
The project does not require a circuit diagram or block diagram.It works on following way:-
RPI camera takes video—> video is sliced into frames—–>frame is resized For processing—>Tensor flow process the frames and detect people
Sir, I am doing this project for semester . So can I get complete details of the project(circuit diagram, code and libraries) .Can you send me the details to my mail i.e. [email protected] is urgent so kindly send the details as quickly as possible sir
code is not opening can u send me
Hi Dinesh, Kindly try to open using WINRAR Software.
but i it is showing that it is zip file and not able display when i am trying to open online winrar
Kindly temporarily turn off the antivirus and open the file. May it is recognizing the file as an alien file.
Kindly temporary turn off the antivirus and open the file. May it is recognizing the file as an alien file.
Kindly temporarily turn off the antivirus and open the file. May it is recognizing the file as an alien file.
but there is problem in opening
but it is not working can u mail it
I NEED FULL DETAIL OF THIS PROJECT CAN U HELP ME
The whole project instruction is provided in the article. Can you elaborate what more details you need
The whole project instruction is provided in the article. Can you elaborate what more details you need
can output of project is not explained in ,video can you provide the explaination of the project plz
I want do implement this project on proteus can you help me in the implementation
in proteus it’s very hard to implement because it needs a lot of python modules to setup on the OS, You can test the crowd detection on pc by installing those python modules and running code
what r the modules that r required for testing
MlX 90614 , Raspberry pi , Camera
where to connect speaker you have not involved in description
Trss/audio jack of raspberry pi
do we need to install noobs for operating this project
You can install any Linex raspberry pi supported os Raapbian be be best one for this
can you tell me what and where is cv2 folder why are we importing it
where to connect speaker you have not involved in description
do we need to install noobs for operating this project
Hello, i would like to seek clarification for this part ,”After successfully cloning, go to the directory → research folder → create a new Python file and paste the code attached with the article. ” I am not sure what should i do in my Pi desktop now. Please advise thank you!
can you tell me what and where is cv2 folder why are we importing it
in program cv2 is imported what is that file and why are we importing it
Cv2 is actually Open CV module of python is used for image processing and capturing image from camera
I need abstract of this project and ppt of this project sir can u please provide.
I want ppt for this project sir please provide
after running the code it is showing no module name util what do plz help and in program there no syntax for buzzer can clarify
this is the error exactly im getting (from utils import label_map_util
ModuleNotFoundError: No module named ‘utils’)
i am getting (from utils import label_map_util
ModuleNotFoundError: No module named ‘utils’) this problem while implementing
and in code there is no syntax for buzzer
probably you do not have the modules file get the modules file https://github.com/tensorflow/models
copy it tensorflow folder purt the code in object detection folder and then go to data folder inside research folder then open the mscoco_label_map.pbtxt and delete all other object to detect except people
I didn’t understand properly can explain briefly
I didn’t understood anything you said, open the folders in order you said i got a code (item {
name: “/m/01g317”
id: 1
display_name: “person”
}) like this and so on
I have to copy only person code and then what i have to do if this is the way of process you told
the file is .pbtx have the list of objects to detected so delete all and let only person, car, bicycle in the list to detect and count them. and then save that file. now in the object detection folder copy my code and run it
i didn’t understood what exactly you told, if you are saying open folder one by one then at last i got code in that I saw ‘person code’, what should I do now. If your asking to copy source code and all I didn’t understood please clarify exactly
use git clone https://github.com/tensorflow/models
Sir, your this project is very good. I I’m implementing same type project can you please send me all details of this project.
E-mail I’d [email protected].
I want output vedio of this project. Can u send it to me [email protected]
Hello! Can I get the code of this project?
Hii….can u send me the code of this project??
My mail id- [email protected]
Attached at end of the article. click on red colour test Download Code
Can I get code for this?
Attached at the end of article
Which algorithm is used?
Sir when I run this code, it give error for (from utils import label_map_util
ModuleNotFoundError: No module named ‘utils’). Why the code getting this type of error?
You might have not properly install the utils or other modules
No I installed every thing according to your instructions but the program getting a error about utils.. please help me because we use this code in our final year project
whats app me the details of your problem 7061350809
Traceback (most recent call last):
File “/home/pi/tensorflow/tensorflow/python/det.py”, line 29, in
from utils import label_map_util
ImportError: cannot import name ‘label_map_util’ from ‘utils’ (/usr/local/lib/python3.7/dist-packages/utils/__init__.py)
i faced these type of error. I installed every library related utils, but it getting these type of error