


A real-time face recognition system is capable of identifying or verifying a person from a video frame. To recognize the face in a frame, first, you need to detect whether the face is present in the frame. If it is present, mark it as a region of interest (ROI), extract the ROI, and process it for facial recognition.
Real-time Face Recognition – Step-by-step Guide
This project is divided into two parts: creating a database, and training and testing.
Creating a Database
Take pictures of the person for face recognition after running the create_database.py script. It automatically creates a Train folder in the Database folder containing the face to be recognized. You can change the name from Train to the person’s name.

While creating the database, the face images must have different expressions, which is why a 0.38-second delay is given in the code for creating the data set. In this example, we take about 45 pictures/images extract the face, convert it into grayscale, and save it to the database folder with its name.
Training and Testing
Training and face recognition are done next. face_rec.py code does everything. The algorithm used here is Local Binary Patterns Histograms (LBPH).
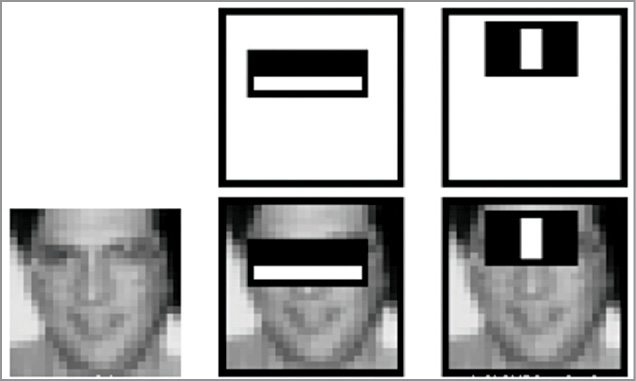
Face detection is the process of finding or locating one or more human faces in a frame or image. Haar-like feature algorithm by Viola and Jones is used for face detection. In Haar features, all human faces share some common properties. These regularities may be matched using Haar features, as shown in Fig. 1.
Two properties common to human faces are:
- The eye region is darker than the upper cheeks.
- The nose bridge region is brighter than the eyes.
Composition of two properties forming matchable facial features are:
- Location and size including eyes, mouth, and bridge of nose.
- Value for oriented gradients of pixel intensities.
For example, the difference in brightness between white and black rectangles over a specific area is given by:
Value = Σ (pixels in black area)- Σ (pixels in white area)
The above-mentioned four features matched by the Haar algorithm are compared in the image of a face shown on the left of Fig. 1.
Testing Procedure
Install OpenCV and Python on Ubuntu 16.04
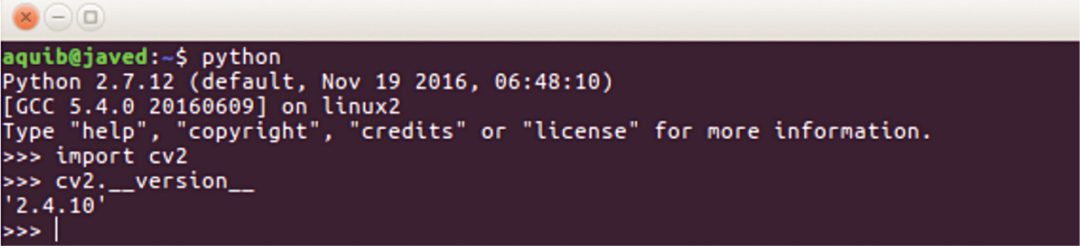
The project was tested on Ubuntu 16.04 using OpenCV 2.4.10. The following shell script installs all dependencies required for OpenCV and also install OpenCV 2.4.10.
$ sh ./install-opencv.sh
After installing OpenCV, check it in the terminal using the import command, as shown in Fig. 2.
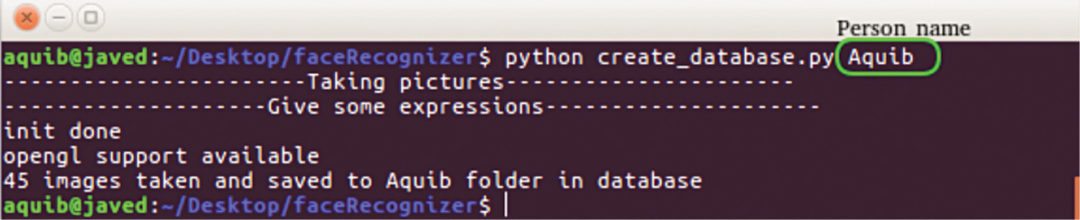
1. Create the database and run the recognizer script, as given below (also shown in Fig. 3). Make at least two data sets in the database.
$ python create_database.py person_name
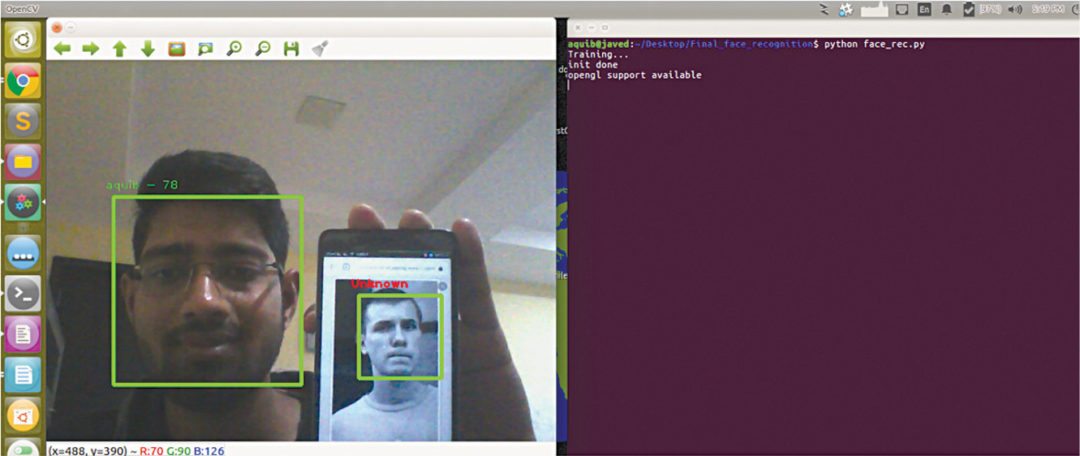
2. Run the recognizer script, as given below:
$ python face_rec.py
This will start the training, and the camera will open up, as shown in Fig. 4. Accuracy depends on the number of data sets as well as the quality and lighting conditions.
OpenCV 2.4.10.
OpenCV provides the following three face recognizers:
- Eigenface recognizer
- Fisherface recognizer
- LBPH face recognizer
In this project, LBPH face recognition is used, which is the createLBPHFaceRecognizer( ) function.
LBP works on gray-scale images. For every pixel in a gray-scale image, a neighborhood is selected around the current pixel, and the LBP value is calculated for the pixel using the neighborhood.
After calculating the LBP value of the current pixel, the corresponding pixel location is updated in the LBP mask (it is of the same height and width as the input image) with the LBP value calculated, as shown in Fig. 5.
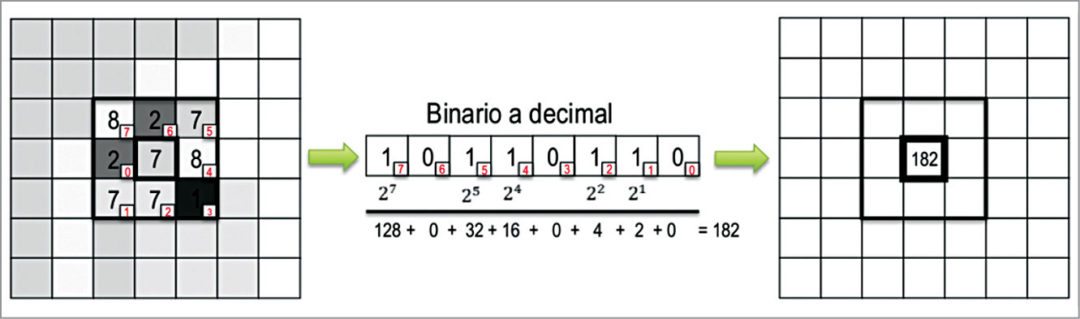
In the image, there are eight neighboring pixels. If the current pixel value is greater than or equal to the neighboring pixel value, the corresponding bit in the binary array is set to 1. But if the current pixel value is less than the neighboring pixel value, the corresponding bit in the binary array is set to 0.
Download source code
Interested in face detection projects? Check out face recognition using Raspberry Pi.
This article was first published on 21 July 2017 and updated in August 2023.
Hi, I’ve downloaded the source code and am able to create a database from create_database.py file. But, am getting an issue while running face_rec.py file. My webcam is getting started! Can you please help me out here?
python create_database.py abc
Traceback (most recent call last):
File “create_database.py”, line 2, in
import cv2, sys, numpy, os, time
File “C:\Python27\lib\site-packages\cv2\__init__.py”, line 2, in from . import cv2
ImportError: DLL load failed: The specified module could not be found.
i’m getting this error :
fn_name = sys.argv[1] #name of the person
IndexError: list index out of range
please tell me solution????
fn_name = sys.argv[0] #This will work, 0 refer to webcam
Hello Aquib,
I need a custom development related to face recognition and I´m not a programmer. How can we be in touch?
Hi, i need .zip file download.
Do you need .zip downloader software?
Hello aquib,
Initially webcam wasn’t showing up but i changes argv to [0] then webcam showed up. but after that it is not capturing the images of mine.
How to do that ?
The reply from author Aquib Javed Khan.
“argv[0] has nothing to do with webcam, cap=VideoCapture(0) instead of 0 put 1 for external webcam”
Hi Aquib,
i have follow your instruction and the code was worked for create database, but when i used “python face_rec.py” I got an error like this
Training…
Traceback (most recent call last):
File “face_rec.py”, line 29, in
model = cv2.face.createFisherFaceRecognizer()
AttributeError: ‘module’ object has no attribute ‘createFisherFaceRecognizer’
how to solve this problem?
Thanks
use like this
model = cv2.face.FisherFaceRecognizer_create()
This is also not working
Before doing what sambit said do this “` python -m pip install opencv-contrib-python “`
I am also getting the same error….
did u got the solution
please tell me how to solve this error.
in windows when i runned face_rec.py
i got without error “training”
but camera not opening
hi have you solved the problem?
hi how did you solve it…..my mail [email protected]
Have you solved this problem mail me at [email protected]
Please help.
python face_rec.py
Training…
OpenCV Error: Bad argument (Empty training data was given. You’ll need more than one sample to learn a model.) in train, file /io/opencv_contrib/modules/face/src/fisher_faces.cpp, line 71
Traceback (most recent call last):
File “face_rec.py”, line 30, in
model.train(images, lables)
cv2.error: /io/opencv_contrib/modules/face/src/fisher_faces.cpp:71: error: (-5) Empty training data was given. You’ll need more than one sample to learn a model. in function train
How did you solve this error? I am getting the same one!
You need to change the value of fn_dir
how to change the value of fn_dir?
you need to run create_database.py first and make sure the output saved in database folder, and change fn_dir to database
Where is “att_faces”?
Its a wrng dataset. Replace this with your dataset name. There is no folder called att-faces.
The face_rec.py seems to be incomplete code. Camera is not opening. I only get “Training….” and then it closes. For att_faces I had to download it myself. 🙁
Have you found it?
The author Aquib Javed Khan replies: It’s not necessary to download but if some one is starting first time and need to download. You need to give more than two samples during training. Probably you are training on one sample only. There is no problem in the program. You may read the article again to understand the training process.
Same issue. Please give a detailed solution.
face integration with eyeglasses.
i have this idea about helping someone finding the right type of fit and shape of eyeglass/frames on their face as i am an optometrist.. can anyone help me on this? i believe with new technologies, it is possible.my email [email protected]
Have anyone found face_rec.py complete file? it is not giving any error but not opening cam.
same issue for me
same error how should solve it
sir,
i am new to python.I have recently downloaded the source code .getting some indentation errors, can you please solve error for me.
below is the code where i am getting errors
please send me a reply
if faces:
face_i = faces[0]
(x, y, w, h) = [v * size for v in face_i]
face = gray[y:y + h, x:x + w]
face_resize = cv2.resize(face, (im_width, im_height))
pin=sorted([int(n[:n.find(‘.’)]) for n in os.listdir(path)
if n[0]!=’.’ ]+[0])[-1] + 1
cv2.imwrite(‘%s/%s.png’ % (path, pin), face_resize)
cv2.rectangle(im, (x, y), (x + w, y + h), (0, 255, 0), 3)
cv2.putText(im, fn_name, (x – 10, y – 10), cv2.FONT_HERSHEY_PLAIN,1,(0, 255, 0))
time.sleep(0.38)
count += 1
Python code blocks are defined by their indentation. That is, it gets structured through indentation. If a block has more deeply nested, it is simply indented further to the right. You may use free text editor such as Gedit and Notepad++ to get proper code indentation. You refer to more detail on Python programming from the websites: https://www.tutorialspoint.com/python/python_basic_syntax.htm and https://www.python.org/about/gettingstarted/
if you are getting indentation error then download notepad++ in your system. Then open this file with notepad++ and replace all tabs(Arrows) with space(dots). This worked for this.
Please help me sir,
After adding the images to database and while running the fac_rec.py the program stopped after printing “Training…”. Where can I find the remaining program to recognize the face. In your output, that “””This will start the training, and the camera will open up, as shown”‘” but it does not happen.
Thanks in Advance.
any solution?
same issue here too.
if anyone know how to solve pls do help us out
thanking you
is it necessary that the platform should be Ubuntu for this ??
it says to me that there is no module named cv2 what can I do to solve this error, I’m working on an Ubuntu web server.
Please help
change the CreateFisherFaceRecognizer() to FisherFaceRecognizer_create()
I m getting error like Traceback (most recent call last):
File “create_database.py”, line 24, in
mini = cv2.resize (gray (gray.shape[0] / int(size), gray.shape[1] / int(size)))
TypeError: ‘numpy.ndarray’ object is not callable
please help me to solve this error
@EFY can you again resend the code without error?
face_rec.py : how do you think the script will open webcam for the recognition part?
you just terminated the script after that
KIndly elaborate your query.
thank you for the information very useful, but I have a little problem when running the application error as follows
Traceback (most recent call last):
File “.\face_rec.py”, line 31, in
model = cv2.face.createFisherFaceRecognizer()
AttributeError: module ‘cv2.cv2’ has no attribute ‘face’
what should I do so the application can run thank you
File “create_database.py”, line 25, in
mini = cv2.resize(gray, (gray.shape[1] / size, gray.shape[0] / size))
TypeError: integer argument expected, got float
While resizing grayscale image it should not be a float vaules to be resized.
Do
mini=cv2.resize(gray,(int(gray.shape[1]/size),int(gray.shape[0]/size))
I got this Error please Help ?
———————–Taking pictures———————-
——————–Give some expressions———————
Traceback (most recent call last):
File “/data/user/0/ru.iiec.pydroid3/files/accomp_files/iiec_run/iiec_run.py”, line 31, in
start(fakepyfile,mainpyfile)
File “/data/user/0/ru.iiec.pydroid3/files/accomp_files/iiec_run/iiec_run.py”, line 30, in start
exec(open(mainpyfile).read(), __main__.__dict__)
File “”, line 22, in
cv2.error: OpenCV(4.3.0) /data/data/ru.iiec.pydroid3/app_HOME/opencv/opencv-python-master/opencv/modules/imgproc/src/color.cpp:182: error: (-215:Assertion failed) !_src.empty() in function ‘cvtColor’
[Program finished]
File “create_database.py”, line 37
time.sleep(0.38)
^
TabError: inconsistent use of tabs and spaces in indentation
File “face_rec.py”, line 19
images.append(cv2.imread(path, 0))
^
TabError: inconsistent use of tabs and spaces in indentation
You can solve these problems by maintaining proper indentation in the code. Refer to more detail on Python programming from the websites: https://www.tutorialspoint.com/python/python_basic_syntax.htm and https://www.python.org/about/gettingstarted/
Hello, i have downloaded this file but im getting a few issues on executing create_database.
faces = haar_cascade.detectMultiScale(mini)
^
Syntax error invalid syntax
This type of error occurs because Python doesn’t know what to do when it encounters wrong indentation.
So type the code again by maintaining proper indentation.